Author:
Virginia Floyd
Date Of Creation:
14 August 2021
Update Date:
1 July 2024

Content
Google SketchUp is amazing! For those wishing to learn how to use it, here are step-by-step instructions.
Steps
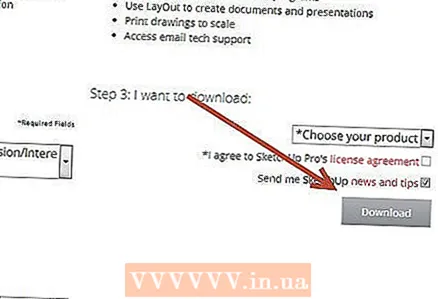 1 Download this program for free from here: http://sketchup.google.com/download.html. Once the download is complete, run the .EXE file.
  2 Follow the instructions. Please read them carefully as the instructions may vary depending on your computer type.
  3 Run the program. You will see three perpendicular axes, which immediately create a sense of three-dimensional space. Check out the toolbox. It has tools like Line, Circle and Polygon. Each of them provides you with a variety of options for creating the shapes you want.
 - 4 Check out the main navigation functions of the program:
- The first thing you need to know about Google SketchUp is that it has 10 simple tools to help you create your model. The first group includes tools such as Orbit, Pan and Zoom. You can use them to move around the drawing and view it from different angles. In this description, you will find a brief explanation of the purpose of these tools.

- To move the entire screen, simultaneously press the center mouse button and hold down the Shift key on the keyboard.

- To remove an object, use the Select button (with an arrow) from the toolbox. When an object is selected, it will be highlighted in blue. To delete the selected object, press the Delete key on your keyboard.

- To save your work, select the "Save As" option from the "File" menu (top left). Select the folder where the file will be stored. Enter a file name and click “Save”. Your file will be saved with a .SKP extension.

- The first thing you need to know about Google SketchUp is that it has 10 simple tools to help you create your model. The first group includes tools such as Orbit, Pan and Zoom. You can use them to move around the drawing and view it from different angles. In this description, you will find a brief explanation of the purpose of these tools.
 5 Draw some lines. Line mode is set by default when you start SketchUp. This mode obviously allows you to draw lines. Try it and see what happens, just to get familiar with how to draw lines. Keep in mind, however, that the line has only one dimension, so it will not be possible to attach it to the axis.
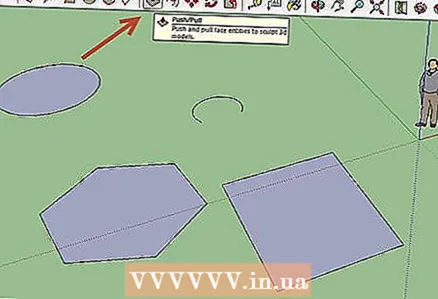
  6 Draw the shapes. Besides lines, you can also create 2D shapes using the appropriate tools. To practice this, draw some rectangles, circles and polygons. All you need to do is select the appropriate tool by clicking on its icon in the menu.
 - Considering that this is a 3D rendering program, you will see that the 2D shapes are arranged in a horizontal plane. And if there is an underlying surface, then the shape will be attached to it.
- 7 Move on to creating 3D objects. This can be achieved by "extruding" or "pushing in" a 2D shape from / to a 3D shape.Use the Pressure / Extrude tool and manipulate the already created 2D shapes. Watch what happens.
- Select the Depress / Extrude tool:
- Click on the shape you want to indent or extrude into a 3D shape.
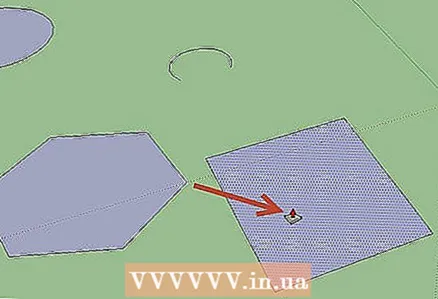
- By clicking, create the required shape and then click the mouse button again.
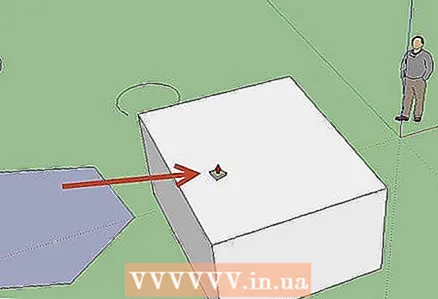
- Enlarge the object to the required size. Add other objects.
- Experiment with the object, adding holes or other elements by cutting out shapes from the already created 3D shape.
- Select the Depress / Extrude tool:
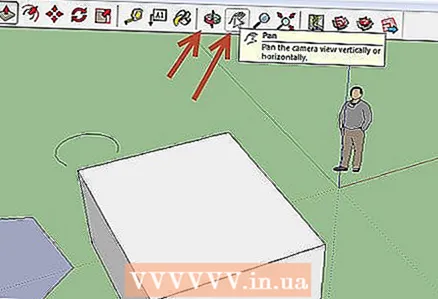 8 Learn to use panning and orbit. In any 3D image processing program, you need to be able to view the created objects from different angles, and SketchUp has this opportunity too. Pan mode allows you to pan the drawing to the right, left, up and down. You can also combine these methods. Orbit mode allows you to rotate around the created object to view it from all angles. Thus, by changing the projection, you can see the object from any angle.
 - Use your mouse's center scroll button to rotate around the image. For the same purpose, you can also use the Orbit button in the upper toolbar (this button has two red arrows).
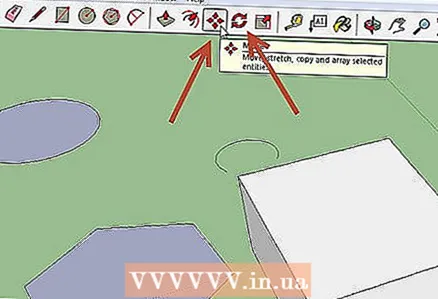 9 Move and rotate objects. This is self-explanatory and quite useful as it gives you the ability to change the position of the created objects. Experiment with the Move and Rotate modes to make sure you can change the position of objects.
 - 10 Color in the object. The finished object is usually painted blue-gray. If the object is under construction, it cannot be colored. Using the Colorize mode, objects can be given color or texture. If you choose a texture, SketchUp will automatically align it to the surface, making your work easier and more interesting.
- To add color, click on the Paint Can tool icon. Select one of the categories, for example, Decorative Coating or Color Picker by Name. Select the color or texture you want, and then click on the area of the shape you want to paint.

- To render windows, select the Translucent Colors category.

- To get rid of unnecessary edges, use the Eraser tool.

- To add color, click on the Paint Can tool icon. Select one of the categories, for example, Decorative Coating or Color Picker by Name. Select the color or texture you want, and then click on the area of the shape you want to paint.
 11 Learn to use the scalability. This tool will allow you to zoom in or out of the generated shapes, as well as view the shapes in more detail. If your mouse has a scroll wheel, you will find that turning it in one direction increases the scale, and turning it in the other decreases it.
 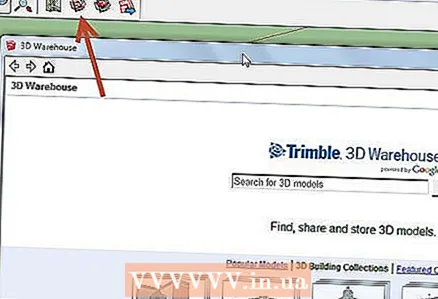 12 Explore the models built into SketchUp. There are many such models. If you find a model that suits you in this set, then you will not have to reinvent it. The collection of 3D objects offers a choice of objects in the fields of architecture, landscape design, construction, images of people, playgrounds and transport. It is recommended that you use this library of ready-made components to decide if any of them are of interest to you and can be used in your work.
  13 Learn to use the guide lines. SketchUp lets you place control lines anywhere in your drawing. Then you can use them to align objects. Control lines appear as dashed lines in your drawing.
 - 14 As you learn to use the standard tools, explore the more advanced SketchUp tools. These include: Resize, Proportional Resize, Follow Me, Arc, Text, Angle, and Roulette.
- Resize Tool: To use this tool, select an object and drag one of the small cubes located in the corners and on the surfaces of the object to resize the object to any size.This way you can create wide, tall, short or low objects.
- Follow Me Tool: This tool allows you to create a new object by moving an already created object along a specific path.
- Proportional Resize tool: If you click on the surface of an object with this tool, the exact same surface will be created. You can enlarge or shrink this surface, depending on how far you drag the cursor.
- Arc Tool: This tool works the same as Line. The only difference is that if you create a line and drag it to the side, the result is an arc.
- Type Tool: This tool will allow you to add text to the surface of an object. The Angle tool helps you unfold an object if you click on the surface of an object and unfold it with the cursor.
- Roulette Tool: This tool will allow you to determine the size of an object, as well as create identical sections of shapes by entering values into a special window in the lower right corner of the screen.
- 15 Try to create something with SketchUp. There are many tutorials on wikiHow to help you create buildings, structures, and other objects.
Tips
- This program has a Surface tool for creating simple surfaces (sides or surfaces of a shape). Use the Line tool to repair damaged surfaces.
- You can import images from Google Earth and then draw on them.
Warnings
- Sometimes, by removing one line in your 3D model, you can lose an entire surface. Don't be alarmed, just select "Edit - Undo" from the menu, or press the CTRL and Z keys at the same time.
- Sometimes the object you create looks proportional from the front or the side, but turns out to be distorted when rotated.
- Computer
- SketchUp program
- A three-button mouse (with a center scroll button) is best for using the Orbit tool
- Internet connection (for downloading SketchUp)


