Author:
Christy White
Date Of Creation:
10 May 2021
Update Date:
1 July 2024

Content
- To step
- Method 1 of 2: Grow watercress in pots
- Method 2 of 2: Growing watercress outdoors in the ground
- Tips
- Warnings
- Necessities
Watercress is considered one of the oldest leafy vegetables eaten by humans. It is a close cousin to mustard, cabbage and arugula. Watercress offers many nutrients and healthy benefits, and can be used in salads, soups, sandwiches and more to add a refreshing peppery flavor. Although watercress is considered a perennial aquatic or semi-aquatic plant, which often grows near slow-flowing water, you can also grow it indoors in pots, and basically outdoors anywhere, as long as it is in the shade and there is plenty of water .
To step
Method 1 of 2: Grow watercress in pots
 Buy the watercress seeds. Seeds can be purchased online or at garden centers and nurseries.
 - You can also start growing from a mature watercress purchased at the grocery store or farmer's market. Simply soak the bottom of the stems in water for a few days to encourage root growth, then plant it in the soil just as you would with seed.
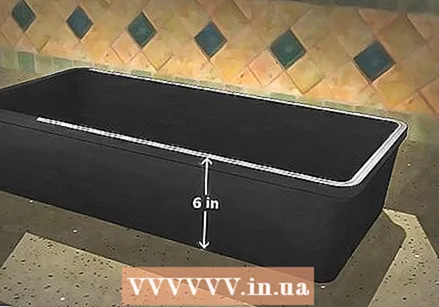 Prepare the tray for planting. Choose a large container or planter that is at least 6 inches high, with drainage holes. Put a layer of garden cloth on the bottom of the container to make sure the potting soil does not wash away with the water. Put potsherds or small pebbles on top to allow good drainage.
 - You can also use several small pots and place them in a larger drip tray.
- It is recommended to use plastic pots instead of earthenware pots as they can dry out too quickly for watercress.
 Place a larger drip tray under the planter to ensure the plants always have enough water.
- You can also use small pebbles in the drip tray to allow water to flow freely into the grow tray.
 Fill the propagator with potting mix. Use a potting mix without soil, which drains well and contains peat moss and perlite or vermiculite.Leave about 5 cm to the top edge and water the soil well.
 - The ideal soil mix pH should be between 6.5 and 7.5.
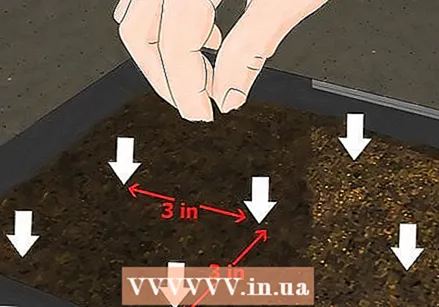 Sow the watercress seeds. Put the seeds half an inch deep in the soil, keeping a distance of 3 to 4 inches between the seeds.
  Give plenty of water. Soak the potting mix enough so that the water fills the drip tray underneath half way, but does not rise above the grow tray. Replace the water in the drip tray with fresh water every two to three days.
 - Make sure the tray does not die out. Check it daily to see if you need to add water.
- To keep the soil moist, cover the surface with a thin, transparent plastic sheet with small holes punctured in it, which will keep water out, but allow ventilation. The foil can be removed when the seedlings are above the ground.
- Mist the surface of the soil with an aerosol every other day.
 Place the container in indirect sunlight. Place the watercress where it gets roughly 6 hours of natural light per day, but try to avoid direct sunlight. This can burn the young plants.
 - You can put the boxes inside, or when the outside temperature is on average between 13 ° and 17 ° Celsius, you can also put the box outside in the warmer months.
 Fertilize the watercress. Add a small amount of water-soluble general purpose fertilizer to the water in the drip tray, following the package instructions for proper dilution.
 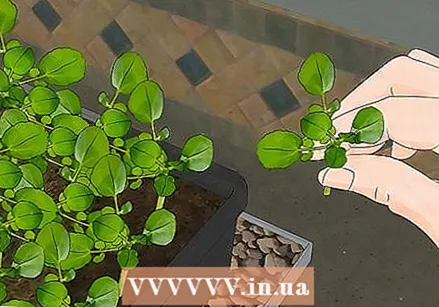 Harvest the watercress. Once the plants have grown 5 to 6 inches high, use kitchen shears or garden shears to trim the top 4 inches of the plant as needed.
 - Do not cut more than a third of a plant when you cut it, so that you leave enough leaves to continue growing.
- Periodic harvesting promotes new growth.
 Wash the watercress. Rinse the watercress in cold water, dry it and use immediately. Or, pack it in bunches and keep it in the fridge for no more than a few days.
Method 2 of 2: Growing watercress outdoors in the ground
 You can also start growing with mature watercress that you bought at the grocery store or a farmer's market. Soak the bottom of the stems in water for a few days to encourage root growth, then plant them in the ground as you would with seed.
 - You can also start watercress from seeds, which can be found at the market, at the gardening store, or online.
 Choose a spot where you want to plant them. Watercress grows well in cool but sunny spots, with partial shade. Planting your watercress in the shallow end of a gently flowing freshwater stream or stream is ideal, but you can also make your own pool or peat bog.
 - The best times to plant are early spring after the last frost, or early fall, before the temperature drops too low.
 Prepare the place. If you have a steady stream or stream, just mix four to six inches of organic compost into the top six to eight inches of the soil.
  Create a place to grow. If you don't have an existing water source, dig a hole roughly 60cm in diameter and 35cm deep to create a swamp pool. Cover the bottom and sides with heavy-duty pond liner, wrapping a six-inch edge at the top, and punch a few holes in the sides for drainage. Fill the covered pit with a mixture of 1 part garden soil, 1 part coarse construction sand, 1 part compost and a handful of fertilizers.
  Water the area. If you are going to plant next to a stream, make sure the soil is well soaked. If you have created a growing area, fill the pool to the brim with water.
 - If you created a grow spot, water it every two to three days to make sure it is thoroughly soaked, or install a water pump to keep fresh water circulating through the pool.
 Plant the watercress. Sow the seeds half an inch deep, spaced about 12mm apart, and cover with a thin layer of fine garden soil.
 - You can also pre-germinate the watercress indoors, using the method above, or you can transplant mature plants. However, the plants are fragile; they can be difficult to replant.
 Cultivate the watercress. Once the watercress has sprouted, thin the seedlings until they are 4 to 6 inches apart. If it has small, white flowers, cut it back to encourage further growth.
 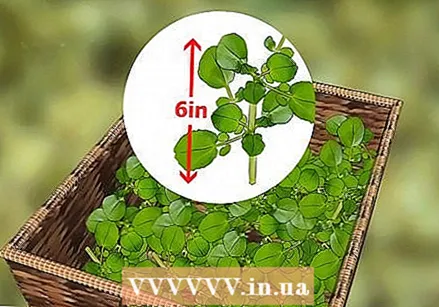 Harvest the watercress. Once the plants are 5 to 6 inches high, use kitchen shears or garden shears to trim the top 4 inches off as needed.
 - Do not remove more than a third of a plant so that the plant has enough leaves to continue growing.
- Periodic harvesting promotes new growth.
Tips
- If whiteflies appear under the leaves of the watercress, wipe them away regularly with soapy water.
- Remove snails and slugs by hand if you see them appear.
- Keep the area around the watercress free of weeds and apply a thin layer of mulch to trap moisture and keep weeds away.
Warnings
- If you're growing watercress near a stream or stream, test the water for contamination or dangerous contamination.
- Do not use insecticides, herbicides, and pesticides on or near your watercress. They are easily absorbed and can be dangerous for the people who eat the plants.
- Wash the watercress well before eating it to avoid ingesting dirt or other contaminants.
Necessities
- Jars
- Drip tray
- Potting mix without soil
- Fertilizer
- Seed or seedlings of watercress
- Potsherds or pebbles
- Garden cloth
- Plastic foil
- Wooden plugs
- Spray bottle
- Garden shears
- Garden shovel
- Plastic pond liner
- Compost
- Garden soil
- Garden hose


