Author:
Helen Garcia
Date Of Creation:
17 April 2021
Update Date:
1 July 2024

Content
Give your old table a new life with a new tile surface. This project is great for square and rectangular shapes.If you are a connoisseur of tabletop carving, then you most likely will not read this. Anyway, here's the article!
Steps
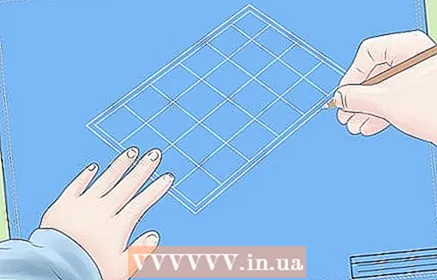 1 Plan your work. Drawing your design will help you a lot. This will help you create the pattern you like, decide how many tiles you need and in what colors. Graph paper is ideal for these purposes, or you can create your own design in graphic programs. Go to your local tile store and find the tiles you like best, then design. You will also need some of the tools and materials that are listed in this article.
 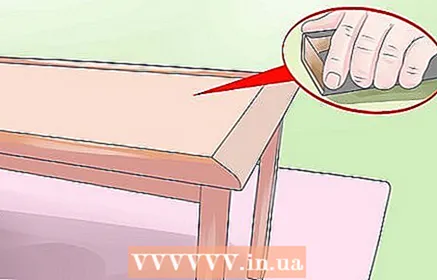 2 Place your table on a spread fabric. Remove the old finish or sand it with sandpaper. Take coarse sandpaper and work well again. The goal is to create a rough surface so that the glue mixture will set, in contrast to a wood-treated, smooth surface which is not suitable for such purposes.
 - If you don't have sandpaper in your home kit, check out a sanding block at your hardware store. Coated with varying hardness sandpaper, this tough foam lets you work like a champion.
- If you have sandpaper, wrap it around an old coated eraser to get better grip and keep your hands safe. A small piece of wood will also help, but an eraser is more comfortable.
 3 Remove all sawdust with a damp cloth. .
  4 Now is the time to test the surface for potential problems. If you have large cracks, or if the table is made of several different parts, such as a picnic table, provide an underlay to cover the cracks. What for? Displacement of the wood can cause cracks in the tiles. Schluter Ditra makes such a product. But, it may not be available in the small amount you need. Another option, and the one we will be using for the project, is a simple hardboard, 1/8 "to 1/4" thick.
  5 Cut the hardboard to fit your desk. If you do not know how to do this, bring all the measurements of the table to the hardware store and ask them to cut the hardboard for you.
 - 6 Using the same glue mix that you used for your tile, cover the table surface. Place the hardboard on the glue, smooth side down and press lightly evenly over the entire table surface. A rolling pin works well for this. Remove excess glue from the edges of the table.
 7 Take your design and lay out the pattern on the floor. This step will allow you to make adjustments to the design and get a feel for how it will look. With a ruler and pencil, draw a line to divide the hardboard in the center and across the middle, now you have four equal squares or rectangles.
  8 You are now at the most important stage of the project - laying, cutting and installing tiles. For beginner tilers: Design a design that doesn't require cutting. You can do this with the size you bought and the width of your grout lines. At the same time, you will learn how to do just that, even if your project design does not allow you to fill it with tiles only, rent a special tile cutter for this project. Most tile stores offer them for rent. For this project, design a symmetrical pattern that follows the two lines you draw and does not require cutting. A tutorial on cutting tiles is here: How to Cut Tile.
  9 Some tilers prefer to place the glue mixture on the surface they tiling and place the tiles on the mortar. They do this by spreading glue over a small area and placing the tiles in the mortar. You have to be careful not to apply glue to a large surface so that it doesn't dry out until you get to it.
  10 An alternative approach is called "smearing" the tiles. Sounds delicious, doesn't it? This technique allows you to take a glue mixture, apply it to the back of a tile as if you were using a butter knife to spread it, then go over the entire tile with a notched trowel. Take a regular trowel, grab some glue mixture and run along one edge of the tile. Take a notched trowel and run it over the tile, then turn the trowel back 90 degrees again. The goal is to smooth and completely cover the back of the tile. Thickness is important here. You need to have the same amount of glue on each tile, on the same level, but you should not spread too thin a layer, because it will not stick well. Enough, if you go around with a notched trowel a couple of times, you won't see the back of the tile and the overall thickness of the grout is the edge depth plus 1/8 ".
  11 Place your plastered tile on the hardboard in the middle where the two lines intersect. Rotate horizontally with light pressure to secure the hardboard firmly. This method of "smeared" tiles has two advantages - non-drying mortar and you can always see that your lines are positioned as indicated in your plan.
  12 To keep the distance between the tiles evenly, place three crosses and this way you will collect your first tiles. These small plastic plus signs should be placed at the corners where the tiles meet at the intersection of two lines and at the corners of the tile along other lines. Separate the lines with spaces so that the lines pass through the center of the crosses. If you are using a model where there are no seams, simply line up the edges of the tiles along all the lines you drew.
  13 From this place everything will go on the knurled one. Work the tiles as described in the "smeared" method and position the tiles firmly using your crosses. You can do without crosses, but they will make your job easier and make your seams much more accurate. When you get to the edges of your table, be sure to remove the glue from the edge and you will have clean edges for further decorating.
  14 If your design calls for a baseboard around the entire perimeter of the table, now is the time to start decorating the edges. Lay all the tiles before you start. The instructions for the solution will tell you how long you need to keep.
  15 In a project like this, use a simple bar. It is a flat piece of wood, about ¼ thick, and wide enough (long if you need to) to cover the entire edge of the table and the thickness of the tile. For example, if your tile is 3/8 "thick and your table is 1.5, you will need a strip that is 1 7/8 wide. If getting 2 pieces is not a problem - it's good, leave the excess below the edge of the table.
  16 When attaching the edges of the skirting board, you need to think about how you want it to look. The most accurate method is to measure the edges as for a picture frame. To do this, you need a miter box and a saw. Since this can be difficult (and frustrating), let's use a simpler method.
 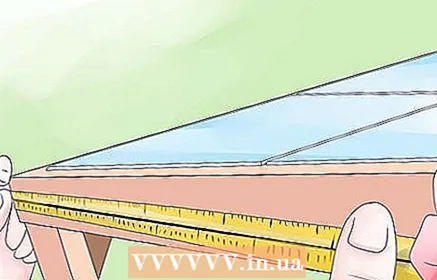 17 Measure the short section of the table and add the thickness of your baseboard. Mark this carefully on the baseboard. Take the marked piece and hold it along the short edge of the table at side level. Make sure to mark at least the thickness of the skirting board outside the other edge of the table. It can be longer, but not shorter. Cut the baseboard carefully. Start with one of the last nails about 1, to finish pressing the tile in the center (but low enough not to break the tile. Hold the baseboard along the short section of the table so that the edge is level with the edge of the tile. Use masking tape to hold the baseboard in Drive in a nail in the middle of the table.
 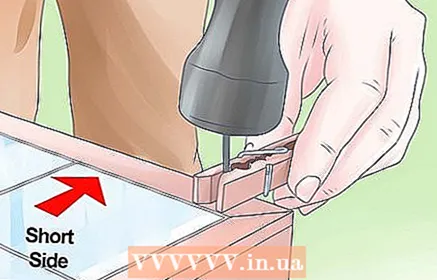 18 Using a straight piece, check to be sure the skirting board is level with the table. Add another nail to the center of the baseboard, driving it in half. Check your level and then add a third nail at the back of the baseboard. If everything is on the same level, drive in all the nails.Hammer carefully, you don't want to damage the skirting board, do you? Add more nails, spaced about 6 apart. Pay attention to the drawing you are aiming for. Using a set of nails, drive them just below the surface of the baseboard. You will feel how to drive them into the wood layer.
  19 Repeat this process on the longest part of the table. Place the end of the skirting board on the part of the skirting board that extends beyond the edge of the table. Holding it in place (again, masking tape does a great job of this), measure so that the baseboard has the same overhang on the other end. Mark your baseboard and cut carefully. Remember, a little more is acceptable, but a little less is bad. Carefully cut off the baseboard, start driving in the nails, and proceed to attach along the long side of the table as in the previous step. Repeat these steps for the remaining two sides.
  20 Finish this step by attaching tape along the top edge of the baseboard. This will protect against further grouting. The tape must not come into contact with the mortar, even from the inner edge of the skirting board. Fold the excess inward along the outside of the skirting board.
  21 Ok, now you are ready to grout. Step number one is to remove the crosses. They can stick. If this happens, grab a sharp object like a pin or knife to grab and remove. You can save them for future projects.
  22 The grout will be either sanded or unsanded, depending on the width of the grout and the type of tile you are using. Consult your tile dealer for specific recommendations. You will probably scratch the glossy tiles if you choose a sanded grout, so choose your method carefully. Additionally, sanding the grout can scratch or stain the edges of the baseboard (so use duct tape as described in the previous step.
  23 Mix the grout to a fairly stiff consistency, something like a dough. The more liquid it is, the less strength. If it's too dry, you won't be able to finish seams. When the grout is the right consistency, use a spatula to put a large amount on the surface of the tile and work the joints with it and fill the joints with a scraper. Use pressure and firm strokes to make sure you fill the joints completely. Wipe off excess.
  24 Next, wet your sponge and wipe off the excess as much as possible. Be careful here to ensure that your sponge is not too wet as this can cause a lot of grout to leak out. Most tiles have a slight bevel or drip at the edges that sink into the raw edges of the tile. Keep the grout level slightly below the tile.
 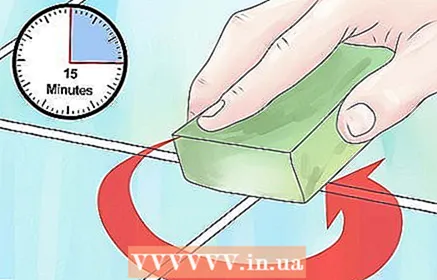 25 Now you need to be patient and let the grout rise. After 15 minutes, take your damp (not wet) sponge and use a circular motion to scrub the tile surface. Now you can add a small indentation to the grout, smoothing it a little. Use a little pressure along the joint to create a concavity and level with the tile.
  26 Rinse the sponge frequently. If the grout smudges a lot when using the sponge, let it sit for another five minutes. This can be the most tedious task, as it seems that the grouting of the tracks is endless. Your goal is to get grout lines where you need them and remove excess grout and plaque.
 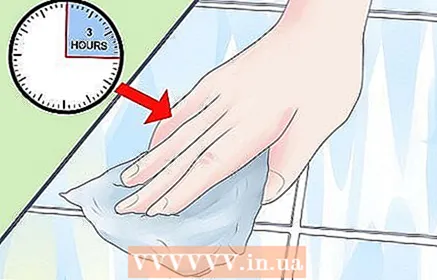 27 Let it sit for a few more hours, then finish with a damp sponge. Use a dry cloth with a sponge to remove plaque. Note: The grout will have perfect directions for a long time, so follow the guidelines for best results.
 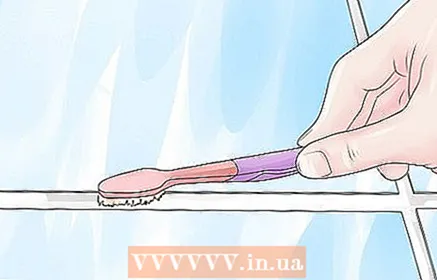 28 Almost ready! With your fresh tiles and freshly worn seams! It's time to seal the joints. You can try everything from filling the entire surface and applying putty with an old toothbrush to sanding gently. Your technique depends on how you want to act.If you want to seal the tiles as well as your grout, do so with the tiles first so you don't run the risk of staining the tiles with the sealed grout. It won't paint too much due to the color difference as you have sealed a small part around the seam to the rest of the tile and this can be difficult to change.
  29 Use as many layers as recommended, for outdoor tables you need more. Let it dry all night.
 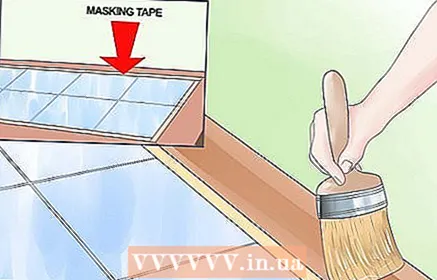 30 The last step is to finish with the edge of the baseboard. Peel off the adhesive tape and apply to the back side, to the table surface. You need to protect the grout and tiles from finishing when you attach the skirting board. Glue gently along the edge between the seams and the baseboard so that no grout is visible. At the edges of the table, use a knife or razor blade to make a nice straight end. Paint the baseboard carefully and let it dry.
  31 Check your corners where there are skirting board joints. You should have good, even seams without excess. If there is a little extra part, rub gently with fine sandpaper, say 100 grit.
  32 If you used nails instead of the glue method, fill the nail holes with wood filler. Use a spatula to wipe off any excess. Some fillers are water based and can be wiped off with a damp paper towel. This grouting method is not a wet grouting method. Approach this method the same way you cleaned the grout - not too wet! Sand them gently with 200 grit sandpaper or a coarse wool. Dry the baseboard with a slightly damp towel and let it dry.
 33 One thing to consider is how to combine paint and topcoat. Minwax creates a great product like other manufacturers. This will allow you to skip the paint stripping step. If you are going to use your desk outdoors, do not follow the next steps. You can also just use a good grade wax paste (not for automotive) on top of the paint or linseed oil. It depends on what you want to see and where it will be used # Congratulations! Your new tiled table is ready for its epic debut. Decorate it with snacks and drinks, invite your friends and show them your work. After all, the satisfaction of a job well done gives you the feeling that it was worth it, right?
 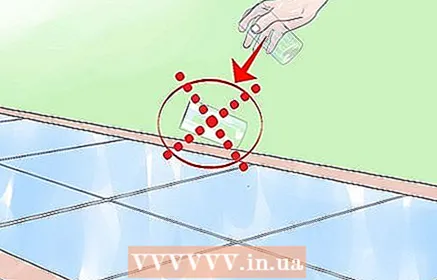 34 Just remember, do not throw anything on the tile that you could throw on a wooden table, the glass will break - a small payback for such a beautiful table.
Tips
- You can use liquid nails in construction instead of finishing nails. This will not require hammering in nails with wood filler, but it will take a little longer to use. If you decide to do this, apply glue to the edge of the table and press the baseboard against it. Line the skirting board and hold in place with duct tape until dry. This method is a little messy, so keep your skin and things at a distance. Also clean up any grout that has gotten into the nails.
Warnings
- You will be working with materials that can cut or chemically burn you. Observe all safety precautions that are written on the product. Protect your eyes and hands.
What do you need
- Notched trowel for applying mortar.
- ordinary spatula,
- good grout sponge,
- float / scraper,
- sandpaper (60, 100 and 200 microns),
- mortar for laying tiles,
- hardboard (if required, see step # 4),
- grout in a suitable color for the tiles,
- your tile,
- crosses (if you are planning butt finishing),
- plinth on the edge of the table, * grout, putty
- tile sealant (this may depend on your tile),
- 2 - 3 disposable sponges, brushes - 1 - 2 "cm,
- skirting board paint,
- final cleaning of the skirting board,
- insulating tape,
- pencil,
- ruler, level,
- roulette,
- the cloth,
- rolling pin,
- small hammer and small nails approximately small 1 "- 1.5" cm long,
- set of nails,
- wood filler,
- small hand saw well sharpened,
- protective glasses,
- rough rubber gloves,
- construction glue (liquid glue, for example, but this is not necessary, see step -12),
- design your tile pattern


