Author:
Virginia Floyd
Date Of Creation:
14 August 2021
Update Date:
1 July 2024

Content
- Method 2 of 4: Use food coloring
- Method 3 of 4: Use an alcohol-based ink
- Method 4 of 4: Use crayons
- Tips
- Warnings
- What do you need
- You can buy dry tempera at art stores or online.
- It is used in kindergartens and schools because it is non-toxic, inexpensive and easily washed off with water.
- Feel free to mix different dry tempera colors together to create your own.
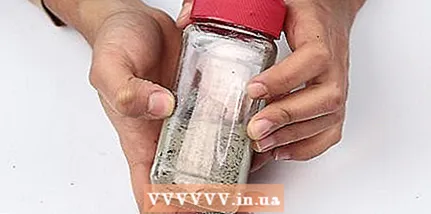
 2 Pour the sand you are about to paint into a suitable container. This can be a cup, bowl, pouch, or any other container you have on hand.
 - Make sure the container is large enough to mix the sand and paint, otherwise sand will spill onto the floor.
- You can paint as much sand as you need.
- You can also use table salt instead of sand. Do not use sugar as it will stick together over time.
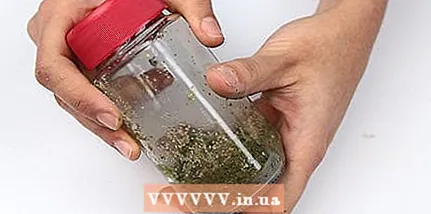
3 Add a small amount of dry tempera to the sand. Start with one teaspoon of paint per glass of sand. 4 Mix the sand and paint well. You can add more paint until you get the color you want. - If using a bowl, stir the sand with a spoon or stick.
- If you can close the container, start shaking it vigorously so that the sand mixes better with the paint.
 5 Your colored sand is ready for storage. Make sure no sand spills out of the container.
 Method 2 of 4: Use food coloring
- 1 Pour the sand you want to paint into a suitable container. This can be a cup, bowl, or any other container.
- Make sure there is enough room in your container for mixing the sand so that it does not spill onto the floor.
- You can paint as much sand as you need.
- 2 Pour water into the container so that it barely covers the sand.
- If you add too much water, you will not be able to color the sand brightly, or you will have to add more paint.
- For this method, only sand will work for you. If you use salt, it will dissolve in water.
- 3 Add 1-2 drops of food coloring to the container and stir. If the color is not dark enough, continue adding the dye drop by drop until you get the desired color.
- If the color is too dark, add a little water to dilute it.
- You can also mix food colors together to create other colors.
- 4 Drain off all the water. Use cheesecloth or strainer for this.
- 5 Let the sand dry. Place it on several layers of paper, on a rag, or on old towels.
- Be careful not to stain anything with dye.
- Try placing a plastic bag under a piece of paper or cloth for extra protection.
- The sand will dry faster if you place it in a warm, dry, well-ventilated place.
 6 Ready. The sand must be completely dry before you put it away for storage.Make sure sand does not spill out of the container.
Method 3 of 4: Use an alcohol-based ink
 1 Choose the color you want. You can use alcohol-based ink (bottled), which is used for rubber stamps, or ink for painting.
 - Alcohol-based inks are available at art stores.
- Feel free to mix different ink colors together to create your own colors.
- You can also use food coloring, but it is less persistent.
- 2 Pour sand into an airtight container. Make sure the container closes tightly. The easiest way is to take a bag that is hermetically sealed.
- Make sure there is enough room in the container for vigorously stirring the sand.
- You can paint as much sand as you need.
- You can also use table salt instead of sand. Do not use sugar as it will stick together.
- It is best to use white sand from art stores.
- 3 Place 1-2 drops of ink in the sand, and then shake the container to mix the sand. Continue stirring until the sand is the color you want.
- If the sand has already taken on the color you want, and there are still some ink residues in the sand lumps in the container, then remove them.
- If the color of the sand is not yet dark enough, continue painting it with ink, one drop at a time, until you get the desired color.
- 4 Your colored sand is ready for storage. Make sure the container does not spill sand anywhere.
Method 4 of 4: Use crayons
 1 Select the desired chalk color that you want to use. For darker colors, you can use pastel crayons.
 - Crayons and pastels are available at art stores.
- Feel free to mix crayons of different colors together to create your own color schemes.
- 2 Prepare your work surface. You will need to rub chalk, pastel, or salt into the sand, so prepare a hard work surface and cover it with something.
- A piece of heavy paper or a plastic bag is ideal for this. They can also be used to pour prepared sand into storage containers.
- When mixing different batches of sand, make sure the surface is free of other paints so that they don't mix with each other.
- 3 Place a small amount of sand or table salt on a hard surface. This method may take you a while, so paint the sand in small amounts.
- It is best to paint with white sand, which is sold in art stores.
- Do not use sugar as it sticks together.
- 4 Take a small piece of chalk or pastels and start rubbing them into the sand. For best results, do this in even strokes.
- The chalk will gradually stain the sand or salt.
- To speed up the process, you can rub the chalk into the sand using a craft knife, palette knife, or other tool.
- For large batches of sand, the chalk can be pounded with sand in a mortar using a pestle.
- If you do this, then grind the chalk into a powder first.
- After painting the sand, wash your mortar and pestle thoroughly, especially if they are used to prepare food.
- 5 Continue rubbing the chalk into the sand until it is the desired color. Feel free to use different colors of chalk or pastels to create your own color.
- 6 Your colored sand is ready for storage. Make sure your container is not spilling sand anywhere.
Tips
- Liquid food coloring is preferable to pasta food coloring because the thick consistency of the paste makes it difficult to mix with the sand, making it difficult to achieve a uniform color and texture.
- Start with less paint than you think you will need.You can always add it, and you won't have any waste of material if the color gets dark too quickly.
- Your child can use colored sand to make crafts with it (under your supervision). Make some patterns on the paper with transparent glue. Pour colored sand into a salt shaker and have your child shake it out onto the paper to create a colorful picture.
- Make a small art project by sprinkling colored sand in layers in a glass jar, bottle, or vase.
Warnings
- When drying colored sand, make sure to place several layers of paper, rags, or a thick towel between the sand and the surface of the table or floor, as paint can leak and stain the surface.
- When using chalk or tempera, try not to inhale the powder. Although it is non-toxic, your lungs won't like it.
What do you need
- White sand, salt (other than food coloring) or plain sand
- Colorant: dry tempera, crayons, alcohol-based ink or liquid food coloring
- Mixing containers: plastic container or sealed bag
- Plastic stirring spoon
- Paper towels, rags, or old towels
- Storage container: sealed food storage bag or plastic container


