Author:
Ellen Moore
Date Of Creation:
14 January 2021
Update Date:
1 July 2024
Content
Having trouble connecting your Macbook to your printer? Not a problem, because there are two ways to connect these devices: via USB and wirelessly. Choose the method that works best for you and get to work.
Steps
Method 1 of 2: Via USB cable
 1 Turn on the printer by pressing the power button.
- The location of this button depends on the printer model. If you cannot find it, check the user manual.
- If the printer does not turn on even after pressing the power button, make sure it is connected to the network. To do this, check if the plug is plugged into the outlet.
 2 Prepare a USB cable to connect your Macbook to your printer. The printer must come with two cables: a power cord and a USB cable. Take a cable with a square entry.
  3 Plug the USB cable into your Macbook. Find a square hole in the side of your Macbook Pro. Insert the USB cable from the printer into this hole.
  4 Insert the other end of the cable into the printer. The printer should then appear in the menu. If not, find and install the correct printer drivers, but usually your Macbook Pro does not need additional software to work with the printer.
 - To install the driver, insert the driver disc (which should have come with the printer) into the drive and proceed with the installation. Drivers can also be installed by connecting to the Internet and searching for the correct printer model.
- To find out the make and model of your printer, look at the box from under the printer or look for the inscription on the side of the device.
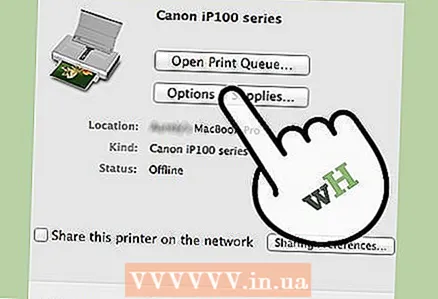 5 Make sure the printer is ready for use. To check that the printer is ready to print, click on the "Print" option or go to the "Print & Fax" menu.
 - If the name of your printer appears in the Print menu, then it is ready to use. Otherwise, continue to the next step to add the printer.
- Print is the print menu used to check if the printer is present and ready.
 6 Add a printer. If the printer is not listed in the Print menu, click the Add Printer button in the same menu. You will see a list of available printers.
 - Select the printer you want to add and click on "Add". The printer should now be ready to print.
Method 2 of 2: Via Wi-Fi
 1 Make sure the printer is properly configured for Wi-Fi. Connecting the printer to a local Wi-Fi network will save space and avoid wired connection problems.
 - To connect a printer to Wi-Fi, connect it to a router, share the printer, and then add it as a network printer. To carry out these actions, the user must have administrator rights.
 2 Make sure you bypass printer restrictions such as MAC address filtering. Address filtering was introduced to prevent network exploitation. Without these restrictions, the security of the device can be compromised, so the system considers them necessary. Access to the wireless network will be limited to the following ports:
 - RealPlayer ports (554, 6970, 7070);
- FTP;
- Lotus Notes;
- SSH;
- popular IM ports (Yahoo IM) - the webcam through Microsoft applications is disabled for security reasons, while Yahoo and Skype are still working;
- ArcGIS (Earth Science application);
- SciFinder Scholar (a search service that searches for bibliographic and scientific information) and several other services for employees;
- Printing (515, 9100, 631);
- Main ports for web browsing (HTTP, HTTPs).
 3 Connect the printer to a Wi-Fi network. Open a file that you can print, such as a photo, text document, or PDF. Open the File menu and choose Print (or press Command + P).
 - Make sure your printer is listed in the Print menu. Select your printer if it is on the menu and go to print.
- If the printer is not in the "Print" menu, click on the "Add printer" button in the window that appears. This will bring up the Printer Setup Utility window. Click on the "Add" button in the "Printers" window. You will see a list of available printers. Select yours and click on the "Add" button.
- After that, feel free to go to print.
Tips
- Check the user manual for the printer. This is not the most interesting reading, but following the exact instructions from the printer manufacturers is still much wiser.


