Author:
Bobbie Johnson
Date Of Creation:
6 April 2021
Update Date:
1 July 2024

Content
- Steps
- Method 1 of 3: Unraveling a Tangled Spring
- Method 2 of 3: How to Get Rid of Small Nodules
- Method 3 of 3: Untangle the knots on the spring
- Tips
- Warnings
The walking spring gives a lot of pleasure, and then, at the most unexpected moment, turns into a ball of knots. A damaged spring can be untangled if you know the right approach and have patience, but your spring is unlikely to return to its original form. Ultimately, it will be damaged completely and you will need more sophisticated methods to repair it, although of course you can always buy a new one.
Steps
Method 1 of 3: Unraveling a Tangled Spring
 1 Grasp one end of the spring with your fingers. Find the least tangled end of the spring and grasp the middle with your fingers. The thumb should be on the outside of the hinge so you can pinch the end of the spring.
 - The long spring is easier to untangle if you place most of it on your hand or toilet paper tube.
 2 Run your index and thumb along the edge of the spring. Run your fingers around the spring towards the first tangled area near the end you are holding. If the end of the spring is not tangled, it will fold evenly around your fingers.
 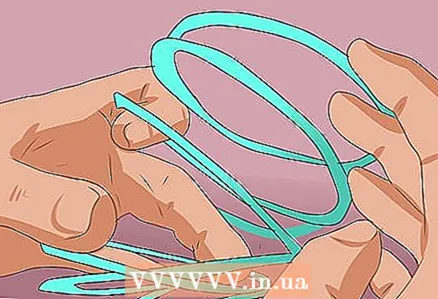 3 Determine where the spring should go after the tangled section. Slowly feel the tangled area, carefully examine it and determine the correct direction of the spring. Stretch the tangled area if you can see it better.
  4 Carefully thread the end of the spring through the tangled area. Remove the “normal” section of the spring from your hand and keep it folded. Rotate the folded section and thread it through the next tangled section so that it touches the section of spring between thumb and forefinger. Then put the spring back on your fingers.
 - It may be easier to do the other way around by slipping a matted loop over and around the folded spring.
 5 Unscrew the spring if it is bent too much. If you notice that the spring is pointing in the wrong direction or is bent too much, try scrolling two tangled sections that intersect each other. Once the section is untangled, you can thread the end of the spring through it again as above.
  6 Repeat the previous steps until the spring is unraveled. Continue unraveling the spring and putting the patched patches on your arm. Once you see a tangled area, use the previous instructions to untangle it.
 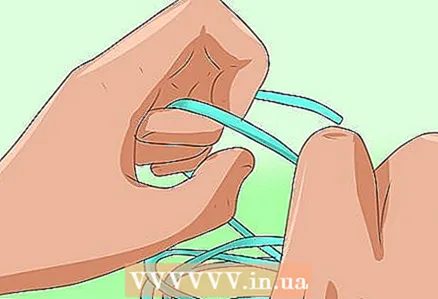 7 Start working at the other end, if necessary. If you are unraveling a spring that is too long or too tangled, you can put the corrected section of the spring aside and move on to the other end. Repeat the previous steps until you completely untangle the spring.
Method 2 of 3: How to Get Rid of Small Nodules
 1 Stretch the two ends of the spring. Hold both ends of the spring, one in each hand. Stretch it in opposite directions to see where it tangles. Continue to hold the spring in this position.
 - This method can only be used if the spring is not too tangled. If your spring is too tangled and does not go in a straight line in the above position, you can use this method only on one of the sections of the spring, or use the method described earlier.
 2 Scroll one end of the spring. Hold the other end during this procedure. Move in one direction to stretch out tangled areas. If the tangled areas are compressed too tightly, stop and turn the spring in the opposite direction.
  3 Separate the confusing areas to correct the imperfections. As soon as there is a little space between the tangled hinges, carefully examine them and determine what exactly needs to be fixed. Separate the tangled section from the rest of the spring. If you keep the spring stretched, the tangled section will snap into place by itself when you release the spring. If this does not happen, separate the tangled section again and carefully correct the shortcomings, turning the spring if necessary.
 - It is easier to do this by asking someone to hold one end of the spring.
Method 3 of 3: Untangle the knots on the spring
 1 Determine your chances of success with a plastic or metal spring. This method is suitable for non-tangled springs with knots that interfere with their normal operation. Some knots on the plastic springs can be removed when heated, but this does not always work and can even damage the toy if you do not handle it carefully. Metal springs are much more difficult to straighten and fix, so use this method only if you have extra time; if not, buy a new toy.
  2 Heat a pot of water. Fill the pot with enough water to completely cover the spring. Heat water on the stove without immersing the spring in it. Water not should be brought to a boil, but it should be heated to a high enough temperature until steam appears.
 - You can heat the water in a bowl in the microwave or kettle and then pour it into a saucepan.
 3 Turn off the fire. Turn off the heat as soon as the water heats up. Never heat the water together with the spring, otherwise it will melt, and you will ruin not only the spring, but also the pan.
  4 Put on gloves and place the spring in hot water. Put on rubber gloves to protect your hands and immerse the spring in hot water. Leave the spring in the water for a few minutes.
  5 Take out the spring and squeeze it. After a few minutes, remove the spring from the water. If the spring is hot enough, you can easily fold it by straightening the knots.
 - If you have a cardboard tube or any other cylinder that is slightly smaller than the spring, you can wrap the spring around the cylinder to achieve the desired result.
 6 Try again using hotter water if you fail. If the spring is too stiff and you cannot bend it, heat the water hotter and try again. If you heat the water too much, you can permanently ruin the spring, so heat the water temperature gradually and do not move away from it. Never heat the spring without water.
  7 Press down the folded spring with a book. Fold the spring and press it down with a book. Leave it in this position for several hours or even overnight to fix the damaged area.
 - If the book falls, try taking a large, thin children's book. Place a small, heavy object in the middle of the book.
- Don't use a book that is too heavy or too wide; it can crush the spring.
 8 Heat the spring in the oven. If the hot water method does not work, you can take a baking sheet covered with foil and put a spring on it. Heat the oven to 121 ° C, which will take about 10 minutes. Use a potholder to remove the spring and fix any unevenness. This is a risky method as some of the plastic springs will melt in the oven.
  9 Cut the spring. If all else fails, use pliers to cut the knots on the spring. You can then reattach the intact areas in place with rubber or super glue, but it will be difficult to reattach them at the correct angle. You will most likely end up with two separate springs.
 - Cut ends may be sharp. Wrap a little duct tape around them to avoid cutting yourself.
Tips
- Knots are less likely to form on metal springs than on plastic ones, but they are almost impossible to fix with improvised means. They are also more expensive.
Warnings
- Children should ask adults for permission before using pliers.
- Be careful with rubber and super glue. Always wear gloves as the glue sticks to your fingers. Avoid getting the glue on other parts of your body, especially your face.


