Author:
Janice Evans
Date Of Creation:
25 July 2021
Update Date:
1 July 2024

Content
This article will show you how to use iTunes to copy purchased music files from iPhone to your computer, as well as how to redownload purchased songs to your computer.
Steps
Method 1 of 2: How to Copy Music
 1 Make sure to buy the music files you want to copy. To copy audio files from iPhone to your computer's hard drive, you need to upload them to your phone's iTunes library.
  2 Connect your iPhone to your computer. Connect one end of the charging cable to your iPhone and the other to a USB port on your computer.
 - If you have an iPhone 7 or older charging cable that needs to be connected to your Mac, buy a USB-C charging cable to connect it to your computer.
 3 Launch iTunes. The icon of this program looks like a multi-colored note on a white background. The iTunes window will open.
 - If a message appears stating that iTunes needs an update, click Download and wait for iTunes to update, then restart your computer.
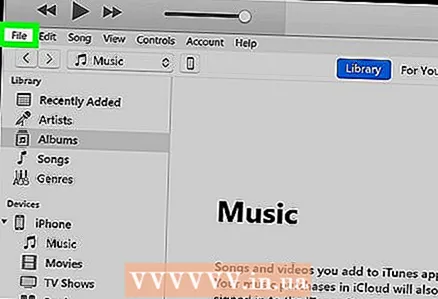 4 Click on File. It's in the top-left side of the iTunes window (Windows) or in the menu bar at the top of your screen (Mac OS X).
  5 Please select Devices. It's near the bottom of the File drop-down menu.
  6 Click on Transfer purchases from [device]. The name of your iPhone will be displayed instead of "[device]". Copying songs from the smartphone to the computer starts.
  7 Wait for all audio files to be copied to your computer. This will take some time, depending on the total size of the music files.
  8 Click on Recently added. This tab is on the left pane of the iTunes window. A list of recently added music files will open.
 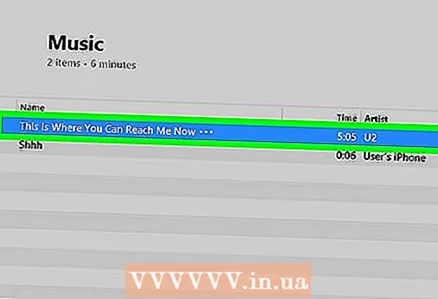 9 Find the purchased audio files you want to copy. Scroll up or down to find the songs you want.
  10 Click on the download icon
  . It will appear to the right of the selected song (or album). The audio files will be copied from iTunes to your computer, which is how you back up your music files to your computer.
 - If you don't see the download icon, the audio files are already on your computer.
- To open the folder containing your audio files on your computer, select the song, click File, and then click Show In Explorer (Windows) or Show In Finder (Mac OS X).
Method 2 of 2: How to re-download purchased music
 1 Launch iTunes. The icon of this program looks like a multi-colored note on a white background. If you accidentally delete iTunes songs from your iPhone or iTunes library, you can redownload them through the account from which the music was purchased.
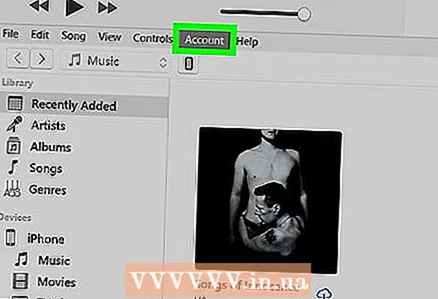
  2 Sign in to the account you want. Click Account at the top of the iTunes window (Windows) or at the top of the screen, and then view your account. It should be the same as the one you signed in on your iPhone.
 - If you're signed in to a different account, click Sign Out> Sign In, and then enter the email address and password associated with your Apple ID.
- If you're not already signed in, click Sign In and enter the email address and password associated with your Apple ID.
 3 Click again Account. A dropdown menu will open.
 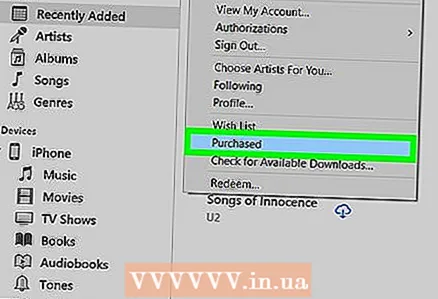 4 Click on Purchases. It's near the bottom of the drop-down menu. The iTunes Store tab will open.
  5 Click on the tab Music. It's in the upper-right side of the iTunes window.
 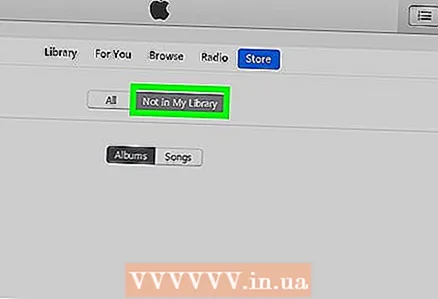 6 Click on Not in my library. You will find this option at the top of the iTunes window. A list of all purchased songs that are no longer in your iTunes library will open.
 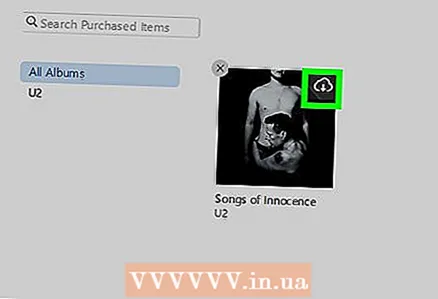 7 Click on the download icon . It's in the upper-right corner of the song or album that you want to re-download. The song or album will be downloaded to your computer.
 - To open the folder containing your audio files on your computer, select the song, click File, and then click Show In Explorer (Windows) or Show In Finder (Mac OS X).


