Author:
Florence Bailey
Date Of Creation:
25 March 2021
Update Date:
1 July 2024
![How to Open Desktop Computer PC Case [HD]](https://i.ytimg.com/vi/NTKIGQEDb4A/hqdefault.jpg)
Content
- Steps
- Part 1 of 3: Opening the Desktop Computer
- Part 2 of 3: Identifying Computer Components
- Part 3 of 3: Opening the laptop
All the boards are located in the computer case; it is the case that protects them from damage and allows the formation of an air flow that cools them. Why do you need to open the case? To clean it from the inside of dust or to install new boards. In this sense, desktop computers are more convenient than laptops, in which, as a rule, you can only change the RAM and hard drive.
Steps
Part 1 of 3: Opening the Desktop Computer
 1 Collect everything you need. You will most likely only need a Phillips screwdriver, although in some cases both pliers and a flathead screwdriver will come in handy.
 - Most often, the computer case is closed with 6-32 bolts, and these are the largest of those that you may come across.
- However, you may also come across bolts of the M3 type - they are slightly smaller than the 6-32 bolts, but this does not mean that they cannot be unscrewed with the same screwdriver.
- A can of compressed air and a low-power vacuum cleaner will come in handy if you want to keep the interior clean.
- A grounding bracelet will not be superfluous, although you can ground without it.
 2 Turn off your computer. Do it right, through the start menu or similar.
  3 Disconnect the cables from the chassis. They are connected to the back of it. If you are afraid then not to remember what and where stuck out - take a photo or drawing.
  4 Locate the contact panel of the motherboard with a glance. It is also located on the back side of the case, it is easy to recognize it - there are many different ports, including an Ethernet port, jack ports, USB and much more.However, now this panel has a different purpose - with its help you will be guided, placing the case for further work.
 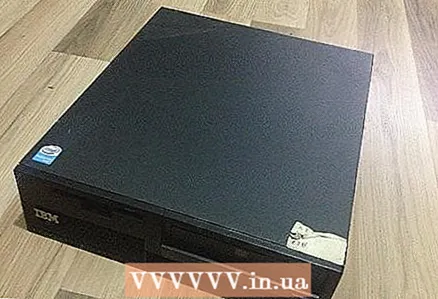 5 Lay the case on its side with the motherboard contact panel at the bottom but still facing the side. If you put the case differently, then you will not get close to the boards.
 - Do not put your computer on the carpet if you are going to get inside, static is not a joke!
 6 Locate the bolts on the back of the case. Two or three you should notice - they attach the side panel, which is removable, to the frame of the case. Remove them - remove the panel itself.
 - However, one should not forget about the fact that the cases are different, including in the aspect of panel mounting. Somewhere you don't even need a screwdriver - everything can be removed by hand, but somewhere there won't be any bolts. If you still can't open the case, then look for instructions for it.
 7 Be sure to ground yourself. You need to do this first, only then you can touch the boards, otherwise the electrostatic charge accumulated on you can literally kill the boards - so much so that you won't even notice until you try to turn on the computer! A grounding bracelet will help you out, and if you don't have one, just touch something metal.
 - You can read more on this topic here.
 8 Keep the inside clean while the case is open. Dust in the system case accumulates to an unimaginable speed, and this leads to overheating of the boards, which entails a decrease in computer performance. Accordingly, since you climbed inside, why not blow off the excess dust (and all the dust in electronics is unnecessary) ?!
 - Read about how to clean your computer.
Part 2 of 3: Identifying Computer Components
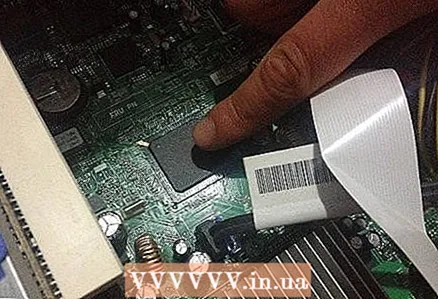
 1 Motherboard. This is the largest board, all the others are connected to it. It is possible that most of it will be hidden from you by other boards. A regular motherboard has slots for a processor, video card, RAM, as well as SATA ports for connecting hard drives and drives.
 - Need to install a motherboard? Click here !.
 2 CPU. Most likely, you will not see it, because it is hidden by the cooler. The processor is located near the center of the motherboard, and closer to its top than to the bottom.
 - Installing a new processor is described here.
- And the features of applying thermal paste - here.
 3 Random access memory (RAM). These are such long and thin boards installed perpendicular to the motherboard and not far from the processor. Your computer can have one or several RAM cards.
 - Need to install RAM? Read on !.
 4 Video cards. If your computer has one, then it will occupy the PCI-E slot closest to the process. These slots can be found in the lower left side of the motherboard, on the side of the case they will be hidden by removable plugs.
 - Video card installation is described here.
- And the specifics of installing a board in a PCI slot - here.
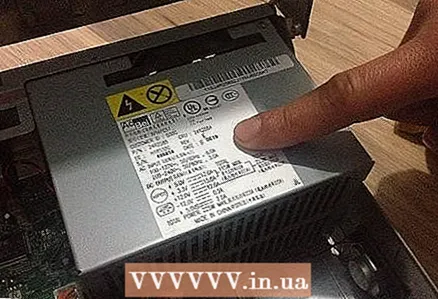 5 Power Supply. It can be located both above and below - it depends on the model of the case. The power supply looks like a large box, from where a thick bundle of wires comes out, going to the rest of the computer's components - it is through the wires that you can check whether all the components of the computer are powered.
 - Installation of the power supply is described here.
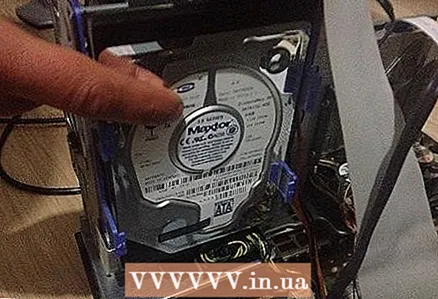 6 HDD. Typically, the hard drive (or drives) can be found in special trays located closer to the front of the case. The disks are connected to the motherboard with SATA cables (on older computers - IDE cables, wide and flat cables), as well as to the power supply, and also with special SATA cables (in old computers, respectively, you can find Molex-type connectors).
 - Hard disk installation is described here.
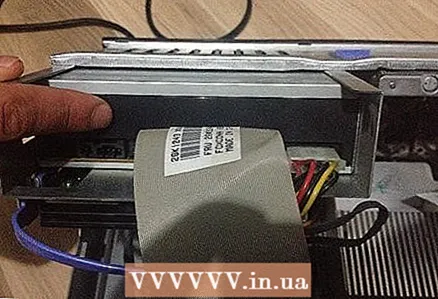 7 CD / DVD drive. This device is most likely located directly above the hard drive bay. It is larger than a regular drive and can also be accessed from the front of the case.Modern drives also use SATA cables.
 - Installing a new DVD drive is described here.
 8 Coolers. In most computers, air movement is provided by the efforts of several fans at once - coolers, which can be fixed above the processors, on the walls of the case and not only. Coolers can be connected either to the motherboard or directly to the power supply.
 - The cooler installation is described here.
Part 3 of 3: Opening the laptop
 1 Collect everything you need. Laptops tend to have bolts that are less wide than desktops, so you need a more modest screwdriver.
 - A can of compressed air comes in handy if you decide to keep the interior clean.
 2 Turn off your computer. Do it right, through the start menu or similar.
  3 Disconnect all cables connected to the laptop. The power cable, all USB devices, headset and everything else must be disconnected.
  4 Place the laptop on a work surface with the die facing down. This will allow you to see the panels that can be removed. Note that access to the "internals" of laptops is much more modest than that of desktop computers, and all because most of the boards in them cannot be replaced by a non-specialist.
 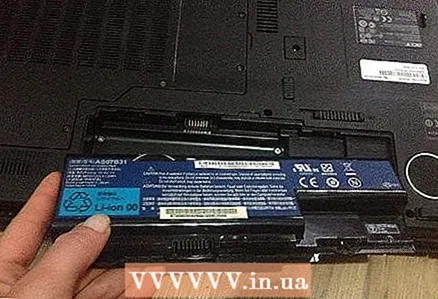 5 Take out the battery. This will prevent your computer from accidentally turning on when it is half-disassembled.
  6 Remove the bolts from the panels to be removed. You may need to remove multiple panels at once. Many laptops have access to slots for RAM and hard drive.
 - Installing RAM in a laptop.
- Installing a hard drive in a laptop.


