Author:
Sara Rhodes
Date Of Creation:
10 February 2021
Update Date:
1 July 2024
Content
- Steps
- Part 1 of 3: Installing Maps
- Part 2 of 3: Configuring SLI Mode
- Part 3 of 3: Testing Performance
If you love playing computer games, you probably want your games to perform as best as possible. One of the key features of a gaming computer is its graphics card; in the case of Nvidia, you can pair two or more of the same graphics cards together to get huge performance gains. Follow our tips to find out how.
Steps
Part 1 of 3: Installing Maps
 1 Make sure your operating system supports SLI technology. Two cards in SLI mode are supported by Windows 7, Vista, 8, or Linux. Three and four cards in SLI mode are supported only in Windows Vista, 7 and 8, but not in Linux OS.
 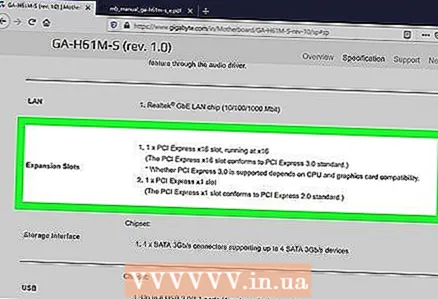 2 Check the installed hardware. SLI technology requires a motherboard with multiple PCI-Express slots, as well as a power supply with a sufficient number of connectors. You will need a power supply with at least 800 watts of power.
 - Some cards allow parallel operation of four video cards in SLI mode. Most cards are made to work in dual-video mode.
- The more graphics cards, the more power will be required.
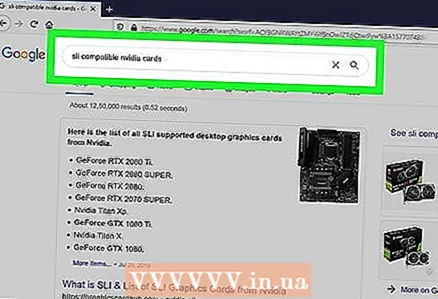 3 Take video cards that support SLI technology. Almost all modern Nvidia cards support the SLI configuration. To do this, you need at least two identical card models with the same amount of video memory.
 - The cards do not have to be produced by the same manufacturer, it is enough that they are the same models with the same amount of memory.
- The cards do not need to have the same frequencies, but then you can see a slight drop in performance.
- For best results, use identical graphics cards.
 4 Install video cards. Install the cards into the two PCI-Express slots on your motherboard. Graphics cards are installed in slots in the usual way. Be careful not to damage the mounts or insert cards at the wrong angle. Once the cards are in place, secure them using special fasteners or screws.
  5 Install the SLI bridge. All cards that support SLI mode usually come with a dedicated SLI bridge. This connector plugs into the top of the graphics cards, thus connecting them together. This allows the cards to transfer data directly to each other.
 - The bridge does not need to be installed to connect cards in SLI mode. Without a bridge, the cards will work together using PCI-Express slots on the motherboard. This type of connection will result in reduced performance.
Part 2 of 3: Configuring SLI Mode
 1 Turn on your computer. After installing the graphics cards, close the computer case and restart it. You do not need to make settings changes until the system is fully powered up.
  2 Install the drivers. Your operating system should automatically detect your graphics cards and try to install the correct drivers for them. This process can take longer than installing video cards, because the drivers will be installed separately for each card.
 - If the installation does not start on its own, download the latest drivers from the Nvidia website and run the installation files when the download is complete.
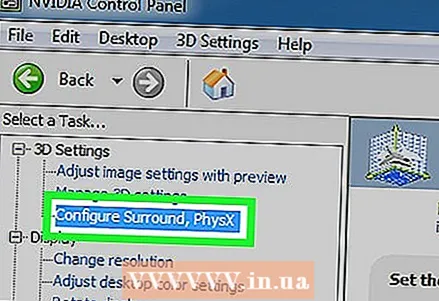 3 Set up SLI. Once the drivers are installed - right-click on the desktop and select "Nvidia Control Panel". A new window will open where you can change the graphic settings. Find the menu item named "Configure SLI, Physx".
 - Select Maximum 3D Performance and select Apply.
- The screen will blink several times while the SLI settings are applied. You will be asked if you want to save the new settings.
- If the control panel does not have the desired function, then your system most likely did not recognize one or several of your cards. Open Device Manager in Control Panel and check if all graphics adapters are listed in the Display adapters list. If your video cards are not in the list, check the connection, as well as the installed drivers.
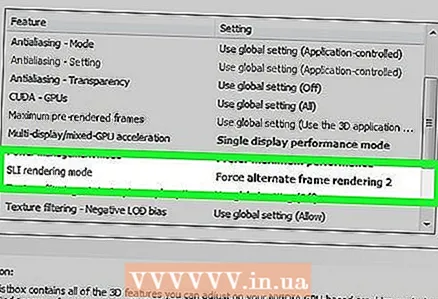 4 Enable SLI technology. Select Change 3D Image Settings from the menu on the left. In General Settings, scroll down the list until you find the "SLI Performance Mode" option. Change the setting from Single GPU to Alternative Processing 2. This will enable SLI mode for all of your applications.
 - You can make separate settings for different video games by opening the Application Settings tab and selecting "SLI Performance Mode".
Part 3 of 3: Testing Performance
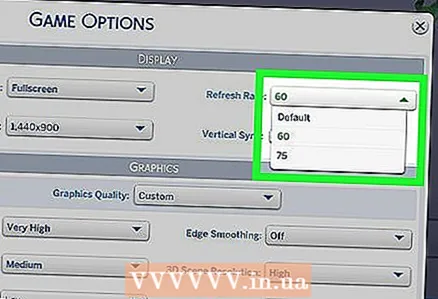 1 Check the number of frames per second. There are many different ways to find out the number of frames per second, therefore, you will need to choose the most suitable one. The number of frames per second will perfectly show the performance of your system, as well as whether everything is being processed correctly for you. Many fans of computer games achieve 60 frames per second performance at high settings.
 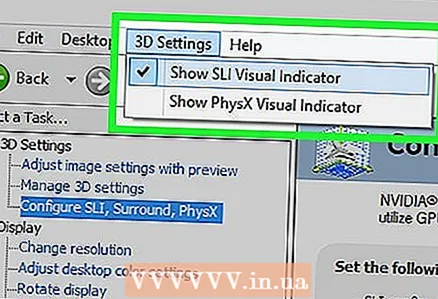 2 Turn on the SLI activity indicator. In the Nvidia Control Panel, open the 3D Settings menu. Enable Display SLI Activity Indicator. You will have a strip on the left side of the screen.
 - Start your game. Once your game is running, you will see how the bar changes. The bar will become higher, which means that the performance has increased, which means that the video cards work correctly in SLI mode, improving the display. If the bar is not too high, then the SLI configuration does not significantly affect the overall performance.


