Author:
William Ramirez
Date Of Creation:
20 September 2021
Update Date:
1 July 2024
Content
- Steps
- Method 1 of 2: Drawing a cartoon owl
- Method 2 of 2: Drawing an Alternative Cartoon Owl
- Tips
- What do you need
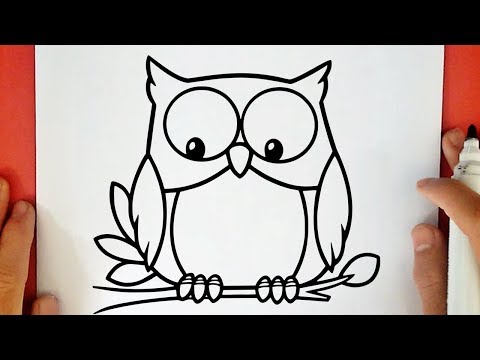
Imagine Halloween is around the corner. It is an observant clever owl sitting on a branch that conveys the mood of this holiday. Of course, there are other symbols as well, such as the headless horseman, witches or goblins looking for sweets in homes. She is also one of the symbols of Greek mythology, the goddess of wisdom, Athena. Drawing an owl is easy and fun!
Steps
Method 1 of 2: Drawing a cartoon owl
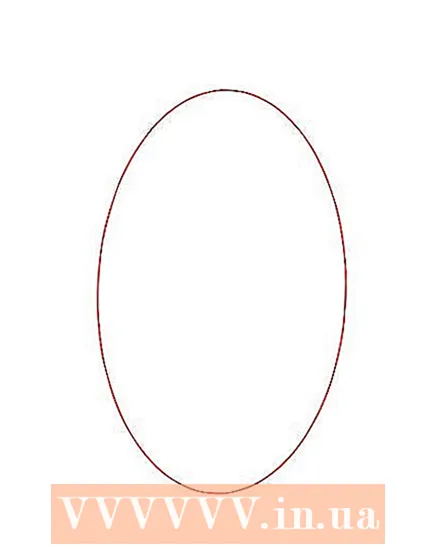 1 Draw a large oval. It should occupy 2/3 of the sheet in height. At first, you may not be able to draw an even oval, but you need to try to make its height twice as large as its width. Take a look at the picture:
  2 Draw the eyes. First, draw two circles at the top of the oval, about 1/5 of the top. Draw smaller circles in each and paint them black for the owl's pupils. You can practice with your eyes. For example, if you want to draw a serious owl, keep her gaze straight ahead. If she is looking at something, then draw the pupils on the right or left side of the eyes. Your owl can also look silly if its eyes are slanted to the sides. [[
  3 Draw the horns. First, draw a wide English "V" from the edge of the oval to both sides. Also draw the same letter, starting from the eyes to the middle of the forehead, vertically. The dot between the eyes will give the owl a distinctive character. The better the horns are drawn, the better the owl will look. The deeper the center of the line between the eyes, the more angry the owl will be. (In the figure at the bottom, the red lines indicate the general shape, and the black lines indicate the finished horns)
  4 Draw the wings. Draw curved lines from the top left and right sides, pointing inward about ¼ towards the center of the oval, then back to the bottom.
  5 Add claws. First draw oblong circles at the bottom of the owl, three on each side, then two horizontal lines to represent the branch. The branch should not be completely straight, it should look like a real branch. Claws also do not have to be oval, the main thing is to make them sharp and sharpened. So the owl drawing will be natural. [[
  6 Add plumage. Draw English letters "U" between the wings. They will look like little feathers.
  7 The next step is the beak. Draw a narrow V just below eye level for the owl's beak.
  8 Paint the wings brown if you like. The head and plumage can be painted light brown.
  9 Be creative. Here you can do whatever you want. You can try, for example, the play of light and shadow. Now you can draw an owl, and you can draw a whole flock for Halloween!
  10 The owl is ready!
Method 2 of 2: Drawing an Alternative Cartoon Owl
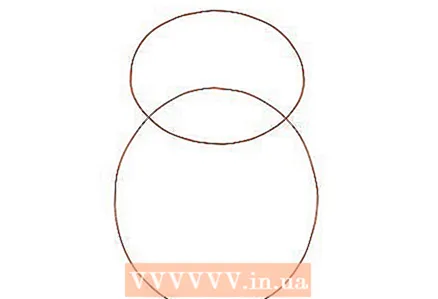 1 Draw a horizontal oval for the owl's head.Also draw a larger vertical oval under the oval in step 1. The vertical oval overlaps ¼ of the horizontal oval.
 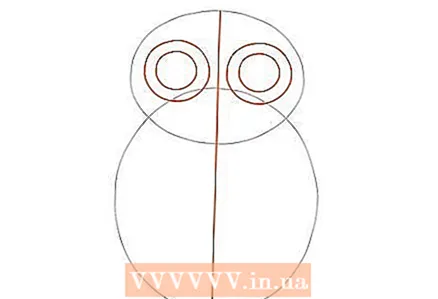 2 .Draw a line that crosses both ovals in the middle. Draw two circles for the owl's eyes.
  3 Add details for the owl's head. Draw a beak and feathers for the head.
  4 Draw a closed parabola that curves upward on the lower half of the vertical oval. Draw two small circles at the bottom.
  5 Draw curves that will be the wings.
 6 Circle everything with a pen and erase unnecessary lines. Add additional details like feathers and so on.
  7 Color to your liking!
Tips
- Use colored pencils for more details.
- The smaller the owl, the less detail you need to draw, since a large owl has a lot of feathers.
- If you want to draw a clever owl, add horn-rimmed glasses to it.
What do you need
- Pencil
- Paper
- Form template, if needed
- Colored pencils, crayons, etc.


