Author:
Bobbie Johnson
Date Of Creation:
8 April 2021
Update Date:
1 July 2024

Content
- Steps
- Method 1 of 4: Paper Bag Helmet
- Method 2 of 4: Papier-mâché Helmet
- Method 3 of 4: Plastic Bucket Helmet
- Method 4 of 4: Clear Plastic Helmet
- Warnings
- What do you need
- Paper bag helmet
- Papier-mâché helmet
- Plastic bucket helmet
- Transparent plastic helmet
Let your imagination run wild and customize yourself a space helmet for your carnival costume. This can be done in various ways, but for relatively simple options, there are enough available tools that can be found in almost every home.
Steps
Method 1 of 4: Paper Bag Helmet
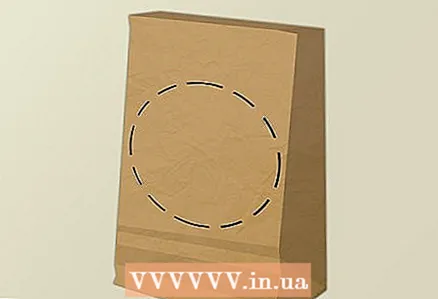 1 Draw a large circle on the paper bag. The circle should be about the size of your face or slightly larger.
 - The circle should be at the level of your face. To place it correctly, place the bag over your head and have someone draw a circle in this position.
 2 Cut out the circle. Remove the bag from the head and cut a circle with scissors.
 - Consider also cutting out semicircles on the right and left sides of the bottom of the bag. While not required, it will hold the bag better on your shoulders.
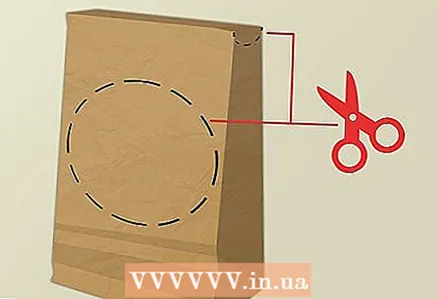
- Consider also cutting out semicircles on the right and left sides of the bottom of the bag. While not required, it will hold the bag better on your shoulders.
 3 Place the end of the paper towel tube on the lid of the cylindrical box and trace around it. Take a cylindrical box (for example, for oatmeal), place the end of a paper towel tube in the center of its lid and circle it with a marker.
 - Do the same for the second box.
- In this case, you can leave the covers on the boxes or remove them for convenience. Note, however, that you will have to temporarily remove the lids from the boxes when you cut the round holes in them.
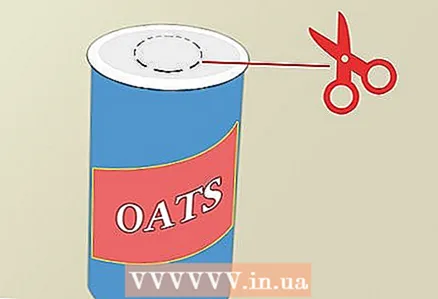 4 Cut the holes. Using scissors, cut out the marked circular hole in each lid. Then put the lids back on the boxes.
 - You will need a nail or sharp end of scissors to pierce the lid somewhere on or inside the circle you have drawn. After you have made the starting hole, stick the end of the scissors into it and cut a circle along the marked line.
 5 Attach the boxes to a paper bag. Place the boxes side by side against the back (whole) side of your paper bag at the bottom of it. Use duct tape or a stapler to attach the box to the bag.
 - Make sure the box lids are facing up.
- The bottom of each box should protrude from the bottom of the paper bag. The boxes can protrude from under the paper bag as far as you like, as long as you can securely attach them to the bag.
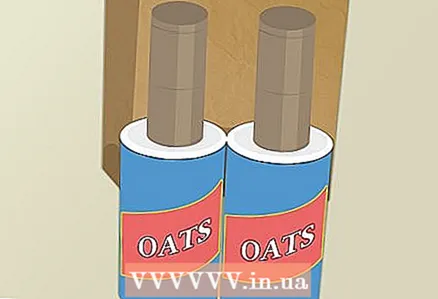 6 Insert the paper towel rolls. Insert one end of the paper towel tube into the hole in the lid of the box. After that, tape or staple the top of the tube to the paper bag.
 - Do the same for the second paper towel tube and the second box.
- The appearance of cardboard tubes should resemble oxygen hoses, and cylindrical boxes should resemble oxygen cylinders.
 7 Decorate your helmet if desired. Take colored markers, paints or pencils and color the helmet as you like.
 - Consider also using lightweight decorations such as aluminum foil stickers or appliqués.
 8 Put on your space helmet. The space helmet is ready and can be used for its intended purpose. Place the bag over your head with the face hole in the front and the boxes in the back.
Method 2 of 4: Papier-mâché Helmet
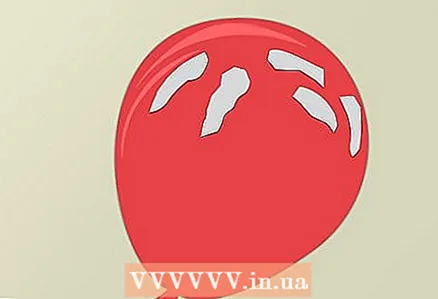
 1 Inflate the balloon. Inflate a regular balloon to a size slightly larger than your head. Tie the tail of the balloon with a tight knot.
 - 2 Tear the newspaper into strips. Take five large newspaper sheets and tear them into strips 5–8 centimeters wide.
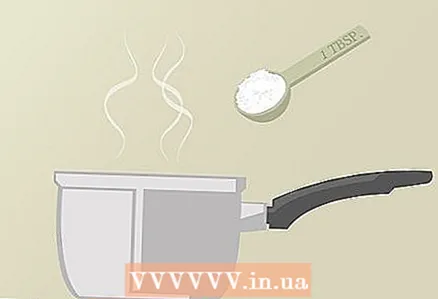 3 Make a papier-mâché paste. If you haven't already, make a papier-mâché paste.
 - Mix one tablespoon (10 grams) of cornmeal with one liter of boiling water and stir well to form a paste.
- 4 Cover the floor or countertop. Prepare your work area before dipping the paper in the paste and sticking it to the ball. Papier-mâché can stain everything around, so place oilcloth or old newspapers on the table or on the floor so that the paste drips onto them, and not directly onto the countertop or carpet.
 5 Stick newspaper stripes onto the balloon. Dip one strip in papier-mâché paste and spread it over the surface of the ball. Do the same with the other strips: lay them vertically and horizontally on the surface of the ball, so that the entire ball is evenly covered with paper.
 - When finished, the ball should be covered with about five layers of newsprint.

- Glue the entire balloon except for one small area around the knot. You will need this hole to then remove the balloon from the resulting paper structure.
- When finished, the ball should be covered with about five layers of newsprint.
 6 Wait for the paper to dry. Place the ball covered with newsprint in a dry, draft-free place. Leave it alone for 24 hours or until the surface is completely dry to the touch.
 - The paste must be completely dry before the next step.
- The drying speed of the paste depends on the weather. In dry weather, the paste will dry faster. If you live in a humid environment, the paste may take more than 24 hours to dry.
 7 Take out the balloon. Use a pin to poke the ball through the hole left at the bottom of the papier-mâché. Then, carefully pull it out through this hole.
  8 Shape the papier-mâché into a helmet. First, cut off the bottom with scissors, then make a rounded slit for the face.
 - Work from the bottom hole. Cut off the bottom of the helmet so that the head and neck go through the hole.

- Cut a rectangle in the front of the helmet through the bottom hole. Its width should be the same as the distance between the outer corners of your eyes. The height of the rectangle should match the distance between the bottom of your forehead and your chin.
- Work from the bottom hole. Cut off the bottom of the helmet so that the head and neck go through the hole.
 9 Paint your helmet. Take your paint and brush and paint the helmet as you like. You can also use foil appliques and space-themed stickers.
 - Antennas can also be attached to the helmet. Make two small holes on the top of the helmet, one on the left and one on the right. Insert a pipe cleaner into each hole and tape the end of the pipe to the inside of the helmet. The outer ends of the brushes can be fitted with a bead to complement the antennas.
- 10 Put on your helmet. After you decorate the helmet, you can wear it.
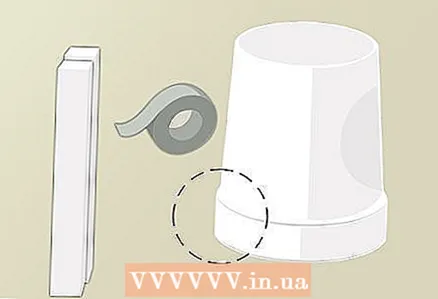
Method 3 of 4: Plastic Bucket Helmet
 1 Draw an oval on a large plastic bucket. It should be at least 18 centimeters wide and 13 centimeters long or more - large enough to show your face through it. Take a pencil and draw an oval.
 - Make sure the hole is at the level of your face when you put the bucket on your head. To correctly mark the hole, hold the upside-down bucket in front of you so that the bottom is flush with the top of your head. Quickly mark the location of your eyebrows and lower lip on the bucket. Draw an oval over the marks.
 2 Make the first hole in the outline of the oval. Place the tip of the nail somewhere along the line you have drawn. Hit the nail with a hammer to break through the bucket.
 - Remove the nail from the hole you made.
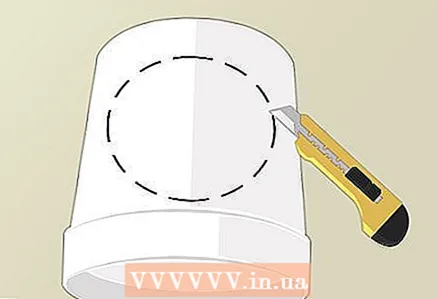 3 Take metal scissors and cut an oval along the outline. Pass sharp metal scissors through the punched hole and carefully cut the oval along the outline.
 - Remove and discard the cut out plastic oval.

- If the edges of the hole are too jagged and you could cut yourself, cover them with strips of white masking tape.
- Remove and discard the cut out plastic oval.
 4 Cut out two rectangular foam pads for the helmet. Take a ruler and pencil and measure 5x23cm rectangles on a sheet of styrofoam. Cut out the rectangles with a carving knife.
 - Carefully round the bottom corners of both rectangles with a knife.
 5 Attach the styrofoam to the bucket. Tape the top of each styrofoam rectangle to the inside of the helmet with white masking tape.
 - Both rectangles should be placed on the back of the helmet. When you put on the helmet, they should go over your shoulders and lie on your upper back. Their purpose is to keep the bucket straight on your head.
 6 Wrap a tea towel around your head. Take a regular kitchen towel and wrap it around your head so that it crosses over your forehead. Tape the ends with tape.
 - The ring should be loose enough so that you can easily take it off and put it on your head.

- The ring should be loose enough so that you can easily take it off and put it on your head.
 7 Attach a towel ring to the inside of the helmet. Use scotch tape for this. The center point of the ring should be aligned with the center of the bucket.
 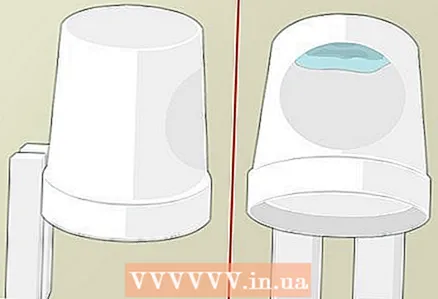 8 Put on your space helmet. Lower the bucket over your head with the face hole at the front. The towel ring should rest on your head and the styrofoam rectangles behind your shoulders. If you did everything correctly, the helmet will stay securely on your head. Ready!
Method 4 of 4: Clear Plastic Helmet
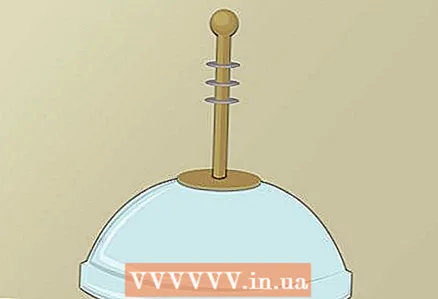
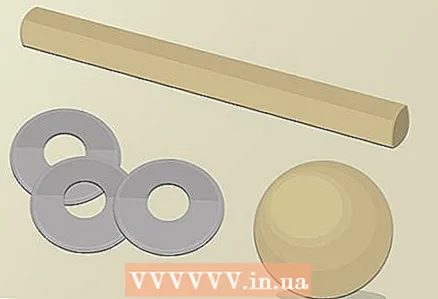 1 Make an antenna. The antenna will consist of a short wooden post, three metal washers and one wooden ball. Use hot glue to attach the balloon to the top of the pin. From the bottom, put three washers on the pin: place them evenly so that the first is about 5 centimeters from the wooden ball, and the last is located in the middle of the pin.
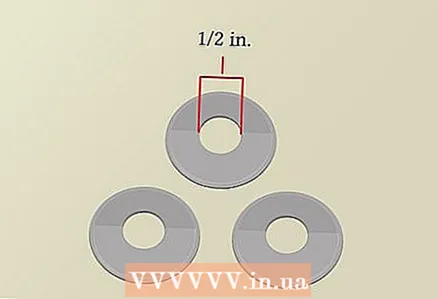
 - The wood pin should be about 1.3 centimeters in diameter and 20 centimeters long (cut to length if necessary).

- The holes in the washers should also be about 1.3 centimeters in diameter. The washers should fit snugly over the pin. If necessary, they can be secured in place with a drop of hot glue on the underside of each washer.
- The diameter of the wooden ball should be 2–2.5 centimeters.

- The wood pin should be about 1.3 centimeters in diameter and 20 centimeters long (cut to length if necessary).
 2 Construct the antenna base. Take the domed plastic lid from your milkshake or ice cream packaging. Find a small wooden disc to attach over the lid. Apply a hot glue ring to the cover and press a wooden disc into it.
  3 Attach the antenna. When the adhesive on the antenna and antenna base hardens, apply hot glue to the bottom end of the antenna pin. Slide the pin through the hole in the wooden circle of the antenna base and glue it.
 - Wait for the glue to dry completely before moving on to the next step.
- Wait for the glue to dry completely before moving on to the next step.
 4 Spray the antenna with aerosol paint. Find gold or copper metallic spray paint. Paint the outside of both the antenna itself and its base.
 - Spray paint should be sprayed in a well-ventilated area. It is also advisable to spread a film or newspaper so as not to spoil the work surface with paint.

- The inside of the antenna base should not be painted.
- Wait for the paint to dry completely. This can take 12-24 hours, depending on the type of paint and climate in which you live.
- Spray paint should be sprayed in a well-ventilated area. It is also advisable to spread a film or newspaper so as not to spoil the work surface with paint.
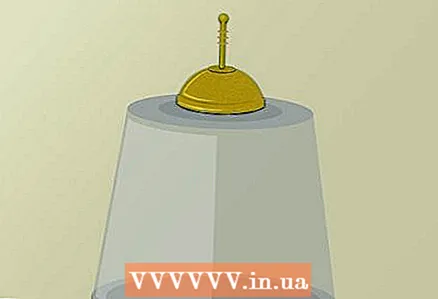 5 Attach the antenna to a large plastic container. Find a clear plastic container large enough to slide over your head. Turn the container upside down. Place the antenna base in the center of the tank bottom and glue.
 - A transparent food container can be used. Whichever container you choose, you should make sure it is large enough for your head and has a very large opening. If the hole is too small, the helmet can get stuck on the head or block the air flow.
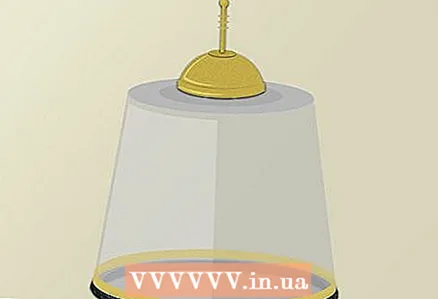
 6 Secure the golden tape around the perimeter of the bottom. Cut a piece of gold-colored tape long enough to wrap around the bottom of the container. To glue the tape to the bottom, apply a thin strip of hot glue to it.
 - Place the tape about 2 centimeters (or less) from the bottom of the container.
 7 Cut off a piece of flexible tubing. Measure a piece of flexible tubing long enough to wrap around the bottom of the helmet. Cut the tube to the desired length using sharp scissors or a knife.
 - Use a black flexible tube 2–3 centimeters in diameter.
 8 Attach the tube. Apply enough hot glue to the bottom edge of the helmet. Wrap the tubing around the bottom of the container so that the ends meet, and press it into the adhesive.
 - Cut off any excess tubing if necessary.
 9 Put on your new space helmet. The helmet can be worn after the glue has dried.
Warnings
- If you are a child, ask an adult (such as a parent or teacher) to help you cut everything you need.
What do you need
Paper bag helmet
- Paper bag
- Crayons, pencils or markers
- Scissors
- 2 cylindrical boxes
- 2 paper towel tubes
- Scotch
- Stapler with staples
Papier-mâché helmet
- Papier-mâché paste
- Newspapers
- Balloon
- 2 pipe cleaners
- 2 round beads
- Masking tape
- Dye
- Brush
Plastic bucket helmet
- Plastic bucket with a volume of 12-14 liters
- Pencil
- A hammer
- Nail
- Metal scissors
- Carving knife
- Styrofoam sheet measuring 20 x 30 centimeters
- White scotch tape
- Kitchen towel
Transparent plastic helmet
- Wooden pin
- Small wooden ball
- 3 metal washers
- Small wooden disc
- Convex plastic cover
- Hot glue gun, glue sticks
- Gold spray paint
- Empty transparent food container from products
- Flexible tube
- Sharp scissors
- Golden ribbon


