Author:
Carl Weaver
Date Of Creation:
28 February 2021
Update Date:
1 July 2024
Content
1 How the plank is performed. Kumbhakasana is an important foundational posture in yoga, from which the transition to many other postures (asanas) is carried out. At the same time, it strengthens the muscles of the arms, shoulders, back and abs. Regular practice of this exercise helps to improve your posture.- Consult your doctor before starting yoga practice. You must make sure that you are healthy enough for this activity.
- Be careful when doing plank pose if you have had back, abdominal, or shoulder injuries.
 2 Get on all fours. If you are just starting to practice yoga and are not very flexible, prepare yourself for the plank, starting with a position on all fours. Anyone can do it.
 - Make sure your hands are directly under your shoulders and your knees are directly under your hips.
- You can place your feet completely on the floor, or you can bend them, placing only your toes on the floor (that is, stand on your toes).
- Inhale and exhale gently through your nose. If you want, you can breathe with a slight hiss that resembles the sound of the sea - called ujai breathing - it makes yoga more effective.
3 Inhale and sit on your feet. Leave your hands in the same place, continue breathing ujai and sit on your heels. You have completed the exercise with a child's pose called balasana. - If you haven't already, curl your toes to rest on the balls of your toes.
- Place your chest on your knees and look forward.
4 Exhale and move into Downward Dog Pose. From the balasana, or child's pose, as you exhale, lift your pelvis up towards the ceiling, leaving your palms and feet in the same place. You have to assume a position that resembles an inverted V - this position is called a downward-facing dog, or adho-mukha-svanasana in Sanskrit. - Push your palms off the floor and engage your abs.
- Roll your shoulders down towards the center of your back and your arms inward so that your elbows are facing each other.
- The heels do not have to touch the floor - it depends on the flexibility of the lower back, hips and calf muscles. The more you practice, the easier it will be for you to place your heels on the floor.
- Try to turn your pelvis towards the ceiling.
- You can look at your navel, but make sure your neck is relaxed and drooping.
- Inhale and exhale - stand in this position for as long as you want, prepare yourself to straighten forward into the bar.
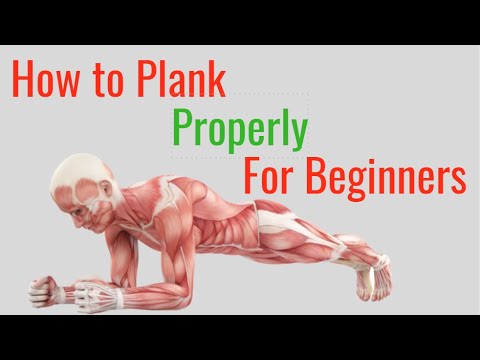
5 Inhale and move into plank pose. From the downward-facing dog position, while inhaling, go to kumbhakasana with the pelvis down. The shoulders should be level with the palms, and the heels should be pulled back - that is, the position resembles a high stop. - Make sure to engage your abs and back muscles. Don't push your buttocks up.
- Feet should be on toes shoulder-width apart.
- Keep your elbows close enough to your ribs and try to pull your shoulders down, away from your head so that they don't pinch your neck, which will kind of lengthen your neck.
- Try to open your chest as much as possible - for this you can pull your shoulders down.
- Try to pull your heels back to add stability.
- Make sure to engage your thigh muscles by pulling your kneecaps up comfortably.
- The weight should be evenly distributed between the hands and feet.
- When moving from adho-mukha-svanasana to the plank position, you should not change the position of the hands and feet. The hands and feet are already in the ideal position to perform the asana.
6 Exhale and return to the downward facing dog position. After you have stood in the bar for about 3-5 inhalations and exhalations, exhale and go back to adho-mukha-svanasana. Let your body rest in this position before moving on to other asanas. - Push your fingers off the floor, engage your abdominal muscles, and try to turn your pelvis towards the ceiling.
- Roll your shoulders down towards the center of your back and your arms inward so that your elbows are facing each other.
- Inhale and exhale - stay in this position for as long as you want.
7 Do the plank pose again. If you enjoyed doing the plank pose, or want to work on your endurance, repeat the plank and downward dog combination. You can do these exercises as much as you like, as long as, of course, you do them correctly. - After completing the plank, hold 3-5 breaths in adho-mukha-svanasana.
8 Try more complex planks. Once you've learned how to do the plank pose well enough, you can try more advanced variations of this pose. Don't move on to more difficult positions if you don't feel strong enough to hold your body in the plank position correctly. - Slowly lift one leg off the floor to complete a one-leg plank.
- Slowly extend one arm in front of you to do a one-arm plank, then return it to the floor.Repeat the exercise on the other hand. You can vary the arms and legs. Make sure your hips remain parallel to the floor and not side to side.
9 Finish doing the plank pose. After you have completed a couple of laps of the plank, complete the practice. You can end the practice in Downward Dog Pose and then kneel down to be on all fours. You must end the exercises with the same asana with which you started, that is, put your hands and knees on the floor. - If you want to get some rest, go to the baby pose (balasanu).
Method 2 of 2: Side Plank
- 1 Get on all fours. If you are just starting to practice yoga and are not very flexible, prepare yourself for the side plank (vasishthasana), starting the practice from a position on all fours. Anyone can accept this position.
- Make sure your hands are directly under your shoulders and your knees are directly under your hips.
- You can place your feet completely on the floor, or you can bend them, placing only your toes on the floor (that is, stand on your toes).
- Inhale and exhale gently through your nose. If you want, you can breathe with a slight hiss that resembles the sound of the sea - called ujai breathing - it makes yoga more effective.
- 2 Inhale and sit on your feet. Leave your hands in the same place, continue breathing ujai and sit on your heels. You have completed the exercise with a child's pose called balasana.
- If you haven't already, curl your toes to rest on the balls of your toes.
- Place your chest on your knees and look forward.
- 3 Exhale and move into Downward Dog Pose. From the balasana, or child's pose, as you exhale, lift your pelvis up towards the ceiling, leaving your palms and feet in the same place. You have to assume a position that resembles an inverted V - this position is called a downward-facing dog, or adho-mukha-svanasana in Sanskrit.
- Push your fingers off the floor and engage your abs.
- Roll your shoulders down towards the center of your back and your arms inward so that your elbows are facing each other.
- The heels do not have to touch the floor - it depends on the flexibility of the lower back, hips and calf muscles. The more you practice, the easier it will be for you to place your heels on the floor.
- Try to turn your pelvis towards the ceiling.
- You can look at your navel, but make sure your neck is relaxed and drooping.
- Inhale and exhale - stand in this position for as long as you want to prepare yourself for the transition to the plank.
- 4 Inhale and move into plank pose. From the position of the dog facing down, while inhaling, lower the pelvis and go into kumbhakasana. Your shoulders should be straight above your palms, and your heels should be pulled back - your position should resemble a high stop.
- Make sure to engage your abs and back muscles. Don't push your buttocks up.
- Feet should be on toes shoulder-width apart.
- Keep your elbows close enough to your ribs and try to pull your shoulders down, away from your head so that they don't pinch your neck, which will kind of lengthen your neck.
- Try to open your chest as much as possible - for this you can pull your shoulders down.
- Try to pull your heels back to add stability.
- Make sure to engage your thigh muscles by tightening your kneecaps.
- The weight should be evenly distributed between the hands and feet.
- When moving from adho-mukha-svanasana to the plank position, you should not change the position of the hands and feet. Arms and feet are already in the ideal position to complete the side plank.
- 5 Exhale and transfer your weight to your right hand to move into vasishthasana. Inhale and transfer your weight to your right arm - it will support your entire body. Hold this asana for 3-5 breaths to train your muscles evenly and reduce the risk of injury.
- Your hips should be parallel to each other and you should place your left foot on your right foot.
- The supporting arm should be straight and slightly in front of the shoulder. The weight should be distributed evenly across the palm to help engage the triceps and maintain balance.
- The left hand, palm, and fingers should be pointing up towards the ceiling.
- Be sure to engage your abs, back, and whole body.
- It can be helpful to have a wall behind you that you are leaning against while doing the side plank.
- 6 Inhale and return to plank position. After you have completed the side plank, lingering in it for 3-5 breaths, inhale and go back to the normal plank pose, that is, to kumbhakasana. Hold this pose for one or two breaths to rest a little before doing the side plank on the left side.
- 7 Exhale and transfer your weight to your left hand to perform vasishthasana on the other side. Inhale and transfer your weight to your left arm - it will support your entire body. Perform this asana on the left side in the same way as on the right. Hold the side plank for 3-5 breaths before completing the exercise.
- 8 Try different types of side planks. If you've learned how to do the side plank well enough, you can try more complex variations of this pose. Remember that you can only move on to more difficult poses when you have mastered the side plank well - this will help minimize the risk of injury due to improper asana practice.
- While in a simple side plank, you can, as it were, "twist" the lower thigh upward and twist - this will involve the oblique abdominal muscles in the work. In addition, it will help to stretch the right side even deeper.
- You can also do a side plank by lifting your upper leg slightly above your lower leg. Hold this position for 1-2 seconds.
- 9 Finish doing the side plank pose. After you have completed a couple of vasishthasana rounds, end the practice by returning back to the regular plank position and then to the downward dog. You can end the practice in the downward dog position, or in the crouching position from which you started the exercises.
What do you need
- Yoga mat


