Author:
Virginia Floyd
Date Of Creation:
5 August 2021
Update Date:
1 July 2024
Content
- Method 2 of 4: Casting on a potter's wheel
- Method 3 of 4: Sculpt by hand
- Method 4 of 4: Applying the glaze
- Tips
- Warnings
- What do you need
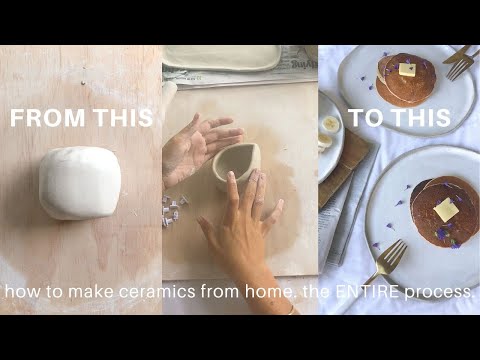
- Oven baking, air drying or polymer clay. Such clays do not require an oven, as they are either air-dried or baked in a standard oven. Due to their high cost, they are best used for making small items such as jewelry, jewelry, etc. Oven-baked and air-dried clays have a natural appearance and consistency. Polymer clays come in various bright colors (like plasticine!), From which you can make beautiful crafts, which after firing become similar to plastic ones.
- Modeling from standard clay. The possibilities of stucco ceramics are endless, but they require an oven to work with. However, the rest of the costs are quite small, the clay itself is quite inexpensive. All that is required is a rolling pin, newspaper or cloth, and other household items. With a sculpting book, anyone can start making pottery.
- Shaping standard clay on a potter's wheel. And again you need an oven. Once you become an experienced twist, you will undoubtedly want to bake in a large kiln, since you will be creating products much faster than sculpting. You can study the use of the potter's wheel from books or better videos. Some people do it, and some people do it, but it's difficult. Most people with no experience buy a circle and try to work on it on their own, and then get frustrated and give up. However, if you are patient, you can develop your skills in shaping pottery on a potter's wheel without firing (a large kiln is expensive, but maybe you have access to it?) By recycling the clay back onto the wheel. You will want to complete your first creations with firing as they inspire pride. But soon you will hate your first pieces! Therefore, it is a great strategy not to burn them at all.
 2 Choose your clay. After choosing the method you will use, you can choose the type of clay. Most clays require oven baking, but most newer grades can be oven baked. If you just want to play with wet clay, don't even bother firing it. Rule of thumb: Wet and dry clays won't work together - be sure to make sure the clays have the same consistency.
 - If you are going to fire clay, choose between high temperature and low temperature firing.
- Low temperature firing is most suitable for bright colors and detailed ornaments. Glazes are very stable at this temperature, the colors remain bright and do not shift during the firing process. The disadvantages are that the products are not completely vitrified (the clay is not completely fused), so you will have to rely on the glaze to make the product waterproof. This makes such products less suitable for use as cookware or for storing water. Since the glaze has not interacted with the ceramics, as is the case with high-temperature firing, there is a high probability of glaze chipping. However, when using the right clay and glaze, the glaze can be quite durable. The clay used in low temperature firing is called pottery.
- Medium and high temperature firing uses clays called fine stone or porcelain. Vivid colors can still be obtained in oxidizing ovens (electric) and to a lesser extent in reducing ovens (gas).After firing at temperatures where the product itself is waterproof, greater strength is achieved, and such products can be used as tableware or oven dishes. Porcelain can be made very thin and still have sufficient strength. At these temperatures, the glaze interacts with the clay shard to create variegated and unique pieces that many people find interesting. Typically, the glaze is displaced (significantly or slightly), so the detailed design will be blurry.
3 Prepare yourself and prepare your workplace. Working with clay can be messy, especially if children are involved. Cover areas that you do not want to contaminate: put tarps or newspapers on the floor, or exercise in a garage or non-residential area. - Never work in clothes that you are afraid to get dirty. If you have long hair, tie it in the back. This will make them less dirty and will not get into your eyes.
Method 2 of 4: Casting on a potter's wheel
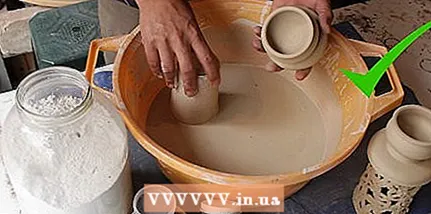
- 1 Prepare your clay. Air bubbles can be disastrous for an otherwise perfect product, so get rid of them before you start. Knead or roll the clay with your hands in small portions - start with a portion that fits in both of your palms.
- Knead the clay like dough, form a ball out of it and hit it on top of plaster of Paris (it absorbs moisture well). Repeat the operation several times until the bubbles disappear. If you are not sure if there are any bubbles left, use a wire to split the ball in half and inspect it.
- 2 Start a circle. With a little effort, throw the clay into the center of the circle. Since you are just starting out, use an amount no more than a large handful of clay for now. Moisten your hands in a bowl of water, which should be placed closer, and start molding the clay.
- Start pulling the clay mass up. Grasp the clay with your hands and begin to squeeze upward.
- Whenever you work with clay, make sure your elbows are pressed against your inner thighs or knees, whichever is more comfortable for you. This will help you hold your hands firmly as you work.
- Start pulling the clay mass up. Grasp the clay with your hands and begin to squeeze upward.
- 3 Center the clay. Using this method, the clay is unwound to a perfectly smooth state, without bumps and beats. Once you get the cone, you are ready to move on.
- Press in the tower with one hand and support it with the other. If you are right-handed, then press the tower with your right hand: the main force is from the top.
- Once the clay looks like a wide lump near the surface of the circle, start flattening the sides by applying pressure to them. Some clay may collect on your left hand - just set it aside.
- 4 Shape the product. Specific instructions at this stage end - each product (plate, pot, etc.) needs to be molded in a different way. But regardless of the type of product, do it with deliberate and slow movements - before you complete each movement, the circle should make about 5 revolutions. All 360-degree clay must receive the same finish to make the product round. Remove accumulated water with a sponge.
- When you're done, clean the piece with a wooden knife and smooth the surface with a scraper.
- Please note that if things go awry and you mess up the mud, then you shouldn't try to make a ball out of it and try to repeat everything. The clay will not accept the required density a second time and will not be molded in the future.
- When you're done, clean the piece with a wooden knife and smooth the surface with a scraper.
Method 3 of 4: Sculpt by hand
 1 Make sure there are no bubbles in the clay. If you put a billet of clay with bubbles in the oven, then there is a possibility that it will explode. As described in Shaping on a potter's wheel, hit the clay by placing it on plaster of paris (it absorbs moisture) and roll it out like dough.
 - If, to be sure, you want to check the mass from the inside, then take a wire and cut the mass in half.If the bubbles persist, continue working.
- 2 Use a pinch, tape, or formation technique. Three techniques can be used to sculpt pottery. The products obtained by each of the techniques have their own characteristic appearance. The reservoir method is best suited for large items.
- Pinch pots: Make a smooth ball about the size of your palm out of a piece of clay and start making a pinched pot. This technique is reminiscent of the way Native Americans molded clay into useful pots. While holding a clay ball, stick your thumb in the center of the ball and push it to the middle. Rotate the ball in one hand and squeeze out the walls evenly with your thumb on the inside and your other fingers on the outside. Smooth the surface with a damp sponge.
- Belt technique: Clay ribbons can be used to sculpt plates, vases and other products of various shapes and sizes. Keep your fingers straight and form ribbons out of the clay that resemble sausages, and then roll them onto ropes 7-12 millimeters long. Make a flat plate using the pinch pot method and turn it over to serve as a base for the base. Place a piece of clay tape along the edge of the base. Moisten your fingers and attach the next tape to it using a little pressure. Continue adding ribbons. The ribbons can be pressed in with your fingers or a tool, both from the outside and from the inside, if you want to create an interesting texture.
- Reservoir technology: Place two wooden planks on a tarp, slightly farther apart than the width of the resulting clay slabs. If you are working on textured fabric, the clay layer will be printed. Place the clay on the cloth between the boards and roll it out. Using a sharp object, cut the slab to the desired size. If you want the product to have multiple sides, then you can make paper templates. Use a damp finger to rub the edges to be joined and scratch them with the tool. Roll out a thin tape of sticky clay and place it along one edge. Press the two edges into each other. To create unusual shapes, layers of clay can be laid out on stones, plates, plastic molds, etc. As the clay dries, it will shrink around the mold, but retain its shape.
- If it is a medium to large piece, make it hollow. Monolithic clay will dry forever and in most cases will simply explode when fired.
Method 4 of 4: Applying the glaze
 1 Burn the clay at least once. After that, you can apply glaze on it! Access your kiln if you don't have your own, and let the professionals take care of the rest. If you have your own oven, be sure to double-check that you can work correctly with it and find out what the requirements of your product are.
 - Different clays react differently to heat. Read the instructions on the clay packaging and do a little research on the internet. Also take into account the dimensions of your item.
 2 Choose a frosting. As with any other step, there are many options. Each type of glaze will have its own special look.
 - Slip: You can buy slip-shaped glazes and underglaze paints, which are usually made to be applied with a brush. All you need to apply this glaze is a brush. Some glazes are difficult to apply with a brush and produce a smooth finish; as a result, marks will remain on the product. Others will melt well enough for the brush marks to disappear.
- Dry: You can purchase glazes in powder form, which are usually formulated for dipping, pouring or spraying. In addition to a brush, you will need a bucket, some water, something to stir, and a mask to avoid inhaling dust.The advantage of dipping is that you can get a more even glaze, and you can do interesting tricks that cannot be done with a brush, such as double dipping, which allows you to get different colors on the same piece. Spray glaze is applied by more advanced people, since it requires good ventilation, a spray gun, a compressor, an application booth, etc.
- DIY: This is the most advanced form of frosting. Based on the recipes, you buy your own raw materials and mix them. Among other things, you will need recipes that can be found in books and on websites. You will also need the chemicals from which the frostings, scales, sieve, and the spirit of the experimenter are derived. Sometimes your frostings will not work well. You will need to learn how to change these glazes to solve problems in your path. Sometimes the results will be amazing.
- 3 Choose your method. You guessed it: there are many ways to apply icing to products. Here's a comprehensive list of methods you can use to brighten your artwork:
- Immersion: If you have a large number of ceramics that you want to glaze on, the dipping method will be the quickest. You simply immerse them in the frosting (it should have the consistency of fatty sour cream) for about three seconds and set them aside. The coverage will certainly be uniform.
- Douche: If you want to apply glaze to the inside of the piece, simply pour the glaze into the pottery, wait three seconds, and drain the glaze back into the bucket. If you are concerned about excess, there are many ways you can get rid of it.
- Pouring is a method suitable for applying glaze to the outer surface of the product as well. Often used to apply a second, thinner layer of glaze. Both layers then interact to create a colored glaze with texture, tint and visual depth.
- Brush application: If you bought a ready-to-use glaze, it will most likely work well with a brush. If the glaze slip is thick, you can start applying it, it is specially designed to mask brush marks. if you Like the look that brush marks give your products, vary the thickness of the coating as you apply. Use synthetic core brushes.
- If you want an even and opaque finish, use a large brush and apply the recommended +1 coats. Place on a circle and twist it slowly, applying slip slowly to ensure a very even coverage.
- Sponge application: To apply glaze with a sponge, dip your piece in the glaze you want to use as a background. Then use a natural sea sponge soaked in a different color of glaze to create the desired pattern. For interesting effects, you can also use sponges that are sold in art stores, cut into pieces of the desired shape. If you have time, you can experiment: mix and match different shapes and colors to see which combinations of effects you like best.
- Engraving: In this case, you will need at least two different types of glazes, preferably those that you have already tested with each other, in order to get satisfactory overlapping results. Start by dipping your piece in the lighter of the two glazes, then let it dry. Then dip it again, this time in a darker colored frosting. Once it's dry, take a mini tape scraper and carefully cut out the top layer of the glaze so that the lighter layer appears on the bottom.Depending on your accuracy when cutting, you can get quite intricate patterns. After firing, you will receive the cut patterns of the first glaze applied, surrounded by a "background" of the combined glaze layer.
- Stamping: Get some floral foam (used to hold professional flower arrangements) from your art supply store. Then draw an outline of the pattern on the surface of the foam. Cut out the pattern with a mini tape scraper, then dip the block into a slip and use it as a stamp to decorate wide, flat items that have been dipped in a contrasting glaze and are already dry.
- Wax reserve: Dip the whole pottery in light glaze; Apply a pattern of cobalt oxide (blue) or iron oxide (brown) pigments; then gently apply the wax reserve to the pattern you just drew. When the wax is dry, gently dip your pot in the second color. If you walked along the edge of the pattern, that is, put wax on top of the white glaze, then you will have three colors (white, cobalt and final). By cutting out the second glaze, you can get even more detail.
- Tape reserve: For curled fine lines with sharp edges and corners and a resistive pattern, use fine masking tape instead of wax. This is done by glazing the entire piece, drying it and applying masking tape according to the pattern of your choice. Dip the pottery again, let it dry and remove the masking tape to expose the lower glaze.
- Pay attention to the firing temperatures indicated on the glaze bottles. If this is a high-temperature glaze and you used low-fired clay, your product will "melt" in the overheated oven.
Tips
- Be sure to dry the clay completely before firing it. Otherwise, it may crack or explode.
- When carving patterns in the clay, wait until it is as hard as leather. Also, do not "scratch" by making deep, fine cuts. Make the cuts wide enough for their depth.
- If you are working on a product for several days, store it under a plastic bag overnight to avoid drying out too quickly.
- Clay forgives flaws, but from working with it with prolonged contact with water or with significant manipulations, you can get tired and lose your mood.
- Always dry the clay completely before firing. The moisture in the clay turns into steam, which, when released from the clay, causes the pot to explode.
- An easy way to make small animals is to make small balls and connect them, and then iron the attachment points.
- Sometimes college will give you enough clay to play a little. You may even be allowed to work in their studio.
- Ideally, you need to find someone with at least a little experience to teach you. This is a very practice-dependent process, so it is important to have someone nearby who can lead you by example and interact with you. This manual is intended as a reminder or rough guide, but in reality each sculptor has a different hand position.
Warnings
- Do not inhale clay dust. Wear appropriate protective equipment if this problem occurs.
- Clay keeps warm and cold; do not burn yourself.
- Some glazes contain lead. They are very colorful, but DO NOT eat or drink them.
- The tools are sharp! Be careful.
What do you need
- Clay
- A plate of warm water
- Cutting wire
- Metal or wooden scraper
- Exacto knife
- Needle tool
- Wooden knife
- scales
- Circle (optional)
- Gypsum (optional)
- Glaze


