Author:
Janice Evans
Date Of Creation:
26 July 2021
Update Date:
17 September 2024

Content
1 Assess the general condition of your dog's ears. Place or sit the dog next to you so that you can easily see its ears. If you only notice dirt and ordinary earwax inside, you can proceed to the procedure for cleansing your ears.- Look for thin ear discharge (clear, gray, or brown), thick waxy discharge, or scratches, scabs, or wounds. In this case, DO NOT CLEAN your dog's ears yourself and consult your veterinarian.
- You will not be able to look deeply into the ear canal because at the base of the ear, where it meets the head, the canal bends a lot. This is why deep ear cleaning is not recommended unless instructed by your veterinarian. NEVER use cotton swabs to clean your ears, as there is a risk of debris moving deeper into the bend or even damaging the eardrum.
 2 Check your ears for parasites and foreign objects inside. Dogs get a wide variety of unwanted objects in their ears. Dogs often run through thickets of grass and trees, where foreign objects such as straws, blades of grass and seeds can fall into their ears. If you notice any of this, you can first (very carefully) try to remove the foreign object or clean your ears to get rid of it. If you fail, you will have to seek professional help from your veterinarian.
 - Ticks and fleas love the relatively secluded spots around and inside the ears. Mites can cause intense itching in the ears and result in a thick brown discharge from the ears. In this case, it is required to diagnose the problem with a veterinarian and prescribe appropriate treatment. Ticks and fleas can be killed (and prevented) with a variety of flea and tick products available from veterinarians and pet stores.
3 Check for symptoms of a fungal ear infection. In the case of a fungal infection, the ears give off an unpleasant odor, itchiness and brownish discharge. With a fungal infection, special medications are used to clear the ears of the fungus. Routine ear cleansing will not cure a fungal infection and may even make things worse. If you notice symptoms of a fungal ear infection in your dog, take it to your veterinarian. 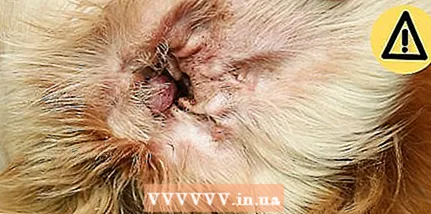 4 Look for symptoms of a bacterial infection on the outer part of your ears. Bacterial ear infections can be mild, which clears up easily with medication, or serious, which makes your dog very unwell. The consultation of a veterinarian is simply necessary in order to accurately diagnose a bacterial infection and prescribe appropriate treatment, since there is a risk of serious complications due to it.
 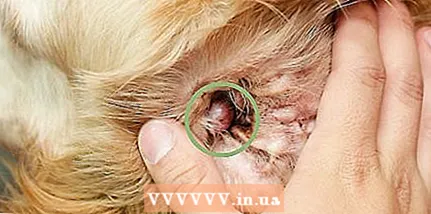 5 Pay attention to anything that might turn out to be a tumor, but remember that they are rare. Sometimes strange swellings and bumps appear in the ear area. In most cases, these are just skin cysts or reactions to minor injuries and insect bites.
 - Observe the status of a suspected tumor at home. If it doesn’t go away in a week, becomes larger, or bothers the dog, consult your veterinarian.
Part 2 of 2: Cleaning your ears
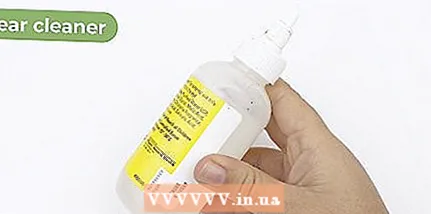 1 Buy a ready-made dog ear cleaner or make your own using regular household products. Both the one and the other means can be safely applied on the inside of the outer part of the ear. The procedure for cleaning your ears is also the same whether you use a commercial or homemade cleaner.
 - In a clean bowl, combine a few tablespoons of wine vinegar and the same amount of rubbing alcohol. Make sure that the solution is at room temperature immediately before use, as neither people nor dogs like it when cold liquids get into their ears. The solution prepared according to the specified recipe can safely clean the inside of the outer part of the ears. However, DO NOT USE this solution if you suspect your dog has an ear infection, and do not put it in the ear itself.
- There are a variety of good multi-purpose dog ear cleaners on the market. Ask your veterinarian for advice on what is best for you. You can also ask for recommendations from sellers at your local pet store.
- 2 Dampen a cotton ball with the cleaning solution. Squeeze out excess moisture so that the cotton is wet, but the solution does not drip from it. If you have a very small dog, you can use half of a cotton ball instead of a whole cotton ball.
- Instead of a cotton ball, you can take a piece of gauze, wrap it loosely around your index finger, and dip it in the cleaning solution. The gauze should not drip! If you accidentally wet the gauze too much, wring it out a little and get to work. Gauze is a more gentle alternative to cotton swabs and may cause some discomfort in your dog. Use your thumb to hold the gauze on your index finger.
- 3 Gently wipe the inside of the outside of the dog's ears. Remove any visible dirt. In the event that the dog has very dirty ears, you will probably need to spend a few cotton balls. If you are careful not to descend deeper than the outer part of the ear canal, the dog should calmly endure this procedure.
- Clean your ears carefully, as the skin on your ears is very easy to damage. Vinegar and alcohol can cause a burning sensation on damaged skin.
- Be sure to carefully clean the ear notches, as dirt and wax tend to build up in these areas.
- Clean both ears.
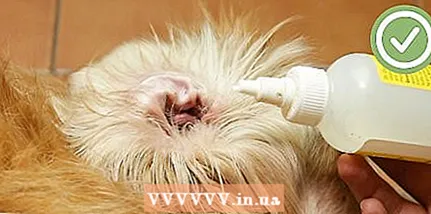
- 4 Only rinse your dog's ears if instructed to do so by your veterinarian. If your veterinarian recommends rinsing your dog's ears (usually because they are simply clogged with dirt and wax), then this can be done with the same ear cleaning solution. The rinsing procedure should rid the ear canal of most of the sticky, thick mass.
- To clean your ears, bring the bottle of cleaning solution directly to the mouth of your ear canal. Press down on the bottle to pour the solution into your ear canal. Gently grab the base of your ear (with your thumb on one side and the rest of your fingers on the other) and massage (very gently) for a minute.
- Use cotton wool or gauze to remove any impurities from the ear that will come out of the ear canal after the massage. You will most likely spend a lot of materials on cleaning very dirty ears.
- 5 Allow your dog to clean their ears on their own after you do this. It's natural for a dog to shake its head after you've cleaned its ears. Let her do this, but try to look away so liquid or dirt does not accidentally get into your eyes.By shaking its head, the dog will get rid of the excess cleaning solution in the ear canals.
- When the dog shakes his head and disposes of the remaining solution, rub his ears again with gauze or cotton wool. This will remove anything that comes out of your ear canal after shaking your head.
 6 Clean your dog's ears regularly. It is good practice to check your ears weekly and clean them (if necessary) and keep you on top of potential ear problems. Debris builds up in the ears relatively quickly and can lead to inflammation, especially in dogs with floppy ears.
Tips
- If you reward your dog after cleansing his ears, you will help him relax, and next time he will behave more obediently, as he expects a treat.
- After the dog is swimming, it's time to clean his ears. The cleaning solution will help remove any remaining water from the ear, which is very helpful as water can lead to ear inflammation.
- Your veterinarian can demonstrate the correct way to clean your pet's ears. This is especially important if the dog has had ear problems in the past.
- Be especially careful and cautious, as the dog may jerk, which could accidentally cause irreversible injury.
Warnings
- Never insert a cotton swab into your dog's ear canal! This can cause permanent hearing damage.
- Never clean your dog's ears with water, as it can leak into the ear canal and cause ear inflammation.
What do you need
- Ear cleaner for dogs
- Cotton balls or gauze


