Author:
Carl Weaver
Date Of Creation:
23 February 2021
Update Date:
1 July 2024

Content
Fresh wood, freshly carved from wood, is saturated with moisture. As it dries, the wood deforms non-uniformly, due to the different shapes and sizes of its cells.Thus, in order to protect the wood structure from warping, cracking and other distortions of shape, it is necessary to completely dry the material before using it. It is cheap and easy to do, but it takes a lot of practice, especially in the case of relatively wet material.
Steps
 1 Get wet wood. It is usually impossible to determine the moisture content of wood by sight or touch. To do this, you need a special device, the so-called hygrometer, or moisture meter. It consists of two probes, which are pressed against a tree in order to take moisture readings from its surface, correlated with the volume or mass of the wood.
  2 Measure the moisture content of the wood. Use the hygrometer according to the instructions supplied with it. In most cases, the relative humidity of wood to be processed should be between 6 and 7 percent. If the device showed much bOhigher moisture, the wood should be dried before further use.
  3 Arrange the wood drying blocks in a row. "Bars" are pieces of wood measuring 25 x 50 mm (1 "x 2") designed to allow free air access to the wood being dried. Spread the blocks parallel to each other, approximately 40 cm (16 inches) apart. You will need enough of these blocks to place all the wood to dry on.
  4 Spread out the first layer of planks. Lay the boards neatly on top of the blocks, perpendicular to the latter. Leave a space of about 3 cm between adjacent boards to ensure adequate ventilation.
  5 Continue to fold the boards by stacking them with bars. With the first layer of planks in place, place the planks on top of them, placing them exactly above the lower ones. Continue on, alternating between sticks and planks, until you have stacked all the planks to dry. The result is a neat stack of boards separated from each other, which is beneficial for drying them.
 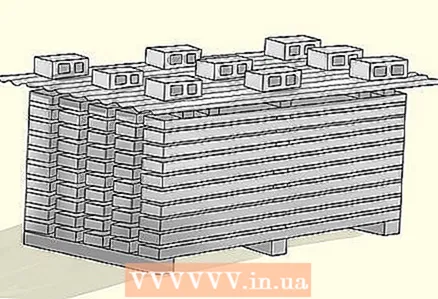 6 Place a heavy piece of plywood on top of the resulting stack of planks. This is to prevent the boards from bending as they dry. To do this, it is enough to press down a stack of boards with a heavy sheet. Place a few blocks of concrete or other heavy objects on top of a plywood sheet.
 - This design is also good for protecting wood from possible rain.
- Do not cover the wood with tarpaulins or other dense material, as this will restrict airflow and encourage moisture to accumulate.
 7 Wait for the wood to dry. The duration depends on temperature, humidity and ventilation conditions; you can periodically check the readiness of the material using a hygrometer. A general rule of thumb is that it takes about one year for every 25 mm (1 in.) Wood thickness to dry.
Tips
- It is best to dry the wood in a dry, cool and well-ventilated place. The more humid or warmer the environment, the longer it will take to dry.
- Wood can be dried both indoors and outdoors. If you dry wood indoors, install a fan in it to speed up the process.
What do you need
- Moisture meter
- Wood planks
- Bars 25 x 50 mm (1 x 2 inches)
- Plywood sheet
- Concrete blocks or bricks
- Fan (if required)


