Author:
Randy Alexander
Date Of Creation:
2 April 2021
Update Date:
1 July 2024
Content
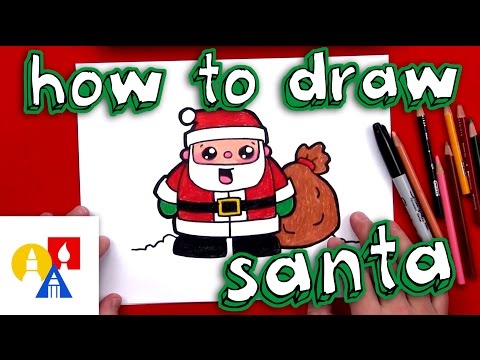
Need a picture of Santa Claus for your Christmas greeting card or decoration? Santa Claus is also relatively easy to draw. Let's start by sketching Santa's figure with simple shapes. Add a few more details to his funny face and jelly bowl-like stomach. Finish with coloring, and you'll have a perfect Santa Claus pattern.
Steps
Part 1 of 3: Outline the figure of Santa Claus
Sketch of Santa's head. Santa is a plump and playful character, so many of the outlines will be circles and oval shapes. Draw a circle near the top of the page. Draw another horizontal oval below the neck and beard.
- Draw an oval that crosses the first circle. The top half of the oval will be drawn slightly over the circle for the top.
- Draw guides for the face. Draw a vertical line down the center of the circle and a horizontal line intersecting. The horizontal line will be at the same level as the top of the oval. These lines will help you define where to draw eyes and nose.
- Draw 2 more horizontal strokes near the bottom of the circle to make the mouth.
- Use a pencil to draw key strokes. Paint lightly so you can then easily erase the wrong lines.

Draw 2 large circles for the body. The first circle will cut through the bottom of the oval above Santa's head. The top of the circle should be at the level of the horizontal line on the lower part of the face. The second circle must be bigger than the first circle and cross it. The apex of this circle reaches the midpoint of the first circle as the body.- The circle above will be Santa's chest. Make it round and slightly larger than the head.
- The lower circle will be Santa's belly. This circle should be drawn about one and a half times larger than the bust circle.

Draw arms and hands. Draw 2 fat ovals to make Santa's arms. The shoulders will start at the intersection of the oval for the face and the oval for the chest. His hands are two circles with 3 zigzag lines for his fingers and an inverted U for his thumb.- By this time, Santa Claus was shaped like a snowman.
- The oval shape where the arm overlaps the breast circle is fine. In the end you'll erase the intersections, and the Santa image will look more in-depth.

Draw Santa's feet. Drawing Santa's leg is similar to drawing his arm. Draw 2 shorter, fatter oval to make the legs stick out from under the belly, then draw 2 more oval shapes for the foot.- Santa Claus has a heavier upper body, which means his upper body will be bigger than his lower body. Try to draw these oval shapes no longer than the rest of the body.
- When drawing Santa's legs, you will start with the two upper oval (for the thighs) at the widest point, close to the outer edge of the abdomen. The drawing of Santa's feet is a little bit out.
Part 2 of 3: Drawing Santa's face
Starting from the nose. Use the horizontal line in the middle to make the level. The tip of the nose will be at the level of the horizontal middle line.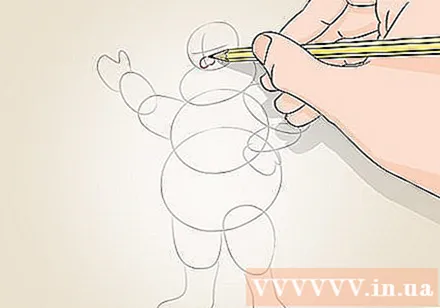
- Draw the nose with an almost circular circle, but with the upper part exposed.
- Draw two wings of the nose. Draw a C on either side of Santa's round nose, a C is swept for the right nose, an inverted C is the left wing.
Draw Santa's mustache. Draw 2 horizontal S protruding sides of the nose, then draw the lower part of the mustache by adding a few zigzag lines below the 2 S letters.
- To draw the mustache for balance, you can draw a small center dot underneath the nose, then draw lines of chi so that the lines meet at that point when drawing the lower part of the mustache.
- Draw 2 curves on the sides, starting at the top of the nose. Draw these two curves down closer to the edge of the mustache. These are Santa's cheeks.
Draw Santa's eyes. Draw two large inverted U shapes above the cheeks to make the eyes.
- If you want Santa to look less cartoonish, draw the eyes with two smaller circles above the cheeks. Santa's eyes won't match his cheeks, and he looks more real.
- Add the pupils to the eyes.Draw 2 circles inside the eye, one bigger for the whites, the smaller one for the pupils.
- If you like and have room, you can draw more smaller circles inside the pupils to make Santa's eyes look sparkling. Color the pupils.
Add eyebrows for Santa Claus. Draw 2 S-shaped curves above the eyes, similar to when drawing the upper stroke of the mustache, then draw 2 dense chi lines to make the upper stroke of the eyebrow. Connect these lines with the 2 S shapes to complete the eyebrows.
- If you don't have enough room to draw really thick eyebrows for Santa Claus, you can draw two rounded rectangles above the eyes.
Draw a beard for Santa Claus. Draw zigzag lines on the sides of Santa's head, starting at the level of the tip of his ear. Draw around the outer edge of the oval that you drew for the head. So you've outlined Santa's beard, now just retouched.
- The more zigzag lines the lines are, the more cartoonish Santa's beard will look. If you want his beard to look more realistic, you can draw softer S-shaped strokes.
- Draw it down so that the beard touches Santa's chest.
Drawing Santa's hat. Starting between Santa's eyebrows. Unlike the eyebrow and mustache, you need to draw smaller rounded strokes to make the white fringe of the hat. Think of it as drawing small clouds. Follow the outline of Santa's head when drawing the body of the hat.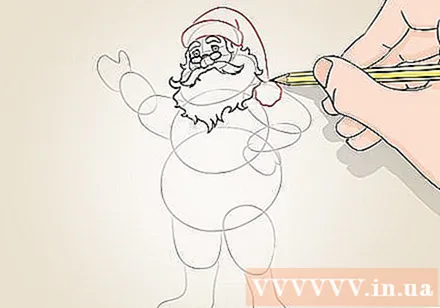
- Extend the stroke from the rim of the hat outward around the head and connect at the ears.
- When drawing curves upwards to make the body of the hat, you can extend the body of the hat higher than the outline of Santa's head for balance.
- Starting on the side of Santa's head, draw a slightly inward curve. Leave this curve open instead of connecting with the hat drawing on the other side.
- Extend the stroke beyond the other edge of the hat to make the tail pointed. Draw one more cotton ball at the top of the hat.
Draw the mouth. Draw 2 U shapes underneath the mustache to make Santa's mouth smile.
- To make Santa's mouth and beard look more realistic, draw 2 chi lines extending from the tips of the mustache. But leave a small space, do not connect these lines to the outer edge of the chin beard.
- Now it's time to paint the sides of Santa's face. Connect the upper part of the beard just drawn (protruding from the mustache) with two wavy vertical lines on the sides of Santa's head. Stretch these two curves up and join the lower part of the hat.
- If painted correctly, Santa's beard will surround his face.
Part 3 of 3: Drawing Santa's clothes and coloring
Repaint the figure of Santa Claus. Once you've finished with the face and beard, you can re-paint Santa's body and start painting more details.
- Fill the outer edges of the circles and the oval drawn from the beginning. Now is the time to paint Santa's body to look like a hologram.
- Draw only the outline of the shapes. Erase all the overlapping lines to give the painting depth.
- Once done, you should have a picture of Santa wearing a hat but no clothes yet.
Sketch of Santa's clothes. Santa Claus wears a knee-length dress, a belt, baggy pants, boots and gloves.
- Start with the shirt. Draw the bottom of the shirt with a curve on the outside of Santa's legs. The lines should be flared and knee-length. Continue to draw two curves that are backwards and together in the navel area. The hem of the shirt also has a white fringe similar to the hat.
- Draw more belts. The belt is a rectangle that gently curves around Santa's belly. The lower edge of the waist is where the two lapels meet at about the navel. Draw a square belt buckle in the middle and 2 "leeches" on the back of the pants.
- Add a button or two in the center of the shirt.
- Underneath the shirt is pants drawn with a few zigzag lines downwards. Santa also has calf-high boots.
- Finally draw 2 rectangular cuffs on the sleeves, and remember to draw your hands.
Santa color. If you want, you can add some details before coloring, such as drawing a longer beard or a more complicated belt buckle. Erase any extra lines you see, then paint.
- Santa's hat, shirt, pants and boots are all red. His boots are a bit darker than any other outfit.
- The frills on the hat and shirt, including the cuffs, will be white.
- You can paint the gloves and belts brown, or even green if you like.
Advice
- Paint lightly with a pencil so you can easily erase it when drawing mistakes.
- Take it easy. You may want to finish quickly, but if you draw slowly, you will be able to draw more details correctly.
- If you want to color your drawing with a marker / watercolor, you should use relatively thick paper and refill the darker lines before coloring.


