Author:
Randy Alexander
Date Of Creation:
4 April 2021
Update Date:
1 July 2024
Content
Learning how to get intramuscular injection may be essential if you or a loved one has an illness that requires the injection. Your doctor will decide this when they see a doctor and the health care staff will also teach you how to inject the drug into the intramuscular form. You must follow their instructions and ask them for technical guidance.
Steps
Part 1 of 3: Conducting an intramuscular injection
Wash hands before starting the procedure. Good hygiene is critical to minimizing the risk of infection. Wash your hands with soap and warm water for at least 20 seconds.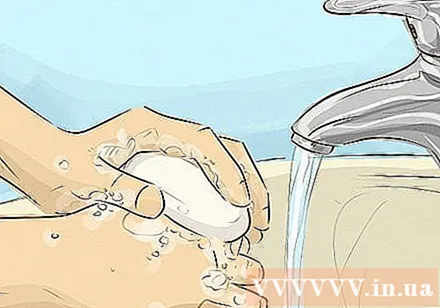

Reassure the person and explain how the process will work. Locate the injection site and describe how it would feel when the drug entered the body if the patient did not know it.- Some medications cause pain or throbbing pain initially after an injection. Most medications do not cause pain, but it is important for the patient to be aware of this in order to reduce the stress of ignorance.
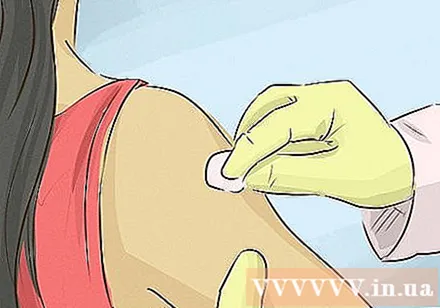
Sterilized with alcohol swab. Before the injection, you must sterilize and clean the skin on the muscle where the injection is needed. With that said, this is intended to reduce the risk of infection caused by the injection.- Let the alcohol dry in the air after 30 seconds. Do not touch the area until injected, otherwise you will need to clean the site again.

Encourage the patient to relax. Patients will experience pain if the muscle site receiving the drug is stretched, so they need to maximize muscle relaxation to ensure there is not much pain during the injection.- Sometimes you should distract the patient before the injection by asking some questions about their life. When a patient is distracted, they tend to loosen more.
- Some people want to position their body so that the injection is not seen. Seeing a needle stick into their body can cause anxiety and fear, not only leading to restlessness, but also muscle strain. To help relax the patient, ask them to look away if desired.
Stick the needle into the specified position. Begin to remove the cover and puncture it gently at a 90 degree angle from the skin surface. If you are learning to inject, don't prick the needle quickly, as you need to make sure the needle doesn't go too deep and touch the bone. About one third of the needle remains outside of the skin. Be careful not to puncture the needle too quickly to prevent it from puncturing the wrong position or causing more damage to the skin than necessary.
- During the practice you will get used to it and the injection rate will be faster. The faster the puncture of the needle, the less painful the patient, but safety should not be exchanged for speed.
- Before the injection, you should pull up the skin around the injection site with your non-dominant hand (as the dominant hand must hold the syringe). Pulling the skin up helps you to accurately mark the target, while reducing pain for the patient when the needle enters.
Pull back on the plunger. After the needle is inserted and before the injection is given, pull the plunger back a little bit. This may seem unreasonable, but it is important because if blood flows into the syringe while pulling on the plunger, it is a sign that the needle is properly inserted into the blood vessel and not in the muscle. You will have to start over with a new needle and syringe if this happens.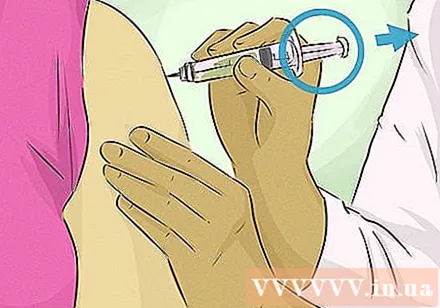
- The drug is designed to be injected into a muscle, not a blood vessel, so if you see blood while pulling on the plunger, the needle must be removed and thrown away. Use a new needle and choose a different site - don't try to inject at the same site before.
- This is not to worry as long as you see blood before you start the injection.
- Usually the needle goes right into the muscle, rarely hitting a blood vessel, but a safety check is always better than regretting it later.
Inject slowly. A quick injection for pain relief is best, but in reality the opposite is true. This is because the drug needs free space in the muscle to fill, and the surrounding tissue has to expand to accept the fluid that is pumped in. Slow injection is a way to give muscles time to relax and relieve pain for the patient.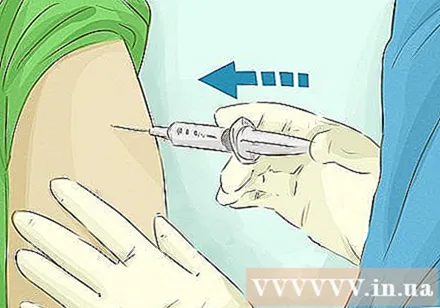
Pull out the needle at the same angle as when it was inserted. Pull out the needle when you are sure all the medicine has been injected.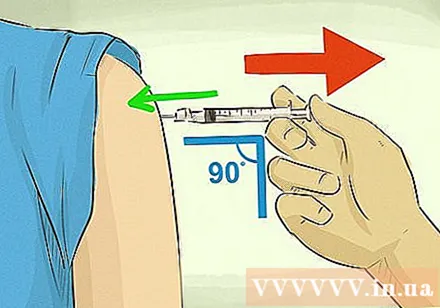
- Use the 2 x 2 gauze to gently press into the injection site. The patient may be a bit uncomfortable but this is normal. Have the sick person hold the gauze while you are disposing of the needle.
Dispose of needles properly. Do not put the needle in the household waste bin. You should buy a special hard plastic container for storing used needles and syringes. You can also use a soda can or another plastic bottle with a screw cap.Be sure to use a can that fits the size of the needle and syringe so that the needle does not go through the body of the can.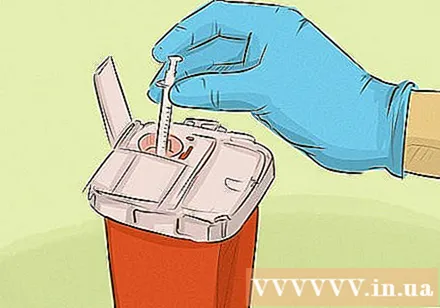
- Ask your healthcare provider or pharmacist about your local requirements for disposal of used syringes and needles.
Part 2 of 3: Understanding the background
Identify the parts of the syringe. The injection is easier if you understand the mechanism behind what you are doing.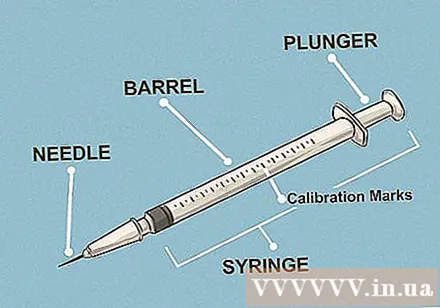
- The syringe is composed of three main parts: the needle, the holder and the plunger. Needles are used to pierce muscles; ampoules with a graduated mark in cc (cubic centimeter) or ml (milliliter) with the next digit, used to store the drug; plunger used to draw the medication in and push it out of the tube.
- Intramuscular medication is measured in cm3 or ml. The amount of drug in one cc is equal to one ml.
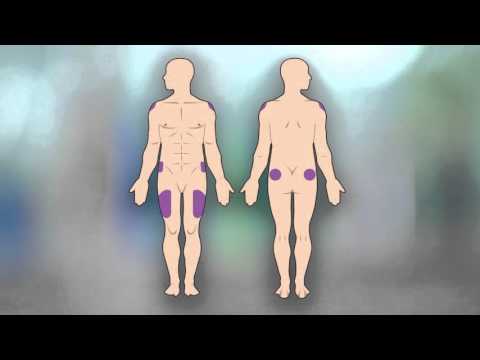
Know where to inject medicine. The human body has several receptive points.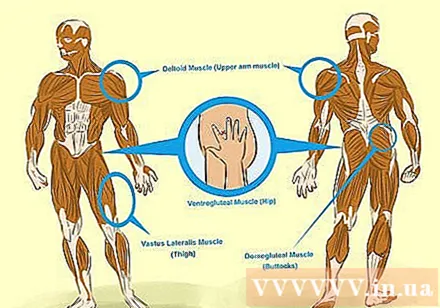
- Muscles of the outer thighs: First, divide your thighs into three equal parts. The middle part is where the injection can be administered. The thigh is a good place to give the injection because it is easy to see. It is also a suitable injection site for children under three years old.
- Belly-butt muscles (hip): In order to correctly position you place the palm of your hand on the cheek outside the upper part of the thigh, which reaches the buttocks. The thumb points to the groin and the remaining fingers point to the patient's head. Separate the first finger with the other three fingers to create a V-shape. You should feel the edge of the bone running along the tips of your little finger and ring finger. The place where the drug can be injected is in the middle of the letter V. The hip is a good place to inject drugs for adults and children over seven months old.
- Hand muscles: Pull the shirt to reveal completely the biceps. Feel the bone running across the upper biceps. That is called the crown of the shoulder. The base of this bone is where a triangular base is formed. The triangular top is just below the midpoint of the base and about about level with the armpits. The location where the drug can be injected is located in the center of the triangle, 2.5 to 5.1 cm below the muzzle. The drug should not be injected into this site if the patient is very skinny or has very little muscle.
- Gluteus muscles: Revealing one of the buttocks. Using an alcohol swab draw a line from the top of your buttocks to the side of your body. Find the midpoint of that line and line it up 7.6cm. From that point, draw another line facing downwards and across the first line, ending the mid-butt. You should now have a cross. You should feel an arched bone in the upper outer quadrant. The injection site is located in this quadrant and below that arc bone. Do not inject into this site on infants and children under three years of age as their muscles are not yet developed enough.
Know who needs the injection. Each person has the best place for an injection, so there are a few factors that you should consider before proceeding:
- Age. For babies and children 2 years and younger, thigh muscles are best. For children three years of age or older, you can choose from thighs or tigers. You should use a needle size between 22 and 30 (mainly depends on the consistency of the medicine - your doctor will tell you which needle size to use).
- Note: For very young children, you should use a smaller needle. Compared to the arm muscles, the thigh muscles can accept larger needles.
- Examine the previous injection site. If the patient has just received an injection in one site, you should be injected in another location, this will avoid scar formation and skin damage.
- Age. For babies and children 2 years and younger, thigh muscles are best. For children three years of age or older, you can choose from thighs or tigers. You should use a needle size between 22 and 30 (mainly depends on the consistency of the medicine - your doctor will tell you which needle size to use).
Know how to inject medication into a syringe. Some syringes are pre-filled, sometimes medication is provided in a vial and you need to be drawn into the tube. Before withdrawing medicine from the vial, make sure you have taken the correct medicine, the medicine is not expired, does not discolor or has foreign objects floating inside. If the vial is new, check that the seal is not torn.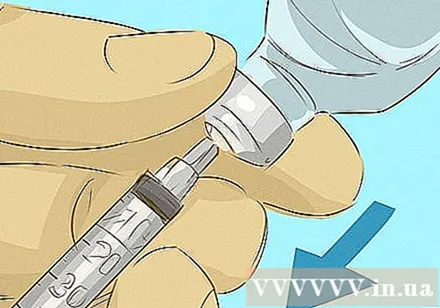
- Sterilize the mouth of the bottle with an alcohol swab.
- Holding the syringe with the tip of the needle facing up, the vial cap remains closed. Draw the plunger up to the scale corresponding to the amount of medicine needed to inject the air in.
- Insert the needle through the rubber cap of the vial and push the plunger in, and air will be pushed into the vial.
- Turning the vial and the needle inside the pill, pull the plunger back up to the dose you need to inject (or through a bit if there are air bubbles). Snap your fingers into the syringe to push the bubbles to the top, then push them into the vial. Check that the correct amount of medication is in the tube.
- Pull the needle out of the medicine vial. If you do not use it immediately, you must cover the needle.
Part 3 of 3: Using the zich zag injection technique
Understand the benefits of the ZichZone injection technique. When injected intramuscularly, the puncture action creates a narrow path between the tissues, and the drug can leak out of the body through this path. Zigzag injection helps to reduce skin irritation and allows better absorption because the muscle tissue is locked to prevent the drug from leaking out.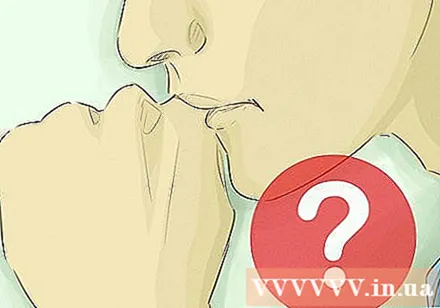
Repeat the steps for hand washing, drawing medication into the syringe, selecting and cleaning the injection site.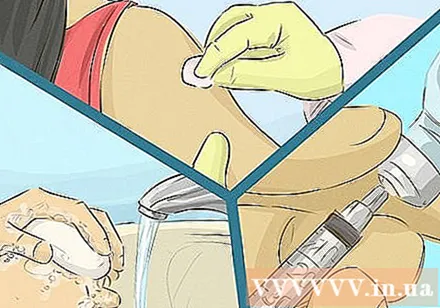
Stretch the skin 2.5 cm towards your non-dominant hand. Hold your hand firmly to fix the skin and underlying tissue.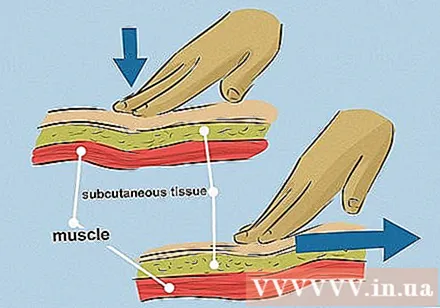
Use your dominant hand to insert the needle into the muscle layer at a 90 degree angle. Pull the plunger back a bit to check for blood draw, then push slowly to inject the medication.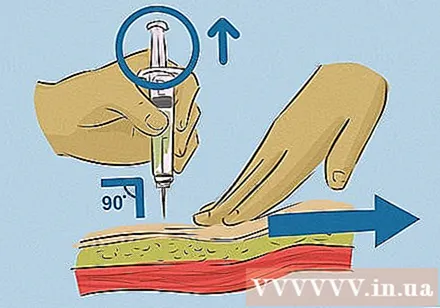
Hold the needle in place for 10 seconds to allow time to spread evenly into the muscle tissue.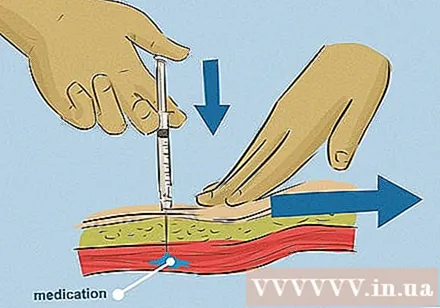
Smoothly pull out the needle and let go of the stretched skin. The zigzag path will close after the needle is pulled out so that the medicine cannot leak and follow it out. As a result, the patient is less uncomfortable and less likely to be injured at the injection site.
- Do not massage the injection site to avoid leaking or irritation.
Advice
- It takes time to get used to the intramuscular injection, people often feel uncertain and confused at first. Remember, everyone has to practice to become proficient, and you can practice by injecting water into an orange.
- Your doctor or pharmacist can tell you how to dispose of the syringe and needle. You must properly dispose of this waste for safety reasons. Do not throw them in household waste bin because it is very dangerous.


")