Author:
Lewis Jackson
Date Of Creation:
8 May 2021
Update Date:
25 June 2024

Content
The toilet flange connects the bottom of the toilet to the drain hose under the toilet floor. When the toilet leaks under the foot, you may need to replace the toilet flange. After lifting the toilet off the flange, you will find it not too difficult to replace the flange, but in some cases you should probably hire a handler.
Steps
Part 1 of 5: Remove the toilet bowl
Put newspaper or rag on the floor next to the toilet bowl. You will place the toilet on it after removing it from the flange. Leave the space large enough to work with the toilet flange, but it is a good idea to place newspaper or rag nearby so you don't have to carry the toilet too far.
- You can also place the toilet in a sink or nearby bathtub, but the bottom of the toilet can scratch ceramic tiles and / or its surface.

Disconnect the water supply from the toilet bowl. You should see an oval valve protruding from the floor or wall, back to the left or right side of the toilet bowl. Turn this valve clockwise to close the valve.- If the valve is closed and the water supply is still not completely disconnected, you must close another valve on the line - the total valve may have to be closed near the water meter.

Drain and drain the water in the drain tank. Because the water inlet valve is closed, the basin will not be refilled after you drain the toilet completely. Press the drain button again to clean the water in the tub.- Use a vacuum or large sponge to absorb any remaining water in the drain.

Remove the water supply hose. This pipe connects the supply valve and the discharge tank, usually with a metal outer cover. Remove this pipe at the coupling with the lower side of the drain tank. If you cannot turn out manually then use the counterclockwise rotation spanner or plier until the coupling comes out.- A little water will flow from the pipe, so keep a towel ready to absorb.
Remove the 2 screws connecting the toilet bowl to the floor. You will see these 2 screws on the left and right sides of the toilet seat. They can be covered with plastic lids, you just need to pry it up with your hand. Then, using your hand or a key or a spanner, open the nut from the bolt (counterclockwise).
- Each nut usually has a metal collar underneath, which can also be a plastic one. You also remove the long temple.
- New toilet flanges are usually bundled with nuts, bolts and flanges, but you should still keep the old ones in case you need them.
Lift the toilet off the floor and place it on newspaper or rag. The toilet weighs about 32-54kg, so if you can't lift it, ask someone else to help you. To lift alone, stand with your legs crossed, your knees bent, grab the underside of the toilet bowl and stand up straight (don't use your back to lift).
- You need to lift the toilet vertically to get rid of the 2 bolts that pierce the base. After you lift the toilet, step aside to place it on the lined newspaper or rag.
- Any remaining water will come out when you move the toilet, so be prepared with a towel to wipe.
Use an old towel or shirt to stuff the toilet drain. Push the towel or shirt into the tube, but don't push it too deep so you can remove it later. Stuffing the end of the tube will prevent odors from rising.
- Some people are not in a hurry to block the end of the pipe until the old flange is removed. However, if you stuff the block now, it will prevent the odor from happening early and avoid accidentally dropping objects on it, like nuts, bolts etc.
Part 2 of 5: Cleaning and checking the toilet flange
Scrape off the old wax ring with a mousse knife. The wax ring sits on the side of the old flange and helps seal the connection between the flange and the toilet seat. The wax rings are often deformed and stained, but you can scrape it off with a plaster knife quite easily.
- Have newspaper or rag nearby so you can clean the knife while shaving. The wax ring will expand into pieces.
Remove the screws that attach the flange to the floor. The screws are caught over the flange and go down to the floor. Usually there will be 4 such screws. Use a screwdriver to turn the screw head counter-clockwise to remove.
- Keep these screws in case the screws are included with the new flange.
Remove flange if it is made of PVC and seal with gasket. If it's a PVC flange (the most common type), you can lift it off the toilet drain hose after the screws are removed. Then, rinse and wipe with a rag so you can see better.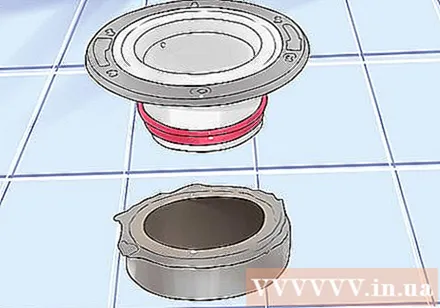
- If the flange is not cracked, chipped or deformed, you can reassemble it with a new wax ring. However, if it doesn't look good, you should replace it.
- Even if you re-use the old flange, you will need a new wax ring.
Hire a repairman if the flange is glued or made of cast iron. If the flange is not PVC and is also not attached to the drain hose with a rubber gasket, you have 2 other options. It can be made of PVC but glued to a PVC outlet, or made of cast iron and fitted to the drain pipe also made of cast iron. In either case, you should call a mechanic to have them repaired.
- If the flange is PVC but glued to the inside or outside of the PVC drain, you will have to use chisels and / or a drill to remove it. If you damage the drain hose in the process, the repair costs will be very expensive.
- If the old flange is made of cast iron and connected to the cast iron drain pipe, you will have to use chisels and a rubber hammer to carefully chisel at the flange edge. Likewise, if you damage the drain hose, the repair cost is quite high.
Part 3 of 5: Buy the right flange instead
Measure the inside diameter of the drain. Usually the diameter of the tube is 10 cm. Record the diameter measurements for reference when purchasing a new flange.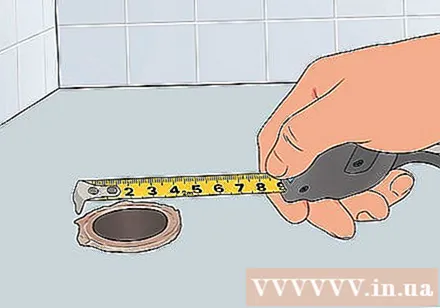
- If you can bring the old flange to the utility store this number is for backup purposes only. However, if the old flange is broken, you should definitely have this measurement.
Take the old flange to the utility store to buy one. Buy a new flange with the same size and shape as the old one. This way you can make sure it fits snugly into the drain.
- If you can't find the right flange or generally need help, ask the shop owner.
- If you don't have an old flange, buy a new flange with the size of the drain that you measured.
Buy a wax ring that fits the new flange. Some flanges come with wax rings, but sometimes you have to buy them separately. In any case, you have to buy a wax ring that fits into the new flange.
- Instead of being made of wax, rubber seals are now produced. However, you can install the rubber washer similar to the wax ring.
Part 4 of 5: Install new flange and wax ring
Insert the supplied screws into the new flange. Take the nuts and flaps aside for a little more fitting.The flange edge will have holes on each side so that you can insert 2 bolts into it. Position the bolts so that they are pointed straight up and facing each other.
- If you lose new bolts, the old flange bolts can be reused, provided they are in good condition.
Push the flange into the drain. The flange edge will lie flat with the floor over the entire circumference, while the neck of the flange slides snugly into the drain. Position the flange so that the two protruding bolts are at 3 o'clock and 9 o'clock (assuming the toilet seat is at 12 o'clock).
- The flange neck will have a rubber gasket to seal it with the inside of the drain.
- If the flange edge does not lie flat on the floor, the floor may be warped or damaged by water. It is a good idea to repair the bathroom floor (or get a treat to it) before continuing to install the toilet.
Tighten the screw to connect the flange to the floor. Use a screwdriver (turn clockwise) to tighten the screws that come with the new flange. There will be pre-drilled holes on the flange for you to screw in.
- Use a drill to create new screw holes in the floor if needed.
- The old holes are in the same location, but may be too large to accommodate new screws. If so, use a rubber hammer to close the plastic stopper into the holes, then screw the screw through the hole on the flange and go into the socket.
- Flanges are usually caught with 4 screws, but may be more or less.
Pull the towel or shirt off the drain. Pick up any fragments of the wax ring, nut, or elbow before pulling out the scarf or shirt. Otherwise they may fall into the tube.
- Don't reuse this scarf or shirt - throw it away!
Tilt the toilet over to fit the new flute in place. Press the wax ring over the base of the tubing around the hole in the bottom of the toilet bowl. Press firmly over the entire circumference of the wax ring, but don't deform it.
- Experts like to fit the wax ring this way to ensure a good seal around the toilet bowl. However, you can also put the wax ring on the flange, then put the toilet on it.
- If you are using a new "wax ring", which is essentially a rubber seal, place the round face on top of the flange and place the toilet on it.
Part 5 of 5: Put the toilet in the correct position
Place the toilet on the flange. Align the 2 holes in the toilet seat to the 2 bolts that sprout up the flange. Once the toilet is on the flange, press firmly near the back of the toilet to deform the wax ring and seal the joint.
- You must do this step regardless of whether you pressed the wax ring to the bottom of the toilet bowl before or placed it on a flange.
Install the bolt and nut on the bolts. Install the plastic bracket on the bolts first, followed by the metal bracket. Then, turn the nuts clockwise by hand before using the wrench to tighten them.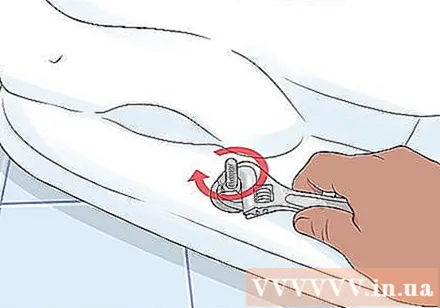
- If you have plastic caps, put them on top of the bolts. However, if the bolt is too long, use a hacksaw to cut it so that the plastic cover fits on top.
Reattach the water supply hose. Use your hand to screw the coupling at the end of the water supply hose to the connector on the bottom of the drain pan. Use a spanner or pliers to tighten if necessary.
- Plastic couplings are usually made to be tight by hand, while metal joints must be screwed with a spanner or pliers.
Turn on the water supply to the drain tank. Turn the oval valve counter-clockwise to re-open the water supply. You should hear the water flowing into the tub.
- While the water is entering the tank, check for a leak at the connection between the water supply hose and the sink.
Drain the water several times to check for leaks. Carefully examine the floor around the toilet bowl. If the floor is dry then your job is done. If you see water seeping up, you may need to remove the toilet and rework, or hire a repairman. advertisement
Advice
- After removing the toilet bowl, if you see no problem with the flange but there is a leak in the base of the toilet simply replace the wax ring and check again.
Warning
- Do not screw the toilet seat connection nut to the flange too tightly. Tightening force can cause the porcelain to crack.
What you need
- Newspaper or rag
- Wrench
- Knife plastering
- Screwdrivers
- Tape measure
- Old towels or shirts
- New flange
- New wax ring


