Author:
Laura McKinney
Date Of Creation:
2 August 2021
Update Date:
22 June 2024
Content
- Some recipes will need to use the in-bowl dough method. At this point, the dough usually only needs to be kneaded for about 1-2 minutes. As for recipes that require dough to be knead for more than 3 minutes, prepare a flat surface instead.
- If you don't want to knead the dough directly on a counter or table, you can create a flat surface from baking paper topped with flour. Or you can purchase special non-stick surfaces designed to aid in kneading at bakery stores.

- If liquid dough still sticks to the surface of the mixing bowl, the dough is not ready for kneading. Stir with a spoon until all the ingredients are mixed.
- Until you find it difficult to stir, the dough is ready to be kneaded.

Transfer the dough onto a flat surface. Pour the dough directly from the bowl onto the flat surface you have prepared. The dough should form a sticky and liquid ball. Now you can start kneading the dough. advertisement
Part 2 of 3: Kneading Dough
Wash hands before kneading. During kneading, the dough must be in contact with bare hands, so you must wash your hands thoroughly and dry them before starting. Remove rings and other jewelry that might stick the dough and roll up your sleeves so that they won't stick to the dough during the kneading process. Since it must be in contact with a powdered surface, you will need to wear an apron to keep your clothes from getting dirty.

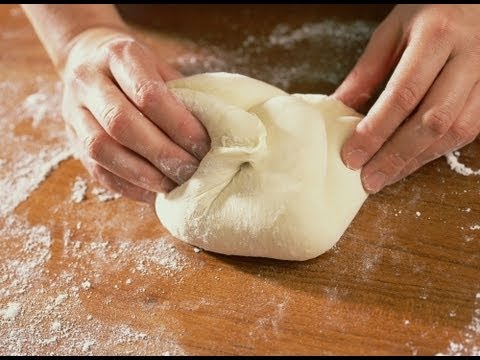
Compress the dough into one block. When you first start touching it, it will feel sticky and it can be difficult to put the dough. Go ahead and mold the dough into a sphere with your hand, press the dough down and reshape. Continue doing so until the dough is no longer sticky and can easily be molded into a ball without breaking.- If the dough doesn't seem to stick, sprinkle it with dry powder and continue to form blocks.
- You can gently rub a little dry powder on your hands so that when kneading, the dough will not stick too much.
Powder punching. Press your palms down on the dough and push forward slightly. This stage is called punching dough and help the gluten get started. Continue doing so until the dough is slightly elastic.

Dough. Fold the dough in half and use the palm of your hand to press the dough into a flat piece. Gently rotate the dough, fold the dough in half and continue to press flat with the palm of your hand. Repeat for 10 minutes or until the dough meets the recipe's requirement.- The kneading process should be rhythmic and regular. Do not knead too slowly and knead each part very quickly, do not leave the dough too long between knocks.
- 10 minutes of dough is a long time. If you feel tired, ask someone to help you.
Part 3 of 3: Knowing When to Stop Kneading
Observe the dough texture. The dough at the beginning will be sticky and rough, but after 10 minutes of kneading, the dough will become smooth and shiny. The dough will dry out and it will feel elastic to the touch. If the dough is lumpy or sticky, then keep kneading it until the dough meets the requirements.
Check to see if the dough keeps its shape. Shape the dough into a sphere and drop the dough onto the kneading surface. If the dough is intact, the dough is finished kneading.
Pinch the dough. The dough will be firm when you knead, like when you turn the oven on, the harder it is to turn. To test the strength, use your finger to pinch some flour. If the dough meets the requirements, the pinch will feel like an earlobe. When you poke in it, the dough will still restore its original shape.
Continue to follow the recipe. Most recipes will instruct you to let the dough swell in a warm place for a few hours after the first kneading. When the dough has doubled its original size, punch the dough down and knead for a few more minutes, then let the dough open again before serving.
- If the dough is kneaded until it is firm, elastic and glossy, the bread made will be crispy on the outside but soft and chewy on the inside.
- If the dough is not well kneaded, the bread made will be hard, thick and flat.
Advice
- To make yeast-free cakes, simply knead them until the dough is smooth and all the ingredients are mixed. To make bread, you need to create gluten. As for yeast-free cakes, the creation of gluten can make the cake hard.
- It is very difficult to knead all the dough by hand. Therefore, using a flour mixer will make the kneading process easier.
- Distinguish between bread flour (for types of yeast) and baking flour (for bread without yeast). Bread dough will help create gluten. Also, make a difference between whole wheat and bleached whole grains.
- Observe kneading times, especially for recipes with time-ready instructions. Twenty minutes of kneading can be a long time, but don't shorten it yourself.
- During kneading, if necessary, dry powder can be added to keep dough from sticking. If you are kneading the bread dough, add enough dough until the dough is almost free from the surface. The amount of flour added will vary, depending on the moisture in the loaf. If making another kind of cake, like a cookie, just follow the recipe and add a little dry flour on the outside so it doesn't get too sticky.
- Try not to tug at the dough and just stretch it out.
- Using a powder scraper or anything that is straight and has a slightly blunt blade will make cleaning easier.
- Before kneading, wash hands thoroughly and dry.
- To make it easier to clean, especially for sticky dough, wear rubber gloves (disposable gloves) while kneading.


