Author:
John Stephens
Date Of Creation:
2 January 2021
Update Date:
1 July 2024

Content
- If you are using butter, keep it on low heat to avoid burning while measuring the flour.

- Maybe you just need evidence to pour the 3 cakes evenly if not exactly. However, this can affect the frying time, as larger cakes will take longer to fry than smaller ones.

Turn the cake over after the dough has started to bubble. After 3-4 minutes of frying, you should see the dough begin to bubble on the surface. This means that the underside is fully cooked. Use a stove shovel underneath the cake and turn your wrists up quickly. Try to turn each cake over on its original position when you first pour the dough into the pan.
Advice: The amount of time that bubbles will appear will depend on the size of the cake. If you pour it into 4 pies, the bubble should pop up after 3 minutes, but 3 larger cakes can take up to 4 minutes.

- If you like syrup but don't want sugar, you can buy sugar-free syrup to sprinkle it on the cake.
- You can store uneaten cakes in the refrigerator to eat for 1-2 days.
Method 2 of 2: Make a banana protein cake

Separate the yolks and whites into 2 separate bowls. Crack the first egg into the top of the bowl or on the table. Separate the egg yolk by holding the yolk in the shell and flatten it in two halves, placing the whites in one bowl, the yolk in the other. Repeat with the second egg.
Beat the egg whites for 2 minutes until soft. Use a high-speed powered whisk or hand whisk and move around the bowl to beat the egg whites thoroughly. If using a whisk, use your wrist to beat the eggs in a circular motion around the sides of the bowl and bottom of the bowl.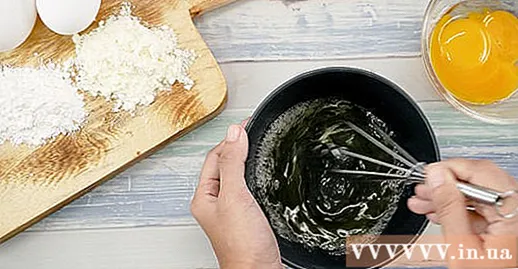
- It may take another 1-2 minutes if you beat the eggs by hand. The egg whites seem thinner and more spongy than before.
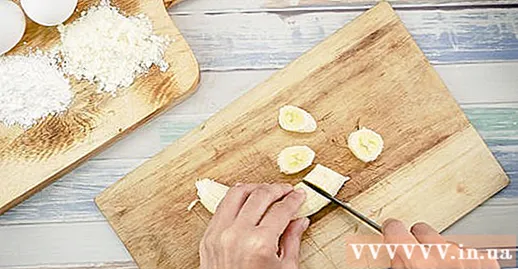
Cut the string into small pieces and place in a bowl of egg yolks. Peel the banana and place it on a cutting board and cut into slices about 1 inch thick. Pour the banana slices into the egg yolk bowl.Advice: You can replace the banana with blueberries or strawberries if you prefer. You can also use half a banana and 10-15 blueberries to combine the best of both worlds!
Place the remaining dry ingredients in the egg yolk bowl. Sprinkle with 2 tablespoons (40 g) of vanilla-flavored protein powder, 1/4 teaspoon (2 g) baking powder, 1/4 teaspoon (2 g) salt and 1/8 teaspoon (0.5 g) powder cinnamon in the bowl of egg yolks and bananas. Mix the ingredients well using a whisk or hand whisk until all blended into a thick dough mixture.
- You can use chocolate protein powder instead of vanilla-flavored protein powder, but many people assume that chocolate protein powder smells like metal when it comes to cooking.
Pour the egg whites into the bowl of ingredients mixture and mix well. Slowly pour the egg white bowl around the edge of the flour mixture. Use a rubber spatula or a wooden spoon to mix the egg whites into the dough. Continue mixing ingredients together for 3-4 minutes until the dough mixture has a uniform texture and color.
Heat a large non-stick pan over low heat and smooth oil on the bottom of the pan. Place a large non-stick pan on the stove. Spray non-stick cooking oil or scour the bottom of the pan with coconut oil. You can use butter pan if you want a more delicious dish. Let the pan heat for about 1-2 minutes.
- If you are using butter, be careful not to burn it. If you notice smoke rising or a burning smell, reduce the heat and add a little more butter.
Pour the flour into the measuring cup. You can tilt the mouth of the bowl to pour the flour directly into the measuring cup, or use the spoon to scoop the flour into the cup. So you will calculate the amount of flour used for each pour, moreover you will also pour the flour into the pan easier because you can use the pouring mouth of the cup.
- You can also just pour the dough straight into the pan, but that will make it difficult to make evenly sized cakes.
Fry each side for 1.5 to 2 minutes. Fry the cake for at least 1.5 minutes. When the dough starts to yellow around the edges, scoop it up with a shovel. Fry the other side for the same amount of time as the first side.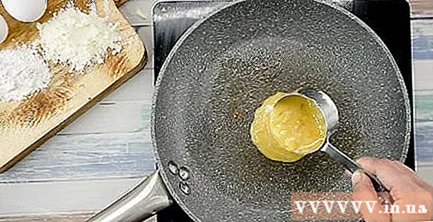
- The cake won't bubble like regular dough, so be sure to keep an eye on the edges to make sure it's fully done.
Remove the cake from the pan and decorate the cake as you like. Use a shovel to scoop out the cake after it is done. Place the cake on a plate and decorate it to your liking. Fresh fruit, nuts, powdered sugar, honey, cinnamon powder or syrup are all good toppings for protein cakes.
- If you like syrup but want healthy foods, you can use sugar-free syrup.
- You can keep uneaten cakes in the refrigerator for 1-2 days.
What you need
Basic protein cake
- Bowl
- Whisk eggs
- Pan
- Measuring cup
- Spoon
- Kitchen shovel
Banana protein cake
- 2 bowls
- Chopping board
- Knife
- Egg whisk or portable whisk
- Batch rubber or spoon
- Measuring cup
- Kitchen shovel


