Author:
Peter Berry
Date Of Creation:
19 February 2021
Update Date:
1 July 2024

Content


- Although each awl has a slight difference in weight, normally, the balance point will be about 2/3 of the length of the stick.

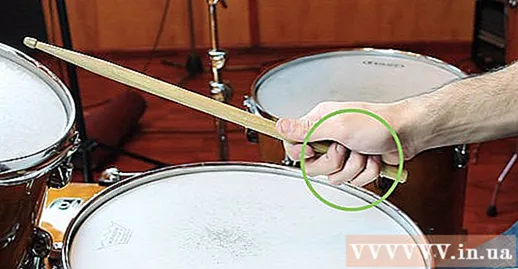
Place your thumb on one side of the drumstick. Once you find your balance, turn your wrists so that it's parallel to the floor. Place your thumb along the side of the stick. Keep your thumb on the side, remember not to rotate your palms together as the thumb will be on the stick (this applies to French grip too).
- You don't need to press your thumb too hard; Its only job is to keep the stick in place and give you a little better control over the stick while playing.

Repeat the steps above with the other hand. You need to apply the same grip to both hands and because of the grip in each hand proportional together so this is called Appropriate handling.
- The American grip is not the only matching grip. You will learn a few more ways to handle each with their own pros and cons below.
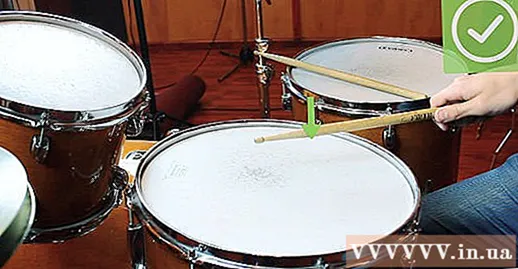
- The American style is very flexible. Because this grip gives you good control and incredible power to play, it is a good choice for genres from improvisation, jazz to rock & roll, funk (mixed music between jazz, soul and RnB) and even classical music!
Method 2 of 4: Play the German Grip

Hold the stick at the same level as with the American grip. Today, the American-style grip described above is often considered the most commonly used matching grip. However, that is not the only adequate grip. For example, the German grip is a common variation of the basic American grip and it is often used to add more force to the drummer (especially for the timers and bass drums in classical music. ). To use the German grip, start finding and grasping the balance point on your drumstick just like the one above.
Adjust your palms so that they are parallel to the surface of the drum. After you have firmly grasped the drumstick, turn your hand so that your palm is facing the drum. Since most drums are installed so that the drum surface is level with the floor, you need to rotate your hand so that the palms are facing down. However, for some vertically installed drums such as bass drums, you need to rotate your hand to face the side of the drum.
Use your middle fingers for support. Curl your middle finger under the drum and let it rest comfortably on the stick. Pinkie and pinkie play a less important role in this German grip compared to other gripping styles. If you want, you can use these fingers to hold the stick firmly by placing it around the drum or by simply gently folding it underneath.
Keep your elbows out. When using the German grip, if you are playing a conventional drum set that is horizontally installed (like most snare drums, baby drums, etc.) then the palm of the grip is parallel to the floor. . When the hand is turned in this way, the drummer's elbow will tend to rotate slightly outward. If you notice your elbow in this position, don't close it. With the German grip, leaving your elbows out will give you more power and control while playing.
Hit with wrist movements. When you're ready to play, hit the drums by moving your wrist downwards in a swing motion. The sticks need to bounce hard when they reach the drum, but if the stick does not bounce, you need to adjust your holding position a little up or down. Keep the swing limited to your wrist and avoid using your arms, shoulders, and fingers.
- The German grip mainly focuses on force. You get loud and resonant shots very easily with this grip, so it's a grip that's great for heavy rock music, marching bands or lively classical music. However, you can find it a bit difficult to control your gameplay when you have to play fast and complex music. Therefore, the German style is not very suitable for jazz drums, technical rock and some other genres.
Method 3 of 4: Play with the French Grip Style
Hold the stick at the level of balance like the American way. Another matching grip is the French grip. Among the corresponding grip, this style is unique as it mainly uses fingers to power each shot instead of using the wrist. To hold the drumstick in French style start exactly like the American or German grip: find and hold the drumstick at the balance point, using your thumb and index finger.
Keep your palms facing each other. Then, point your palms inward so that the palms are facing each other. Your palms should be perpendicular to the floor.
- Your palms need to be facing each other, but they don't need to be close together. Keep your hands as long as you feel natural enough. For most drummers this is about 30 cm.
Use your middle, ring, and little fingers for support. Curl the middle, ring and little fingers below each drum. As you play, these fingers support the stick and give you control over the stick. This is extremely important in the French grip as it utilizes the strength of the fingers more than other matching grip.
Elbow closed. Since you have your palms in opposite position, your elbows should naturally drop to the sides. If your elbow is not already, close it slightly and keep it about 2.5 cm from your upper body.
- You don't need to be too tight on this, when playing, you will find your elbows automatically positioned comfortably near the sides of your body. You just need to avoid letting your elbows curl outwards as this can reduce your play force.
Hit the drum with your finger. Once you have a comfortable position and are ready to start hitting, bring your wrist down a bit and use your fingers to pick up the drumstick. You may not be able to avoid a few wrist movements, but most of the strength of the strike should come from the fingers of the stick, not from the wrist rotation or movement of the forearm and shoulder.
- Since the fingers are used to power the shots, the French grip often increases the player's control and dexterity more than the other wrist styles. This feature makes the French grip very suitable for skillful beat styles such as jazz, technical rock and cheerleading works.However, since the fingers don't have as much force as the wrist, the French grip doesn't suit loud and powerful drums, but hard rock or heavy metal (a genre). rock music with strong beats) is often demanding.
Method 4 of 4: Play in a Traditional Holding Style
Place the drumstick between your thumb and index finger. Leave the drumstick between your thumb and your non-dominant index finger. Move the drumstick up and down until you find its relative equilibrium, then straighten the stick so that your hand supports the stick at this point.
Surround the stick with your thumb and index finger. Curl your thumb so that it sits comfortably above the drum, then lift your index finger and rest on the stick so that the inside of your finger touches the stick. You may feel a little unnatural compared to the thumbs up to surround the drum, but it is important to give this traditional grip a firm control.
- When handled properly, the cushion on your thumb should rest on the first knuckle of your index finger (or as close to it as possible) while your index finger should be bent and placed on top of the stick.
Place the end of the middle finger on the side of the stick. Raise the middle finger along the outer edge of the awl so that the inside of the second or third knuckle touches the awl. You may find this pose unnatural at first, but it doesn't necessarily make you completely comfortable.
Curl your remaining fingers under the awl. Next, raise your little finger and little finger under the stick. Place the drumstick in the epidermis of the ring finger or on the knuckle of the middle finger and adjust the little finger below the ring finger to increase hold. When handled properly, your pinky and pinky fingers should be arched like your index finger.
- When your index finger, pinky finger, and little finger are arched and your middle finger is stretched out, you look like you are "lifting your middle finger". Do not worry! This posture is perfectly fine, in fact this is exactly the sign of the correct grip.
Hit the drum with wrist movements. In this traditional grip, you need to use the main wrist movement by pointing the wrist downwards to hit. Of course, the obvious difference from the other styles is that the upward holding you're applying with your non-dominant hand will require slightly different wrist movement than the one you're used to. However, you still need to rotate both hands in the same direction as usual
- The traditional grip is often used when playing jazz drums and in parade bands. Since it will be difficult for your non-dominant hand to have the same strike force as the upside-down hand, this style doesn't suit the loud and powerful drumming you often see in heavy metal music.
Advice
- The secret lies in relaxation. Play as comfortably as possible, as if you are sleeping deeply and comfortably.
- There are two things to consider. For your hands, the trick is to learn to hold the awl and release at the same time.
- Make sure that the end of the stick is poking out from the back of your hand, and that the drumstick is through the palm rest. Many people let the drumstick through the "sunken" part of the hand. This pose is not correct as the stick needs to be in contact with the flesh of your hand!
- Don't forget your feet. If you play with a drum set, your feet are your pillars, like the foundations of a house. If the nail is not stable, the house will fall.
- When you have a firm grip on the drumsticks, be sure to not point your fingers.
- Holding the drumstick as described above is a good start. However, to play with force, play subtly and most importantly, play with CONTROLS requires more technique than just holding a stick. A lot of things change over the years and things change the way you hold the stick, for example the appearance of your body. Playing drums essentially involves a combination of fingers, wrists, forearms and shoulders.


