Author:
Lewis Jackson
Date Of Creation:
13 May 2021
Update Date:
1 July 2024

Content
Referring to the term "steam engine", people often think of locomotives or cars powered by Stanley steam engines, but they have many more applications than just for use in the industry. download. Steam engines, invented more than two thousand years ago, have become the main source of energy for about three centuries, and steam turbines are now producing more than 80. % of electrical energy in the world. For a better understanding of how a steam engine works, make your own with a steam engine from easy-to-find materials using the methods in this article! See the steps below to get started.
Steps
Method 1 of 2: Make a Steam Engine from a Soft Drink Can (For Kids)
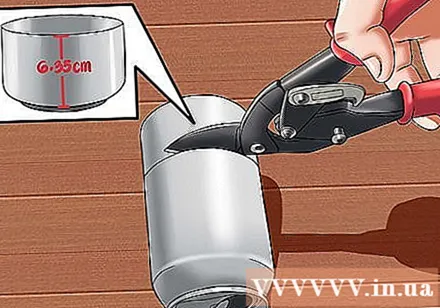
Shorten an aluminum can to about 6.35 cm. Use scissors to cut aluminum or regular scissors to cut a horizontal line, around the body of the can about 1/3 of the height from the bottom of the can.
Fold and curl the edge of the can with pliers. Fold the sharp edge inside the can to remove its sharp edge. Avoid cutting your hands when you do this.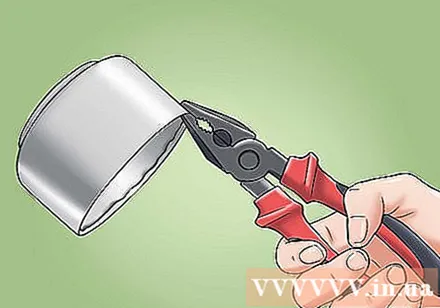
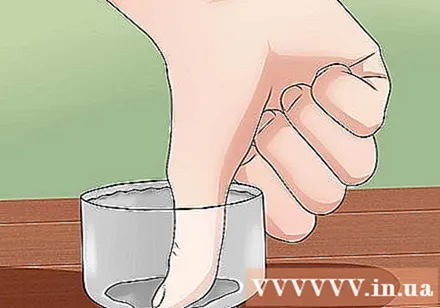
Press the bottom of the can from the inside to flatten it. Most soda cans have a recessed bottom. Press it flat using your fingers or using the bottom of a glass or cup.
Punch two holes on opposite sides of the can, about 1.27cm from the top. You can use a paper puncher to punch or use a hammer and nail. You need to make a hole slightly larger than 3,175 mm.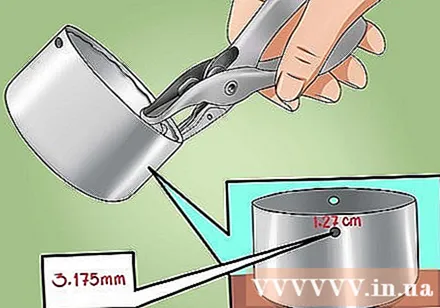
Place a box candle in the center of the can. Crumple the aluminum foil down and around the candles to help the candle box stand. The box candles come in small cans, so the candle wax won't melt and drip onto your aluminum can.
Wrap the center of a copper tube about 15.24-20.32 cm long around a 2 or 3 ring pencil to make a coil. The 3mm tube is easy to wrap around a pencil. You will need to leave an extra tube space to rest horizontally on top of the can, plus a 2 x 5.08 cm straight tube on each side.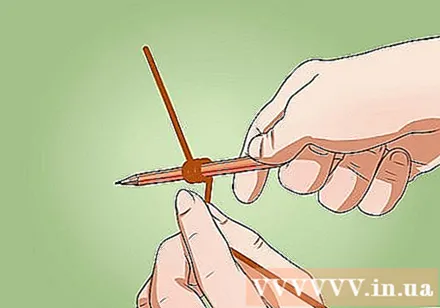
Plug the ends of the tube through the two holes in the can. The center of the roll will be directly above the wick. Try to make the excess tube on each side the same length.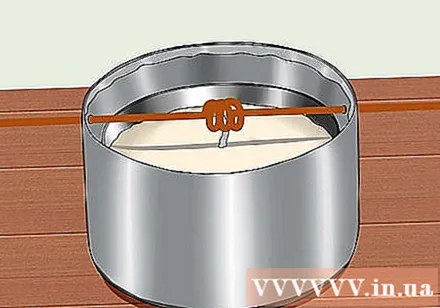
Bend the ends of the tubes with pliers to form a 90-degree angle. Bend the tube straight at the ends so that they point in opposite directions on each side of the can. Then, bend the tube Again keep the ends of the tube lower than the bottom of the can. When you are done, you will have a curled tube located just above the wick and extending it to two "exhaust pipes" that bend in opposite directions on either side of the can.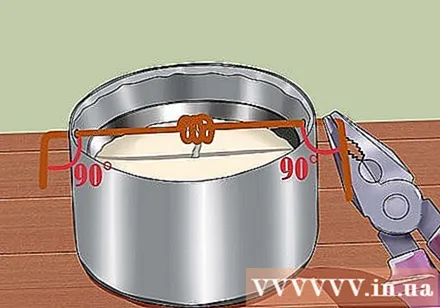
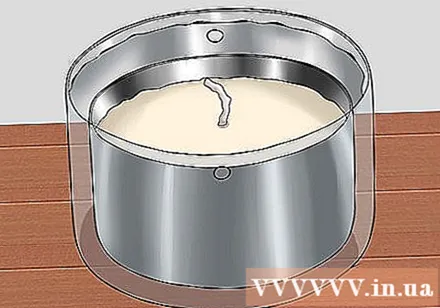
Place the can in the tub of water so that the ends of the tube are covered with water. Your "boat" should float comfortably. If the ends of the tube are not completely submerged, try making the can a little heavier, but don't submerge it.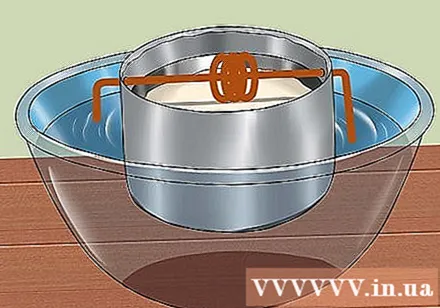
Fill the tube with water. The easiest way to do this is to put one end in the water and then suck on the other end and suck like a straw. Alternatively, you can place your finger on one end and then put the other end in a running tap.
Light a candle. After a while, the water in the tube will heat up and start to boil. When it turns into a stream of steam, it shoots out from the two "exhaust pipes" on the copper pipe, causing the entire can to rotate in the water basin. advertisement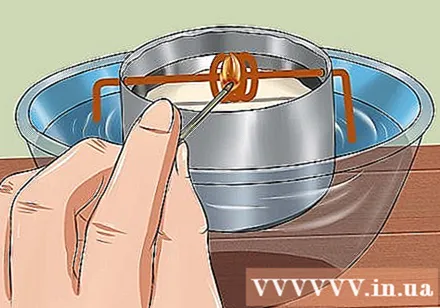
Method 2 of 2: Making a Steam Engine from Paint Box (For Adults)
Cut a rectangular hole near the bottom of the paint can (4.5 liters). Cut a 15x5 cm horizontal rectangle on the side of the paint box near the bottom.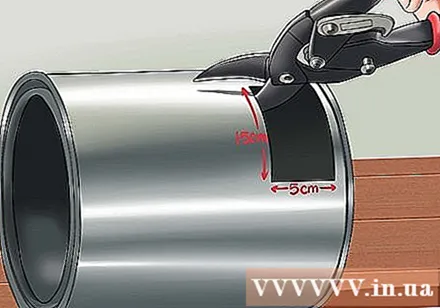
- Note that this paint can (and the others you will use later) only contains latex-based paint (water-based paint) and must be washed off with soap and water before use.
Cut a piece of wire mesh 12x24 cm. Fold 6cm at each end of the 24cm side to a 90th angle. It will form a 12x12cm square "table" with two 6cm "legs". Place this piece of mesh in the paint box, feet down, and fit the edge of the hole in the paint box you just cut.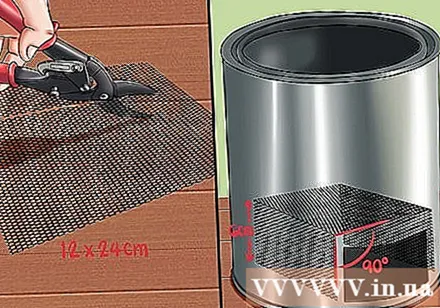
Cut small semicircular holes in the lid according to the circumference of the lid. Later, you will burn coal inside the paint can to provide heat to the steam engine. If coal is not supplied with enough oxygen, it will not burn. Create ventilation by drilling or punching semicircular holes around the edge of the lid.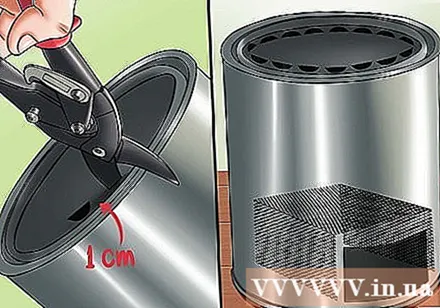
- These air vents 1cm in diameter are ideal.
Wrap a coil of copper tube. Take about 6 m of 6 mm diameter flexible copper wire and measure 30cm from one end. Starting from that point, wrap into a coil of 5 turns 12 cm in diameter. Wrap the rest of the tube about 15 rings, 8 cm in diameter. You should have about 20 cm of excess tube left.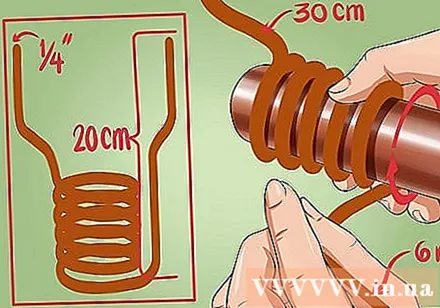
Pass both ends of the spool roll through the vent holes in the cover. Bend both ends of the reel so that they are facing up, then thread each end through a hole in the cap. If the excess tube is not long enough, you may need to remove the spool slightly.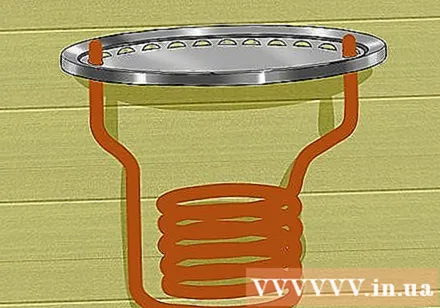
Put the coil and coal in the paint box. Place the spool over the strainer. Put in coal to fill the free space. Close the lid tightly.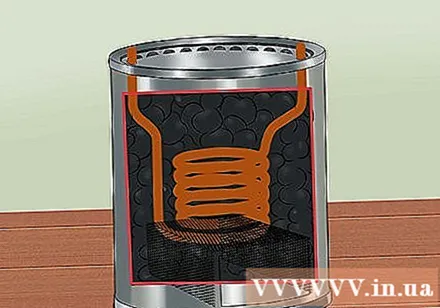
Drill pipe fitting holes on the smaller paint box. Drill a 1 cm diameter hole in the center of the lid. On the side of the paint box, drill 2 holes 1 cm in size, one near the bottom of the box and the other one near the lid.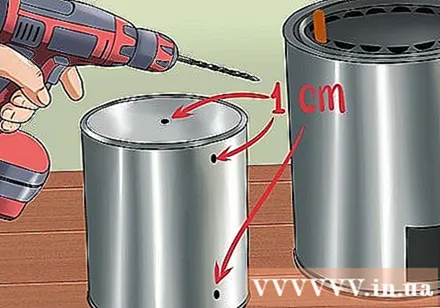
Insert the rubber buttons into the two holes in the small body. Plug the ends of the copper tube between the two presses. Insert a 25cm long hard plastic wire into the press button and a 10cm segment into the other button so that they fit snugly and leave a small amount of space behind the button. Plug the longer-corded push button into the hole below the small box, and the press with the shorter cord attach it to the hole above. Secure the tubes to the button with the tube locking ring.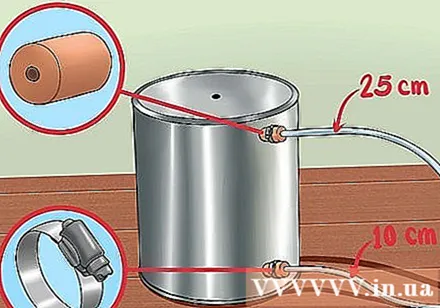
Connect the plastic tube from the big box to the small box. Place the small canister over the large box so that the stoppers rotate away from the large box vents. Use metal tape to secure the tube from the bottom stopper to the spool from the bottom of the copper tube roll. Then firmly attach the plastic tube from the button above to the higher end of the same coil in the same way.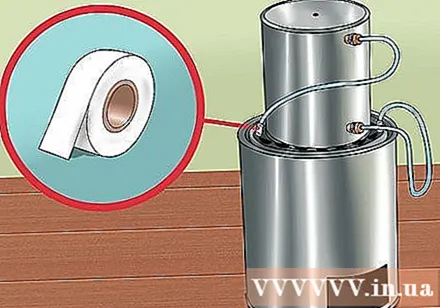
Attach a hollow copper tube to the junction box. Use a hammer and screwdriver to remove the round cover from the circular wiring box. Make sure the inside of the box still has the clip attached to the wire holder ring. Take a copper tube 1.27 cm in diameter and 15 cm in length and put it in the box so that the tube protrudes a little from the electrical box. Use the hammer to lightly beat the top edge of the copper tube so that it will flatten in. Insert the lower end of the tube into the hole in the small paint can lid.
Insert a meat stick into the latch button. Take an ordinary barbecue skewer and plug it into a small wooden knot 1.5 cm long and 0.95 cm in diameter. Insert the rod and pin into the copper tube on the junction box so that the rod points upwards.
- The meat stick and the latch will act as the "plunger" while the machine is running.To make the movement of the plunger more visible, you should attach a small piece of paper "as a flag" to the end of the meat skewer.
Prepare the machine for operation. Remove the junction box from the small paint box above and fill it with water, overflowing the copper tube coil until the paint box contains about 2/3 of its volume of water. Check all connections for leaks and make sure the seals are firmly seated. Secure the flaps of the two paint cans by tapping them lightly with a hammer. Replace the junction box on the box cover.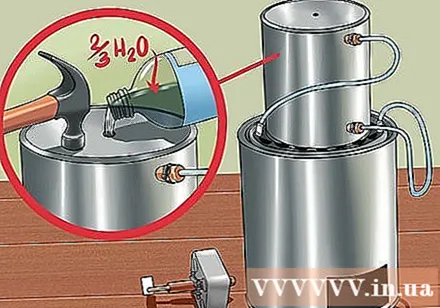
Run the engine! Crumble newspaper and stuff it under the screen, then burn it. When coal catches fire, it burns in about 20-30 minutes. At the same time they will heat the water in the coil, the steam will be pushed up into the box above. When the steam reaches the required pressure, it pushes the plunger up. When the steam escapes and the pressure is reduced, gravity pulls the plunger down. Cut back on the skewer to help reduce the weight of the plunger if needed - the lighter the plunger, the more often it "bounces". Try sharpening the stick until the volume where the plunger can "run" up and down continuously.
- You can speed up the burning of coal by blowing through the vents with a hairdryer.
Be careful. This steam engine must be controlled and operated with care. Never run a steam engine indoors. Never run it in a place with something flammable like dry leaves or drooping canopy. It should only be run on a hard and non-combustible surface such as a concrete floor. If you work with children, be sure to have an adult watching at all times. Do not let children come near the machine while the coal is on fire. If you don't know how hot the machine is, assume it's too hot to touch.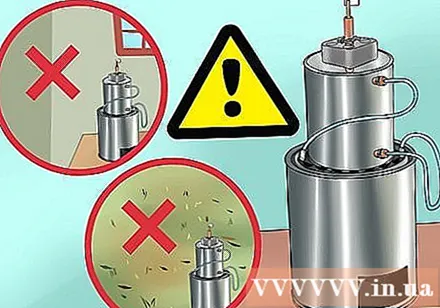
- Also, make sure the steam can escape from the "kettle" above. If the plunger gets stuck for some reason, the pressure will increase in the small box. In the worst case scenario, the box might explode. That extremely danger.
Advice
- Place the steam engine in a small boat, with both tubes threaded back and submerged, to make a steam-powered toy. You can create simple boat-shaped objects out of a plastic soda bottle or bleach can to create a “green project”.
Warning
- Do not seal the copper tube in any way other than immersing its head in water. Although unlikely, excess pressure can cause the tube to explode and injure you.
- Remember to use tongs, pliers, or gloves if you need to move the machine while it is running.
- When you have to hold the engine while it is running, do not point the end of the exhaust at anyone, as the stream of hot steam can cause burns.
- Don't try to make a more complicated steam engine unless you know how to do it. Even a small burst of boiling water could cause serious injury.
What you need
Steam Engine from Soda cans
- Aluminum cans
- Aluminum shears or big scissors
- Pliers
- Hole puncher
- Candles box
- Silver paper
- 3,175mm copper pipe
- Pencil or meat skewer
- Country
- Pot
Steam Engine from Paint Box
- 4.4 liter paint canister (preferably unused, otherwise wash with soap and water)
- Paint box type 1.1 liter (as above)
- 6 m of 6.35 mm copper wire pipe
- Metal adhesive tape
- 2 pressed buttons
- Round metal wire junction box
- The power cord clamp is suitable for the wiring box
- 15 cm 1.27 cm copper tube
- 12x24 cm iron mesh
- 35 cm hard plastic tubes of 6.35 or 3.17 mm
- 2 clamps for plastic pipes
- Charcoal grill (flammable is better)
- Barbecue sticks
- Wooden button 1.5 cm long and 0.95 cm diameter (one end is opened)
- Screwdrivers
- Wait
- Hammer
- Aluminum shears / scissors
- Pliers


