
Content
- To step
- Method 1 of 2: Activate content search for a generic file type
- Method 2 of 2: Activate content search for a specific file type
- Tips
Are you trying to find a document whose file name you can't remember but what is in it? Windows 7 does not always automatically search the contents of files, especially when it comes to the more obscure files. This means that when typing in a search term it will search the file names, but not what is actually in each document. To search broadly in the content (for the most common file types) or in specific files (best for unusual file types), use one of the directions below.
To step
Method 1 of 2: Activate content search for a generic file type
 Right click on the Startbutton and select Open Windows Explorer.
 Press Alt. This will bring up a toolbar at the top of the Windows Explorer window.
 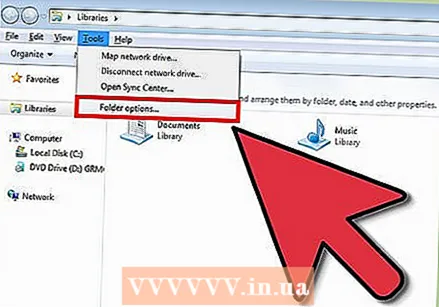 Go to Additional > Folder options.
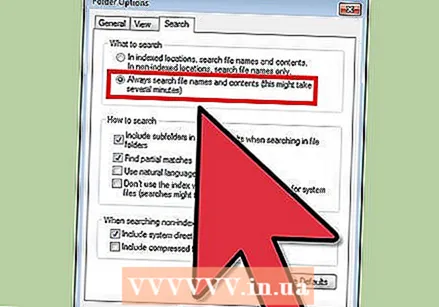 In the tab Search click on Always search for file names and content. This process can take several minutes.
 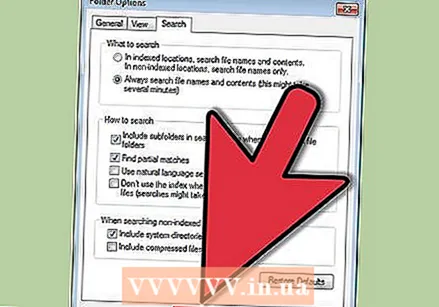 click on OK.
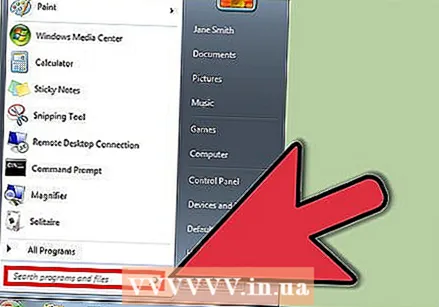
 Run a search as a test. Go to Start and enter a search term in the field Search programs and files. The results should contain the search term of more than just the title of the file.
Method 2 of 2: Activate content search for a specific file type
 Go to Start and find the field Search programs and files.
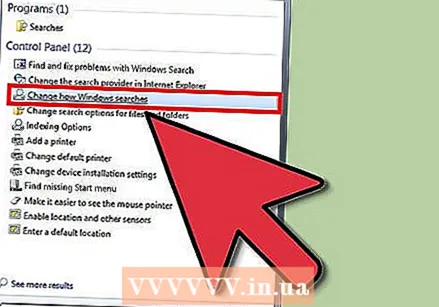 Type "search" and then choose Change Windows search methods.
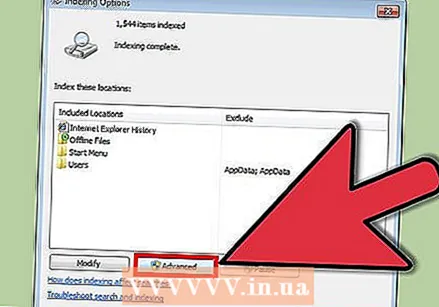 Press the button Advanced just below the list of index locations.
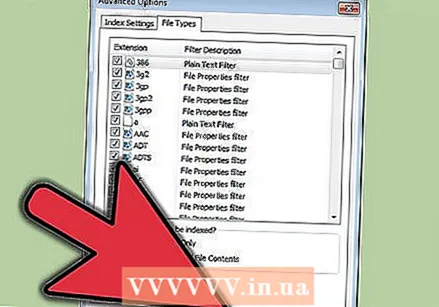
 Go to the tab File types.
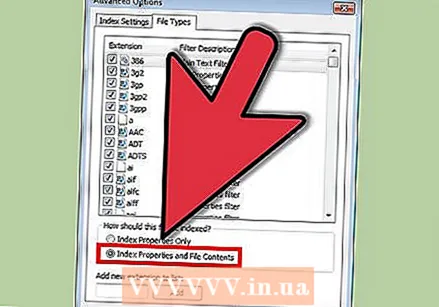 Select the desired extension and click Index properties and contents of the file to activate content search. If you want to view the contents of Excel files, for example, scroll down to .xlsx.
 - If the extension is not listed, enter your own desired file extension, such as ".php," in the input field at the bottom and click Add.
 Press OK.
Tips
- If you are still unable to find the contents of files, try the following:
- Open Windows Explorer
- Right click on the folder you want to search, eg. My Documents
- Click on: Properties
- In the tab General, click on: Advanced
- In the dialog box Advanced Features select your:
[x] The contents and properties of files in this directory may be indexed - Click on: OK
- Click on: OK
- You can also add additional folders to the list of indexed locations.
- After updating your indexing options, you will have to wait a while for your results to appear as expected, as Windows will have to recreate the index with the contents of the new files.
- The indexing options page will be displayed with the real-time status of the indexing operation.
- You can also access Indexing Options by clicking the Start button, then Control Panel, then Indexing Options. If you don't see this, type "index" in the search field of the control panel.
One last resort: Make sure indexing is active. Right-click on Computer and select Manage. Expand "Services and Applications". Click on Services. Look in the list and look for a service called "Windows Search". Right click on it and select "Properties". In this screen you indicate for "startup type:" that it should be automatic. Then click Start to start the service.


