Author:
Christy White
Date Of Creation:
9 May 2021
Update Date:
23 June 2024
![How To Blur Backgrounds in Photoshop [FAST & EASY!]](https://i.ytimg.com/vi/m_Qk8QsLbAs/hqdefault.jpg)
Content
- To step
- Method 1 of 3: Blending two images together
- Method 2 of 3: Blur an image in the background
- Method 3 of 3: Blurring an image in a selection area
- Tips
If you want to give images a blur effect in Adobe Photoshop, you have a number of options. Not only is it possible to merge two images with a smoothing effect, it is also possible, for example, to blend part of the image itself into a colored background. These fading techniques are very versatile. Once you know how they work, you can create your own blur effects.
To step
Method 1 of 3: Blending two images together
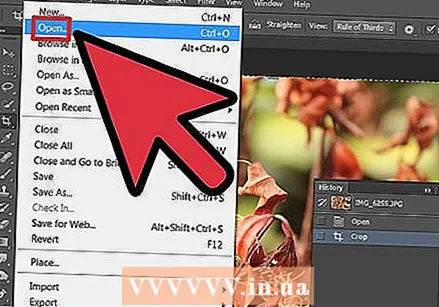 Open the first image in Photoshop. Select "Open" from "File" and locate the image on your hard drive. Open the file in Photoshop.
 - It's easiest to start with an image that is no Photoshop image is. Such an image has only one layer. However, you can always use the Flatten feature to merge all layers into one image.
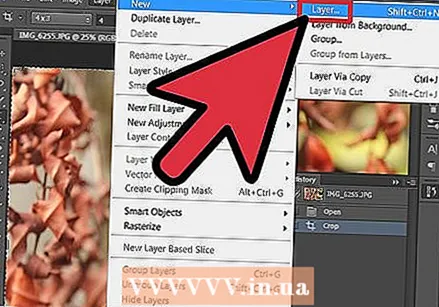 Create a new layer above the background layer. To merge two images, place a second image on a separate layer separate from the first. Click on "New Layer" in the "Layers" tab on the right, to create a new layer.
 - The "New Layer" button is located at the bottom of the "Layers" tab. It looks like a miniature sheet of paper with a dog-eared head.
 Copy your second image and paste it into the new layer. Select the second image you want to use (you can select the whole image with Ctrl + A; on a Mac use command + A), copy it to the clipboard, and paste it into the new layer.
 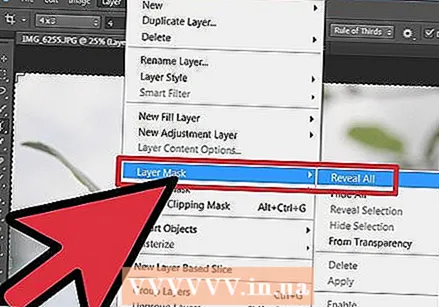 Add a layer mask to the layer of your second image. Click Add Layer Mask in the "Layers" tab. This button looks like a small rectangle with a circle in the center.
 - Alternatively, select Layer> Layer Mask> Show All from the main menu.
- Make sure none of your image is selected before creating the layer mask. You can use the Select> Deselect button in the main menu to undo previous selections.
 Choose the Gradient tool from the Toolbox. Look for an icon in the Toolbox (usually on the left side of the window) with a rectangle with shifting colors (from light to dark). If you can't find this, hold down the Paint Bucket and use Gradient when it appears.
 - In our case we use a black and white gradient. Select it from the "Options" menu.
 Drag lines with the color gradient tool to create a blur. Hold down Shift and click a point in your second image where you want the blur to begin, then drag in the direction you want to create the effect. Release the mouse button. You see two images that flow smoothly into each other.
 - Experiment with different line lengths with the gradient tool. The longer the line, the more gradual the effect.
 Rearrange the two images as needed. Once you've got the hang of blurring one image into another, move the images in their layers around until they are positioned for maximum effect. Repeat the steps above to reapply the gradient as needed.
 - Note that the first image will be set as the background layer by default. In Photoshop it is not possible to move the background layer, so to do this, hold down Alt (Option on the Mac) and double-click the word "Background" in the Layers tab.
 If you want to blur an entire image, adjust the Opacity. The steps above assumed that we wanted to blur one image into another, with a gradient effect. But if we just want to make one image transparent and overlay it over another, our job is a lot easier. Simply select the layer you want to blur and change the "Opacity" value in the "Layers" tab.
 - Note that higher values result in less transparency, and lower values in the opposite. A value of 100% will make the image appear "normal", while a value of 1% will make the image almost completely transparent.
Method 2 of 3: Blur an image in the background
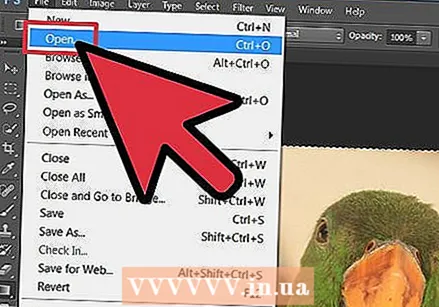 Open a new image in Photoshop. As in the previous section, first go to "Open" in the file menu, to find the image on your hard drive that you want to use.
 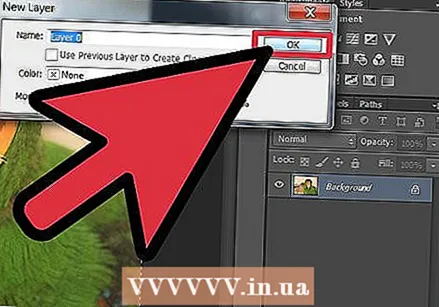 Unblock the background layer. As mentioned above, Photoshop doesn't allow you to move the image in the background layer by default. To "unblock" your image, use the trick described in the section above, or double-click the image itself.
 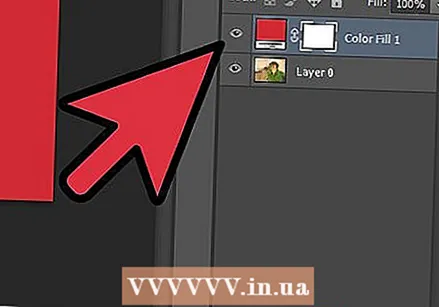 Create a new adjustment layer below the first layer. To make a layer below your background layer, click the New Adjustment Layer button while holding down Ctrl (Command + click on the Mac). Choose "Full Color" as the fill type.
 - The New Adjustment Layer button looks like a small black and white circle.
- Note that the color of the foreground used for the new layer. You can change the foreground color with the Eyedropper tool.
- Blurring an image into a colored background usually looks best when the color is reflected in the image itself. The Eyedropper can help you with this, because it allows you to choose colors from the image.
 Use a black and white gradient on a layer mask. Now that you have an image in one layer and a solid-color background, it's relatively easy to fade one image into another. Select the Gradient tool (with a black and white gradient), hold down Shift and drag the mouse from where you want the blur effect to start, to where you want it to stop (as in the section above.)
 - As indicated above, you may want to move the image in its own layer for the desired effect.
Method 3 of 3: Blurring an image in a selection area
 Select part of your image. There are multiple options for selecting part of an image in Photoshop. Below you will find some of the most common options.
 - Quick select. The symbol of this tool looks like a brush with a dotted line. By "painting" with this tool in Photoshop, that part of the image you are painting over is automatically selected, along the indicated edges.
- Marquee. Its symbol looks like a dotted rectangle and a dotted oval. With these tools you can make rectangular or round selections.
- Lasso. The symbol for this looks like a lasso. With this tool you can draw a free selection.
 Make a selection and copy it to a new layer. Once you have selected part of your image, place this selection in its own layer. Go to Layer> New> "Layer via Cut" in the main menu.
 - You can also do this with the keyboard shortcut Ctrl + Shift + J (Command + Shift + J on a Mac).
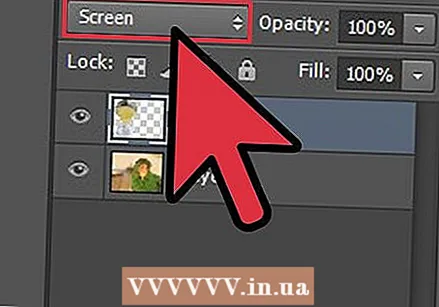 Select "Bleach" from the Layer Mode menu. On the right side of the window, in the "Layer" tab, select "Bleach" from the drop-down menu.
  Adjust the opacity. As indicated above, in the tab "Layers" there is also the setting "Opacity". Adjusting the values in this box makes the layer (with the part of the image you selected) less or more transparent.
  You can also use Gaussian Blur for this as an alternative. The above method uniformly blurs the entire selection. However, if you want the edges of the selection to blend into the surrounding image, use a handy tool such as Gaussian Blur. The method will change a bit, but it's not difficult - just follow the steps below:
 - Make an adjustment layer from your selection.
- Select Blur> Gaussian Blur from the "Filter" menu.
- Type a value in the "Radius" box. Determines how much the blur effect is applied to the image (higher values make the area to be blurred larger).
Tips
- Experiment with different presets in the Gradient tool menu for other ways to blur images.
- You can also experiment with other blur tools with your selection (you can find them in the "Filter" menu at the top of the window).


