Author:
Frank Hunt
Date Of Creation:
13 March 2021
Update Date:
1 July 2024

Content
- To step
- Part 1 of 6: Specific tips
- Part 2 of 6: Drawing from reality
- Part 3 of 6: Sketching
- Part 4 of 6: Elaborate the drawing
- Part 5 of 6: Working with shadow and light accents
- Part 6 of 6: Get the right equipment
- Tips
If you can draw objects and people to make them look real, you can make a big impression. The basic techniques are easy to learn and with a little practice you can become very good at them. These are a few helpful ways to create realistic drawings.
To step
Part 1 of 6: Specific tips
 Learn to draw the human body. If you want to draw people, you have to be able to draw their bodies in a realistic way. Cartoon characters are disproportionate drawings of people, but with a little practice you can get the shape right.
 - Study the muscle structure and skeleton diagrams. Living bodies are not just fleshy blobs, they have the shape and structure of bone and fat. Failure to observe how the body works often leads to serious anatomical errors. Don't be afraid to draw things without skin.
 Learn to draw detailed faces. Human faces are very difficult to draw. How far apart are the eyes? How can you make them look real and not like a cartoon character? By studying faces and with these tips you can draw realistic faces.
  Learn to draw landscapes. Are you going on a trip and do you want to draw the beautiful places you see? Or do you want to draw the place where you live? You can learn to draw landscapes with these simple tips.
  Learn to draw animals. Maybe you prefer to draw animals. That can be a lot of fun and is not as difficult as it seems! With some practice and good tips you can learn to draw animals.
  Learn to draw cars. You can also learn to draw cars and other machines. It's fun and popular. Try drawing your dream car!
  Learn to draw shadows and light. Shadow and light add depth to a drawing and make it appear more real. Learn where to draw shadows and highlights so that your drawing becomes more real.
  Learn to use perspective. When you incorporate perspective into your drawing, the size of something seems to change as it is further away. With perspective you make your drawing more realistic.
Part 2 of 6: Drawing from reality
 Use a model. The easiest way to copy something is to use a model. Draw what you see in front of you. This can be a person, an object or a landscape. Drawing something you can observe directly is good for improving your drawing skills.
 - Try to work as fast as you can. This way your brain learns to absorb the most important information quickly and efficiently. Before you get into details, pay attention to basic shapes and proportions. This means you don't have to make any adjustments when your model moves.
 Draw a picture. If your model isn't available, or if the model moves too much or doesn't have time to model, you can use a photo. It is not a good learning method, but gives the same end result.
 - If you want to draw something as realistic as a photo, this is the easiest method, as you will have the time to look closely at details.
 Draw from your imagination. Although you won't learn much because of this, you can create a realistic image from your imagination. If you want to draw really realistically, you need to have a good grasp of the concepts of shadow and light, as well as proportion, shapes and creases.
Part 3 of 6: Sketching
 Make a sketch before you start. Before you start, make a sketch of the image where you want to go. This gives you a better view of the end result, because you can try out the composition and details, it is a kind of draft version.
  Make a sketch in miniature. You can start with small sketches to indicate the basic shapes of the drawing. This is a good way to view the overall layout (called composition in the art world).
  Draw a detailed sketch. Once you've figured out which composition to use, you can make a more detailed sketch. This way you learn to shape your subject, it is a draft version. If this drawing is too difficult at this stage, it is better to take a simpler pose or shape.
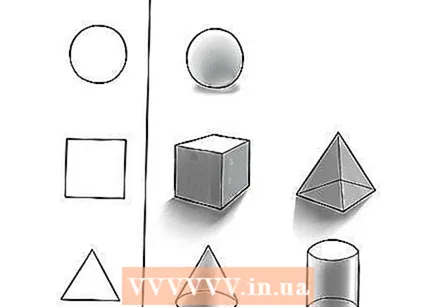
  Find the basic shapes. Look at the basic shapes of the object you are drawing when you place the sketches. Everything consists of one or more shapes. A nose, for example, is a complex pyramid, while trees are made up of a number of cones or circles. Find the shapes that give depth to your drawing and help you draw them properly.
  Make a copy. Make a copy of your sketch to draw over. It is best to make your drawing over a sketch, a basic sketch or a detailed sketch, whichever you prefer. This way you can adjust the shapes and it gives you guidance when drawing the end result.
Part 4 of 6: Elaborate the drawing
 First, draw the entire outline of the subject. If you do that correctly, it will be much easier to determine what to draw where. It is often easier to draw the shadow of the background first than the edge of the object itself.
  Draw what you see, not what you "think" you see. One of the most important aspects of realistic drawing is actually drawing what you see and not what you think you see. Our brains tend to generalize images, so if you pay attention to what your brain skips and try to recreate it, you not only create a more realistic drawing, but you also learn a lot from it.
 - A trick to avoid drawing assumptions is to take a picture from a magazine, turn it upside down, and then copy it. This technique makes your brain think it is dealing with something new instead of something you know. This way you can draw what you really see, unique shapes, instead of your assumptions about what an object looks like.
- Pay special attention to ears, noses, tree leaves and clothing collars. These are things that our brains generalize in our heads. If you want to draw something realistic, you have to be careful to draw what makes the object unique. Ears, for example, differ from person to person.
 Use perspective. Perspective is very important to make objects appear realistic, it indicates the shifting size of objects in depth. For example, if you are creating a realistic landscape, draw the trees that are far away smaller and less detailed, even if they are actually larger than the trees that are closer to you. With this you simulate how your eyes perceive objects, it makes your drawing more realistic.
 - First, find the horizon. If you look around you, you will see that there is a line where the physical earth ends and heaven begins. This is the horizon line. Now determine where this line should be in your drawing and draw a line lightly with a ruler.
- Make use of a vanishing point. You can work with one, two or three points. One vanishing point is the simplest. A two-point perspective is most commonly used. A three-point perspective is difficult, so don't use it until you are more experienced in perspective. Below is a description of the two-point perspective.
- Draw one or two vanishing points on the horizon. This is the direction (or directions) in which the objects disappear. The points can fit on the paper, or they can extend far beyond the sheet of paper, onto your table. In a two-point perspective, the points should fall on either side of the object you are drawing.
- Draw the centerline of the object, then use a ruler to draw lines from the top and bottom of the object to the vanishing point.
- Determine the length of the object and then draw some vertical lines, between the vanishing lines, to create a box for your object to fit into.
- Draw a line from the back line on one side to the vanishing point on the other to complete the box. You can now see which parts of the object are visible.
 Pay attention to the proportions. Proportions are the dimensions of objects in relation to each other. Especially when you draw people, it is important to pay attention to the ratio to make your drawing realistic. For example, most faces follow mathematical formulas, so parts of the face and body are in a certain way in relation to each other. If the ratio is not right, your drawing looks like a cartoon character or just plain weird.
 - For example, humans are five to seven times the length of their head. The distance between eyes is one eye length. The line of the mouth usually goes towards the corners of the jaw. The distance between the elbow and the wrist is one foot length. For example, the human body has many standard dimensions and it may take you a while to get to know them, but it is worth it and it is interesting to learn.
Part 5 of 6: Working with shadow and light accents
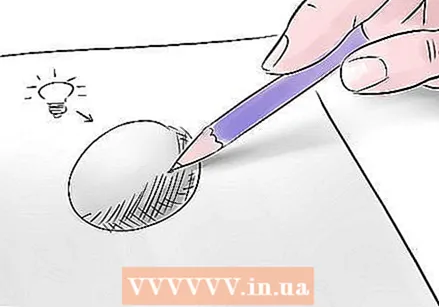 See where the light comes from. Light accents and shadows make your drawing look like a photo. The more detailed you apply light and dark and the better it is, the more realistic your drawing will look. Before you apply these light accents and shadows, you must first find out where the light comes from in your drawing.
 - The light source can be a lamp or the light coming through a window. Outside, the sun can be your light source. The light moves in a straight line from the light source and bounces off the side of the object closest to the light source.
 Draw shadow. The sides that are out of reach of the light are in the shadow. The farther from the light, the darker the shadow. Once you have determined where the light is coming from in your drawing, you can decide where the darkest shadow will be. Start by darkening these areas. Shading gives drawings depth and shape.
 - The next step is to apply the less dark shadows. These are the areas in the shade that are not as dark as the darkest areas of the shade. Continue in this manner until you have drawn three to six different shades of shadow.
- Once the shadows are in place, you can blend them by running your finger or a feather over them. This makes the shadows flow nicely into each other. Keep hard lines where you see them, such as from a table or other hard objects.
- Hatching and variation with lines. If you're using ink or don't want to use shadows, you can get depth and shape through carefully placed lines and textures. Thicken the outer edge of shaded areas, such as the dimple at the top of an apple or the spot on the neck where the ear begins. Use lines to follow the shape of an object and place overlapping lines in different directions to create shadows.
- Find out how to shade and etch and see examples of what it looks like. Copy the examples. Drawing with this type of shadow is difficult and takes a lot of practice. Ultimately, it offers many possibilities.
 Draw light accents. When you are done with the shadows, you can add highlights where the light hits the object directly. You can do this by erasing, with white charcoal or with similar materials.
 - When a face is illuminated from the front, the light accents are above the eyebrows, along the nose line, at the top of the cheeks and on the chin, because these areas are the most protruding.
Part 6 of 6: Get the right equipment
 Use pencils. The most commonly used material for drawing in this style is the pencil. With pencils you can easily apply shadows and leave white areas or erase to create highlights. With pencils you can apply better layers and you keep good control over your drawing. They are also easy to rub.
 - Pencils come in different hardnesses (depending on how much graphite is in them). The harder the pencil, the lighter it draws. Use different pencils for lines in different shades of gray. Hard pencils are marked with an H and soft pencils with a B. The higher the number next to the letter, the harder or softer the pencil is. A standard pencil is an HB.
 Use pens. You can also use pens to create realistic drawings. With a pen you can very precisely draw lines and indicate proportions, shading, varying types of lines and etching shadows. You can use all types of pens, but a fountain pen or a brush pen will give the best result as it allows you to vary the line width better.
 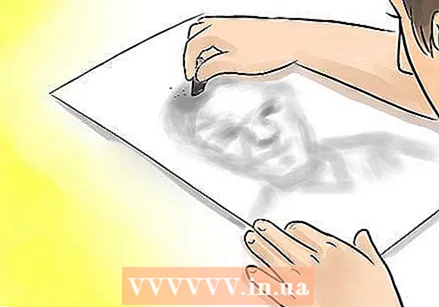 Use charcoal. You can also use charcoal to make realistic drawings. Charcoal is probably the easiest material to use to create shadow and light, an important aspect of a realistic drawing. Charcoal also stains easily and rubs well, which is convenient to use, but can also cause problems.
 - Charcoal for drawing comes in different forms. Charcoal from willow or vine is a good middle ground, while charcoal pencils are good for drawing details.
 Use appropriate paper. Choose paper that is appropriate for the material you are using. Charcoal in particular needs special paper suitable for charcoal drawings (thick paper for the charcoal to stick to). Pencils work better on plain, ragged paper as it helps with the rubbing out.
 - Take acid-free fiber paper, if available. This paper ensures that your drawing does not turn yellow over time or get damaged in any other way.
- In addition to specialty paper, charcoal also needs fixative spray to prevent smudging when you are done with your drawing.
 Use a feather. A feather is rolled up paper in the shape of a pencil. With the tip you can mix charcoal or pencil, so that the shades of gray in your drawing merge. Anytime there is too much charcoal or graphite from pencils on the tip of the feather, you can sharpen it. You can buy or make your own feather feathers.
  Use an eraser. An eraser is indispensable to erase mistakes and to add light accents. You can use a regular plastic or rubber eraser for pencil drawings or a malleable eraser for charcoal drawings. The malleable eraser can also be used for pencil drawings, because it is easy to knead into a point for detailed erasure.
Tips
- Realistic drawing of hair and skin is difficult to master. Draw the hair in pieces, so it grows too. Each piece has its own shadows and light accents. Hair drawn in this way appears more realistic. Look for skin irregularities. Freckles, blemishes, scars and wrinkles make the skin more realistic instead of plain plastic skin.
- Draw often. Have a sketchbook handy and draw when you can. Draw people around you when you are waiting for the bus or train. You can also draw the things around you when you are having lunch or watching TV. Practice makes perfect.
- Use a sharp-tipped mechanical pencil to draw details such as eyelashes and wrinkles. This way you can display them better and they look more realistic. A good width for such a pen is 5 mm or less.
- Flip your drawing over or look at it in a mirror from time to time while you are drawing. This way you can see when you draw incorrectly. Flipping your drawing is very useful and has the most effect in the sketch phase.
- Enjoy drawing!
- Mechanical pencils work fine and are thin, making them well suited for drawing.
- Ask the person you are drawing to sit still.
- Sketch without applying pressure.
- The most important thing is the shade! With shadow you create contrast and dimensions. So always draw shadow, even if it is barely visible in the lighter areas. More shadow makes the drawing more realistic.


