Author:
Roger Morrison
Date Of Creation:
18 September 2021
Update Date:
1 July 2024

Content
- To step
- Part 1 of 3: Designing your rangoli
- Part 2 of 3: Finishing the outline drawing
- Part 3 of 3: Filling up your rangoli
- Tips
- Necessities
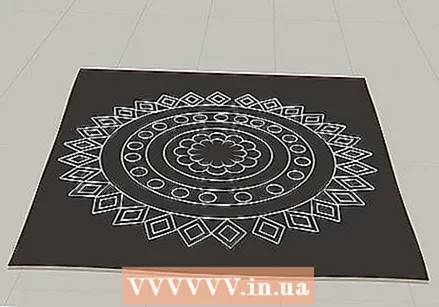
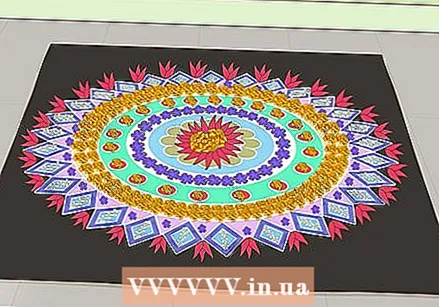
Rangoli are traditional Indian sand drawings that are often made during Diwali, the Indian festival of light. Traditionally made on indoor floors and outdoor areas, they depict a variety of patterns. The drawings can be made in different sizes and with different materials. Whether you are looking for a fun activity to do with your kids or want to make decorations to celebrate the Diwali festival, beginners and experts alike can make rangoli.
To step
Part 1 of 3: Designing your rangoli
 Choose which pattern you want to use. You can use a variety of patterns for your rangoli, but most of the patterns are symmetrical whether you choose a simple or intricate pattern. You can be inspired by a plant or an animal or come up with your own geometric pattern.
 - Depending on how good your creative skills are, you can opt for small, simple geometric or floral designs, or opt for larger, more complex patterns featuring animals, gods or goddesses (such as the Hindu goddess Lakshmi, traditionally worshiped during the Diwali festival) .
- Flowers such as lotus flowers are very popular patterns for rangoli. Some other traditional patterns include fish, snakes, tridents and peacocks - the national bird of India.
 Decide where to draw your rangoli. You can draw your rangoli on a flat dry floor indoors or outdoors, or you can draw it on paper to hang it somewhere.
 - The first rangoli had small patterns displayed in pairs, but you can now make your drawing as big as you want and even cover an entire floor with it. The size of your design will determine the best place to draw your rangoli.
- If you are a beginner, it is best to draw your rangoli on black paper, as this will help you correct mistakes. The bright colors of your drawing will contrast beautifully with the black background of the paper. If you choose to do this, glue the paper to a piece of cardboard to give it a solid background and texture.
- If you decide to make your rangoli on the floor, do it in a place where not many people normally pass so that you don't get in anyone's way.
 Sketch the outline of the pattern on paper. Use a pencil and eraser to practice drawing the outline of your rangoli on black or white paper. Keep practicing until you are happy with your design.
 - If you're making your drawing on black paper, feel free to practice drawing your design on the black paper you'll be using for your final rangoli. Just make sure to sketch lightly so that you can easily erase the lines if necessary.
 Draw the outline of your pattern on the floor with chalk. If you are not making your rangoli on black paper you will have to draw the contours on the floor or whatever surface you are making your rangoli on. Draw the contours with thin, light chalk lines.
 - Lightly draw the outlines with the chalk so that you can easily erase mistakes.
Part 2 of 3: Finishing the outline drawing
 Draw over the contours of your drawing with white chalk to make the lines thicker. This is a good thing to do if you are a beginner as the white chalk will help to display the outline of the drawing neatly and clearly. If you have experience making rangoli you can skip this step.
 - If you've already made a thin outline drawing on the ground, make the lines thicker and darker with a coat of chalk.
- In India, white chalk is traditionally used for the contours. White is a sign of peace and purity, and makes your final rangoli look brighter and tidier.
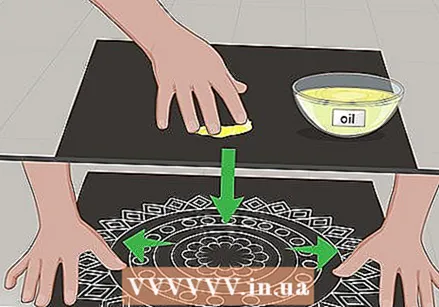 Apply adhesive to the black paper, if using. If you are making a rangoli on black paper, it is necessary to treat the surface so that the materials you use stick to it. Spread a small amount of cooking oil on your entire drawing to make the materials stick.
 - Do not soak the paper with cooking oil. Just put a little oil on your fingertip and follow the chalk outlines of your drawing with it. Use the same technique to smear some more oil in the faces of the drawing itself.
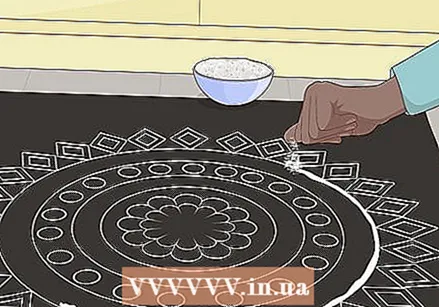 Add depth to your outline drawing with textured white material. The habit is to use natural substances such as semolina, rice and sand.
 - To pour the material easily and neatly onto the chalk drawing, roll a piece of newspaper into a cone, cut a hole in the narrow tip and fill the cone with the material. Use your finger to close the hole in between and follow the contours you drew to represent your pattern.
- If you have a lot of experience, you can manually add depth to the drawing by rubbing the material between your thumb and forefinger and following the lines of the drawing.
 Choose the materials you want to use to fill your drawing. You can fill rangoli with different types of edible materials such as herbs and grains or with materials that you have bought in the store, such as colored rangoli powder.
 - The tradition is to use colorful, natural remedies such as turmeric, chili peppers, grains and even pasta.
- You can even use natural materials found outside, such as flower petals and dried leaves.
- Another option is to use ground chalk or colorful powders specifically for making rangoli.
Part 3 of 3: Filling up your rangoli
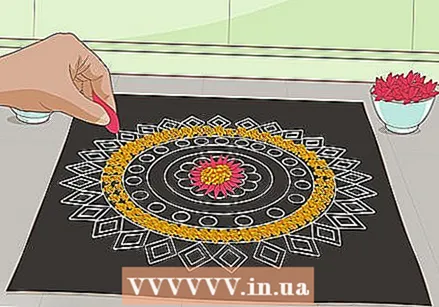 Fill in the faces of your rangoli with the materials you have chosen. Use the paper cone or your fingers to completely fill your rangoli with the materials of your choice. This is the most interesting and usually the most fun step.
 - To fill in your rangoli, you can use the same paper cone you used to add depth to the contours. You can also use your thumb and index finger to add the materials manually.
- In Indian culture, it is important to fill up your rangoli completely and not leave any blanks.
 Use different fabrics and colors for your drawing. Using different colors and textures will make your final drawing look even more artistic. The variety is what makes a rangoli look beautiful.
 - At this step you can really get creative with your rangoli. Use and combine different materials until your rangoli is filled and you are happy with the colors of your drawing.
 Put the finishing touches on the i. Place some candles and lanterns in earthenware pots around your final rangoli to light up your drawing.
 - If you made a rangoli on black paper, hang or place your drawing outside or wherever you have in mind. You can put candles around your drawing and put the finishing touches on the i.
- Write down some wishes in chalk if you want to make your rangoli even more special.
Tips
- Before you start sketching your pattern, it's a good idea to draw a grid to make sure your drawing is symmetrical.
- If you're making rangoli with kids, don't use textured materials if you don't want mess. Have the children draw and color their rangoli with chalk, wax crayons or markers.
- Practice drawing rangoli with chalk on a sidewalk or other stone or concrete surface.
- Be patient. Making a beautiful rangoli takes time and requires concentration.
Necessities
- Black paper
- White paper
- Glue
- Cardboard
- Pencils and eraser
- White chalk
- Edible oil
- White material with a texture like semolina or white rangoli powder
- Other colorful materials such as leaves, petals and colored powder
- Candles or lanterns in earthenware pots (optional)


