Author:
Tamara Smith
Date Of Creation:
22 January 2021
Update Date:
1 July 2024

Content
A pipette is a type of laboratory equipment used to measure and transfer very small amounts of liquid. Accuracy and precision in the pipette measurement are necessary because any deviation in the delivered volumes can affect the results of an experiment. To ensure accuracy, it is necessary to check the pipette calibration every few months. The calibration process helps to verify that the equipment is dispensing the correct volumes so that it can be restored if it is not.
To step
Part 1 of 2: Checking the calibration
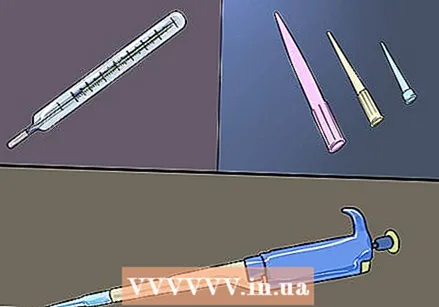 Gather the necessary materials. To check the calibration of a pipette, you need a pipette, pipette tips, distilled water, a beaker, thermometer, a balance and dishes. The balance must be microgram specific to calibrate micropipettes with a maximum of 1 µl.
 - You don't need more than 5 ml of water. Fill the cup with the water.
- Make sure the pipette tips fit properly.
 Measure the temperature of the distilled water. Place the thermometer in the water and let it sit for at least one minute. If the red line on the thermometer is still moving, leave it for another minute. After a minute, write down the temperature in a notebook. Remove the thermometer and dry it when you are done.
 - The temperature of the water is important to the calculations made to check the calibration.
 Place the scale on the balance and set it to zero. Ideally, you use a balance with doors and an insulated room. Place the bowl in the room and close the doors. If there are no doors, just place the bowl on the balance. Press the "Zero" or "Tare" button and wait for the balance to read zero.
 - By setting the balance to zero, the weight of the plastic bowl is not taken into account and it becomes possible to measure only the weight of what you put in the bowl.
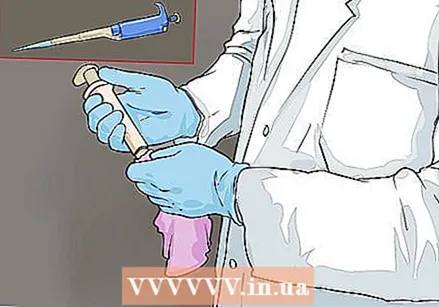 Prepare the pipette for calibration. Before starting, wipe the pipette with ethanol to kill any contaminants - in addition, make sure the pipette tip does not become clogged. Place the correct tip on the end and set the volume you want to test.
 - Before calibration, you test both the smallest volume and the largest volume that the pipette can dispense.
 Flush the tip before calibrating. Push the button in to the first stop and insert the tip into the distilled water so that about 2 mm of it is submerged in the liquid. Release the button to draw up some liquid, then dispense the liquid again by pushing the button down. Repeat this three times to flush the tip.
 - Push the button to the second stop to dispense any liquid remaining in the tip and remove the pipette from the water.
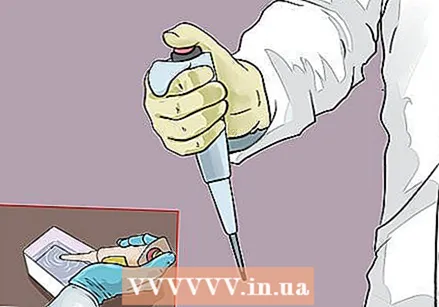 Draw up the calibration volume. With the tip out of the liquid, push the button down to the first stop. Place about 2 mm from the tip in the distilled water and release the button to draw the liquid into the tip. Wait about a second before removing the tip from the water.
 - Make sure the tip is completely submerged during the entire aspiration process. You don't want bubbles in the tip or the result will not be right.
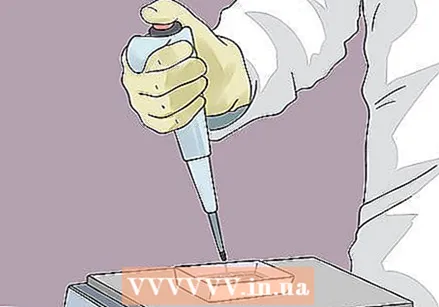 Dose the liquid in the bowl on the balance. Place the tip against the bottom of the bowl and push the button down to the first stop. Move to another spot, slightly away from the water, and push the button to the second stop. Hold down the button and lift the tip of the bowl.
 - Keep the tip on the pipette, because you will be using it again to do more calibration tests. Make sure the tip does not touch anything.
 Record the weight that indicates the balance. Close the door if you are using a balance in an isolated room. Wait for the values to stop changing. Record this value in your notebook.
 - It is important to wait for the number to stabilize before writing it down. Your readings will be wrong if you don't wait.
 Repeat this process until you have taken at least 10 measurements. Set the balance to zero, flush the tip, draw up the same volume, dispense the volume and then record the weight. You need multiple recordings of the same volume and then you can take the average of all recordings together.
 - You can repeat this same process with different volumes, as long as you take multiple measurements per volume.
Part 2 of 2: Calculating the results
 Use the formula for the calculated volume. The formula for calculating the volume delivered by the pipette is V = w * Z, where w is the weight of the water, Z is the conversion factor based on the density of the water, and V is the calculated volume of how much water there is handed in.
 - You can find the Z variable by looking up the density of the water using the temperature recorded at the start of the experiment.
- For example: If the temperature of the water was 23 ° C, then you assume a Z value of 1.0035 µg / mg.
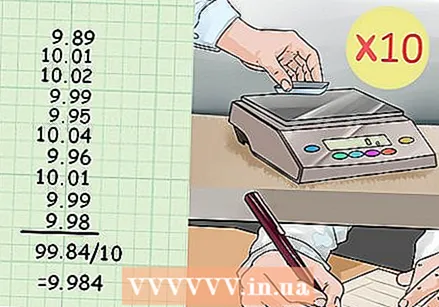 Calculate the mean of the repeated trials. You must have weighed the volume of water dispensed by the pipette at least 10 times. To calculate the mean of all these values, add them up and divide them by 10. If you have completed more or less trials, add each trial and divide the sum by the total number of trials.
 - For example: The ten weights you registered for a 10µl pipette volume are as follows: 9.89, 10.01, 10.02, 9.99, 9.95, 10.04, 9.96, 10.01, 9.99 and 9.98.
- The mean is: (9.89 + 10.01 + 10.02 + 9.99 + 9.95+ 10.04 + 9.96 + 10.01 + 9.99 + 9.98) / 10 = 99, 84/10 = 9.984
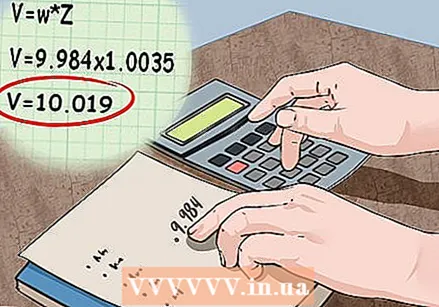 Apply the variables to the equation and solve it. Once you determine the correct values for each variable, you can incorporate them into the equation and solve for the calculated volume. To solve this, simply multiply the average weight of all test values by the Z value.
 - For example: V = w * Z = 9.984 * 1.0035 = 10.019
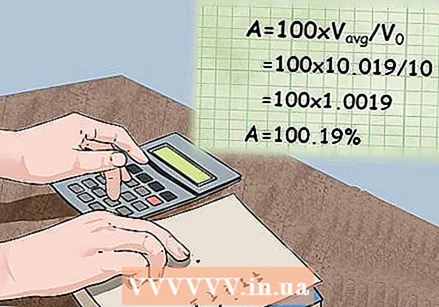 Calculate the accuracy of the pipette. To calculate the accuracy you can use the equation A = 100 x V.avg/ V0 where A is the precision of the pipette, V.avg the mean calculated volume, and V.0 the value you set for the pipette. Accuracy must be between 99-101%.
 - If the pipette is properly calibrated, the calculated value should be very close to the actual value you set on the pipette.
- For example: A = 100 x Vavg/ V0 = 100 x 10.019 / 10 = 100 x 1.0019 = 100.19%
- This pipette is properly calibrated.
 Send the pipette in for calibration, if necessary. If your pipette fails the calibration test, stop using it for experiments immediately. Pipettes are very delicate and expensive parts of laboratory equipment. You cannot repair the calibration yourself, so you will have to send it in for proper maintenance. Alternatively, some companies will come to your lab and calibrate your pipettes there.
 - For maintenance, contact the company that makes your specific pipette brand.


