Author:
Charles Brown
Date Of Creation:
1 February 2021
Update Date:
1 July 2024

Content
- To step
- Method 1 of 3: Hand stitching an emblem
- Method 2 of 3: Sew on an emblem with a sewing machine
- Tips
- Warnings
- Necessities
Many people wear uniforms with badges, whether they are in the military or a member of a scouting group. Sometimes you will need to sew a new emblem on your uniform when you are promoted or earned a new emblem. Emblems can be sewn onto a uniform by hand or a sewing machine. It's a simple and easy process.
To step
Method 1 of 3: Hand stitching an emblem
 Wash, dry and iron your uniform before you start. If you have a new uniform, make sure to wash and dry it once before sewing the emblem on. Otherwise, the fabric under the badge will bubble after you wash and dry the uniform for the first time.
 - Many uniforms are made of cotton. Cotton will usually shrink slightly after the first wash. If you sew a patch onto your uniform before washing it, the fabric underneath the patch will shrink and pull on your patch, causing it to bulge.
- It is also a good idea to iron where the decal will be placed before starting to sew. Ironing the area removes all wrinkles from the fabric. If you sew the badge on creased fabric, your uniform will have permanent wrinkles.
 Grab a sewing needle and yarn. Choose thread in the color of the uniform or the border of the emblem.
 - If you can't find the correct color thread, look for a darker color that matches the uniform or the border of the emblem as closely as possible.
- A darker color of thread matches the fabric better than a lighter color and is less noticeable. You can also use sheer thread to make the stitches less noticeable.
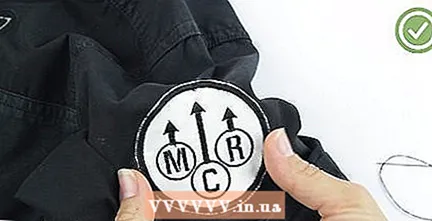
 Place the emblem in the right place on the fabric. Some badges, such as badges on army uniforms, need to be sewn in a specific place.
 - For example, you may have a flag emblem that needs to be sewn on the shoulder or upper arm of the sleeve. The flag should also be positioned so that it points in the correct direction. The flag may also need to be positioned so that it looks like it is blowing in the wind when you walk.
- Ask your supervisor where you should sew the emblems.
 Cut a piece of yarn. If you are not very experienced in sewing, it might be a good idea to use a piece of thread that is no more than 18 inches long. Longer pieces tangle quickly and are more difficult to work with than shorter pieces.
 - You can also try not to cut the thread and leave it on the spool.This also prevents the yarn from tangling.
- You also don't have to worry about running out of yarn and putting a new piece of yarn through your needle.
 Cut the ends of the yarn. Cut any loose pieces of yarn hanging at the bottom of the knot.
 - Leave a piece of yarn about 1 inch long. This way you will not accidentally cut the knots. Tuck the piece of yarn under the emblem.
Method 2 of 3: Sew on an emblem with a sewing machine
 Iron the uniform. Before sewing, iron the uniform to get all wrinkles out.
 - Ironing the uniform before sewing will avoid sewing over wrinkles and leaving permanent wrinkles in the fabric.
 Place the emblem where it should be. It is a good idea to place the emblem on the garment or uniform before sewing and make sure it is in the right place.
 - If you've sewn the patch onto your uniform and only then find out it's in the wrong place, you'll have to take it off and start all over again.
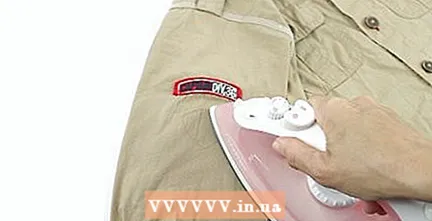 Iron the garment. You will need to iron the sleeve or garment so that there are no wrinkles in the fabric.
 - Ironing can also help smooth out any bumps and holes from the previous decal.
- Ironing the garment before sewing will prevent you from sewing over wrinkles or leaving permanent wrinkles in the fabric.
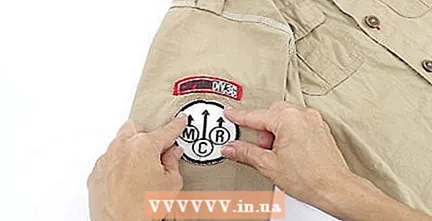 Place the emblem in the right place. Make sure the decal is in the right place before you sew or glue it on the sleeve. If you sew an emblem onto an army uniform, you will have instructions for where to place the emblem.
 - You may have to measure exactly where the emblem should be placed. Read the instructions you got on the decal to fix it in the right place.
- You can pin the emblem or use self-adhesive tape to iron the emblem onto the fabric.
- Ironing the emblem is not a permanent solution. This is only for holding the decal in place while sewing. By not using pins you can simply sew the emblem without having to worry about pins.
- When you have ironed the decal onto the fabric, let it cool before you start sewing.
 Secure the yarn with a knot or the machine. When you have sewn around the emblem, tie off the yarn.
 - Grab your scissors and cut any loose threads. Leave a short piece of yarn about 1 centimeter long. This way you will not accidentally cut the buttons.
Tips
- If you can get to the place where the emblem should be with the sewing machine, you can sew the emblem with your sewing machine. If your sewing machine uses top thread and bobbin thread, the top thread should be the same color as the border of the emblem. Choose bobbin thread in a color that matches the back of the material.
- If you cannot sew the emblem on the fabric without bumps with straight pins, you can staple it temporarily and remove the staples from the fabric after sewing. You can also use self-adhesive tape to temporarily stick the decal to the fabric until you can sew it on with your sewing machine.
- If it is difficult for you to push the needle through the emblem and fabric of the uniform, use a thimble to protect your fingers.
- It may be easier to use iron-on tape to attach the decal instead of sewing it on.
- A leather needle is an excellent needle for sewing on an emblem.
- An ironed and sewn-on emblem will look good for years and hundreds of washes.
Warnings
- Many organizations now opt for ironing emblems that you iron on the fabric. So check if you have an ironing emblem before hand-sewing the emblem onto the garment.
- If you only iron the emblem onto the fabric, it will eventually curl and come loose from the fabric. Depending on what you do while wearing the uniform, the emblem can also catch on sharp edges and branches. Sew the decal on to make it stick better.
Necessities
- Yarn in the same color as the uniform or the edge of the emblem
- Scissors
- Sewing needle
- 1 or 2 straight pins or safety pins
- Optional: wire piercer and / or thimble
- Sewing machine, if you have one
- Self-adhesive hem tape
- Iron


