Author:
Morris Wright
Date Of Creation:
24 April 2021
Update Date:
1 July 2024

Content
- Ingredients
- The base
- The batter
- The dipping sauce
- To step
- Part 1 of 3: Boil the eggs
- Part 2 of 3: Coating and frying the eggs
- Part 3 of 3: Making the sauce
- Tips
- Necessities
Kwek kwek is popular street food and a delicacy in the Philippines, but you can make your own version at home with the right ingredients and supplies. Hard-boiled quail eggs are coated with orange batter and fried until crispy, then eaten with a sweet and sour dipping sauce.
Ingredients
For 4 servings
The base
- 1 dozen quail eggs
- 1 cup (250 ml) of flour
- Water, for cooking
- Cooking oil for frying
The batter
- 1 cup (250 ml) of flour
- 3/4 cup (185 ml) of water
- 1 tablespoon (15 ml) of annatta powder
- 1/2 teaspoon (2.5 ml) baking powder
The dipping sauce
- 1/4 cup (60 ml) (rice) vinegar
- 1/4 cup (60 ml) of brown sugar
- Ketchup 1/4 cup (60 ml)
- 2 teaspoons (10 ml) soy sauce
- 1/2 teaspoon (2.5 ml) black pepper
To step
Part 1 of 3: Boil the eggs
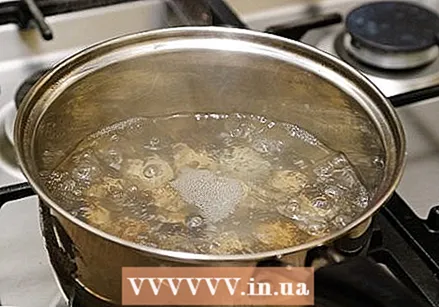 Boil the eggs. Place the eggs in a medium saucepan. Add water until the eggs are 1 inch (2.5 cm) under water. Heat the pan over high heat until the water starts to boil. Turn off the heat, put the lid on the pan and let the eggs boil for an extra 5 minutes in the hot water.
 - In general, it is recommended to heat the water and eggs at the same time. If you place cold eggs in boiling water, some of the eggs may break.

- To make the eggs easier to peel and to prevent the yolks from taking on an unappealing green hue, rinse the eggs in cold water as soon as you remove them from the hot water. This stops the cooking process and creates a barrier of steam between the egg white and the shell, making the shell easier to remove. You can rinse the eggs under cold, running water or submerge them in a bowl of ice water.

- In general, it is recommended to heat the water and eggs at the same time. If you place cold eggs in boiling water, some of the eggs may break.
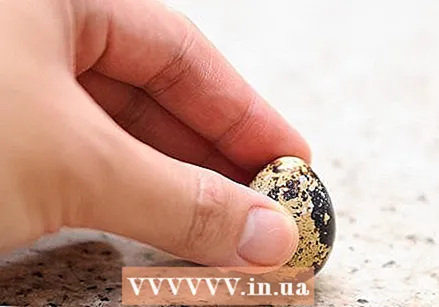
 Cool and peel the shells. Let the eggs rest at room temperature or in cold water, until cool enough to handle. Once they have cooled down enough, you can peel the eggs with your fingers. When you're done, you'll have a dozen hard-boiled quail eggs.
 - To peel the eggs, tap them firmly on a hard surface with just enough force to break the shell. Peel the peel from this break.
- You can do this step up to two days in advance. If you do not want to use the boiled quail eggs immediately, you must keep them refrigerated in a closed container until you are ready to use them. However, you may not keep them for longer than two days.
- To peel the eggs, tap them firmly on a hard surface with just enough force to break the shell. Peel the peel from this break.
Part 2 of 3: Coating and frying the eggs
 Dip the eggs in flour. Sprinkle 1 cup (250 ml) of flour in a small, shallow-sided saucer. Roll the freshly peeled quail eggs in the flour, until each is coated all the way around.
 - You can use cornmeal to coat the eggs instead of wheat flour. Corn flour contains less gluten, but otherwise behaves in the same way as wheat flour and sticks just as well.
 Put the annatta powder in warm water. Dilute the annatta powder by dissolving it in 3/4 cup (185 ml) of warm water. Stir with a whisk until dissolved.
 - Annatto is usually used as a food coloring, and when combined correctly, it gives a deep orange color. However, it does give the batter a slight aftertaste.
- If you don't have annatta powder, you can use orange food coloring instead. Add a few drops of orange food coloring or a few drops of red and yellow food coloring to the warm water and mix until you get a deep orange color. The coloring will not give the batter exactly the same flavor as the annatta powder, but the color should be the same.
 Combine the ingredients for the batter. Using a whisk, stir another cup (250 ml) of flour, baking powder, and diluted annatto in a large bowl. Combine thoroughly until no more lumps can be seen.
 - To improve the quality of the batter, set it aside for about 30 minutes before coating the eggs. By letting the batter rest for a while, the flour can absorb the moisture better, creating a thicker, richer batter. The resting time also gives the baking powder more time to become active. Be careful, though, because if the batter rests for more than 30 minutes, the baking soda will produce bubbles that escape, creating a denser, less airy batter.
- Also note that baking soda is not a necessary ingredient. Some recipes omit it completely. You can also omit it, and the end result will just be a less fluffy batter.
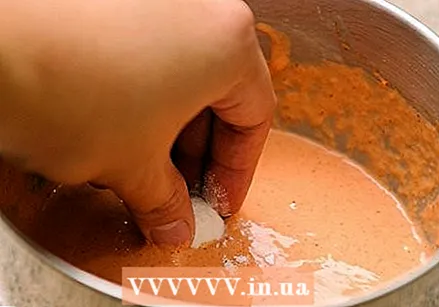 Coat the eggs with batter. Roll the eggs in the batter. Roll them around gently until all sides are coated.
 - If you don't want sticky fingers, use a metal skewer or fork to coat the eggs. It is critical that each egg is coated all around.
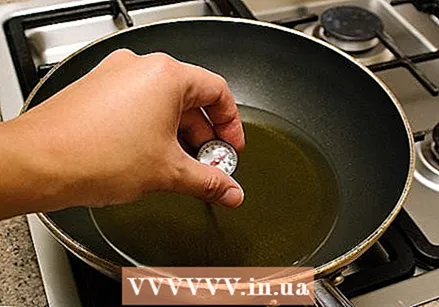
 Heat oil in a deep pan. Pour 1 inch (2.5 cm) of vegetable oil into a large pan with high sides and a heavy bottom. Heat the oil over high heat over the stove until it reaches a temperature of 180 degrees Celsius.
 - Check the temperature of the oil with an oil or candy thermometer.
- If you don't have a thermometer, check the temperature of the oil by adding a small dollop of batter. The batter should immediately start to sizzle and fry when the oil is hot enough.

- Check the temperature of the oil with an oil or candy thermometer.
 Fry the eggs. Place the coated eggs in the oil four to six at a time. Cook them with a slotted spoon, stirring gently, until the batter is golden brown and crispy. This will only take a few minutes.
 - To prevent batter from getting on your fingers, use a skewer to pierce the coated eggs when transferring to the hot oil. Use a second skewer or fork to scrape the eggs off the skewer and into the hot oil.
- Work carefully to prevent the hot oil from splashing when you put in the eggs.
- Understand that the temperature of the oil will fluctuate as soon as you put the eggs in and remove them. Keep an eye on the oil thermometer while frying the eggs. Adjust the heat on your stove as needed to maintain a temperature of around 180 degrees Celsius.
 Drain the eggs lightly and cool. Place several layers of kitchen paper on a plate. Remove the kwek kwek from the hot oil and place the eggs on the plate. Let the excess oil soak in the kitchen paper.
 - If desired, a plate lined with clean paper bags instead of paper towels will also work well.
- Alternatively, you can place the fried eggs in a metal strainer and drain the excess oil that way, instead of using a paper towel.
- It is best to enjoy the kwek kwek while it is still slightly hot. The dough will be crisper when eaten fresh, and can become soft once it cools.
- Kwek kwek does not heat well as the dough tends to get soaked during cooling and heating.
Part 3 of 3: Making the sauce
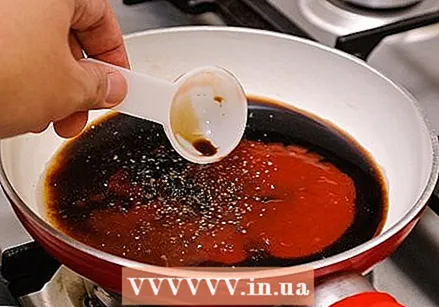 Combine the ingredients in a pan. In a small saucepan, combine the rice vinegar, brown sugar, ketchup, soy sauce, and black pepper. Stir until an even mixture is formed.
 - If you want a spicier sauce, crush some hot peppers and mix it with the other ingredients. If you still want a smoother sauce, you can get the same amount of heat by adding 1 teaspoon to 1 tablespoon (5-15 ml) of chili sauce.
- Make this sauce while the eggs drain and cool. By the time the sauce is ready, enough of the oil has drained and the eggs are cool enough to eat. However, you don't want the eggs to be completely cooled, as this will make the batter soggy.
- You can also make the sauce ahead of time. Then keep it in an airtight container and in the refrigerator until you are ready to eat it. Microwave it for 30-60 seconds or heat it gently on the stove.
 Heat it through and through. Simmer the sauce on the stove over medium heat until the sugar is completely dissolved. Stir frequently when the sauce is boiling.
 - When it is ready, remove the dipping sauce from the heat. Let it cool until it is cold enough to touch.

- When it is ready, remove the dipping sauce from the heat. Let it cool until it is cold enough to touch.
 Serve the eggs. Add the dipping sauce in a bowl. Serve it alongside the freshly baked kwek kwek.
Tips
- If you can't find good quail eggs, use small chicken eggs. Follow the same cooking, batter and frying instructions for the eggs and serve them with the same sauce. Note, however, that when made with chicken eggs, the dish is called "tokneneng" instead of "kwek kwek".
Necessities
- Two small saucepans
- Shallow dish
- Small mixing bowl
- Large mixing bowl
- Deep, heavy skillet
- Candy or oil thermometer
- Skewers
- Fork
- Skimmer
- Plate
- Kitchen paper, paper bags or metal sieve
- Whisk
- Mixing spoon
- Bowl (for the dipping sauce)
- Serving plate


