Author:
Roger Morrison
Date Of Creation:
26 September 2021
Update Date:
21 June 2024

Content
- To step
- Method 1 of 3: Using two intersecting lines
- Method 2 of 3: With overlapping circles
- Method 3 of 3: Using a compass and a protractor
- Tips
- Warnings
- Necessities
When you can find the center of a circle, it becomes easier to perform simple geometric tasks, such as finding the circumference of a particular area. There are several ways to find the center of a circle! Using intersecting lines, overlapping circles, or a compass and ruler.
To step
Method 1 of 3: Using two intersecting lines
 Draw a circle. Use a compass or a circular object. The size of the circle does not matter. If you have found the center of an existing circle, you do not need to draw a new circle.
 - A compass is a tool specially designed for drawing and measuring circles. You can buy these at an office supply store, among others.
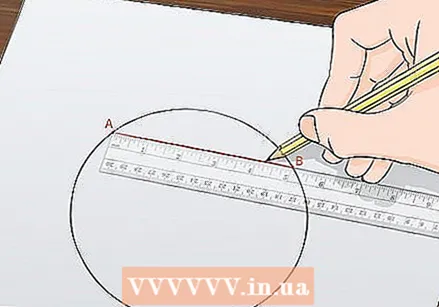 Draw a chord between two points. A chord is a straight line segment that connects any two points along the edge of a curve. Name the chord AB.
 - Use a pencil to sketch your lines. This way you can erase the marks once you find the center. Draw lightly so that you can erase the marks more easily.
 Draw a second string. This line should be parallel and equal in length to the first chord you drew. Call this new line CD.
 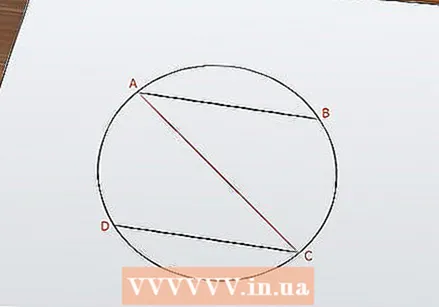 Draw another line between A and C. This third chord (AC) should go through the center of the circle - but you have to draw another line to find the exact center point.
  Merge B and D. Draw a final chord (BD) over the circle between point B and point D. This new line will go over the third chord (AC) you drew.
 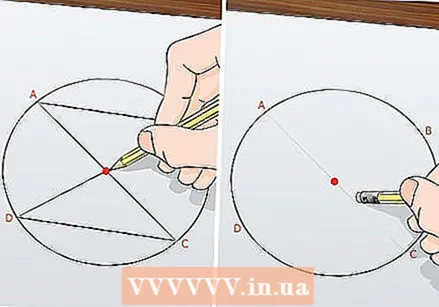 Determine the center. If you have drawn straight and accurate lines, the center of the circle is at the intersection of lines AC and BD. Mark the center point with a pen or pencil. If you want only the center point to be marked, erase the four cords you drew.
Method 2 of 3: With overlapping circles
 Draw a line between two points. Use a ruler or compass to draw straight lines within the circle, from one edge to the other. The points you use do not matter. Label the two points A and B.
  Use a compass to draw two overlapping circles. The circles must be exactly the same size. Make A the center of one circle and B the center of the other. Place the two circles so that they overlap like a Venn diagram.
 - Draw these circles with a pencil, not with a pen. The process will be easier if you can erase these circles later.
 Draw a vertical line through the two points where the circles intersect. There will be a point at the top and a point at the bottom of the space created by the overlap of the circles. Use a ruler to make sure the line goes straight through these points. Finally, you name the two points (C and D) where this new line intersects the edge of the original circle. This line marks the diameter of the original circle.
 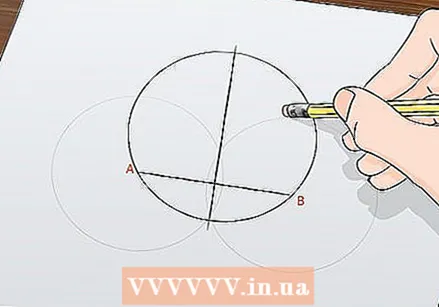 Erase the two overlapping circles. This clears your workspace for the next step of the process. Now you should have a circle with two perpendicular lines through it. Do not erase the centers (A and B) of these circles! You are going to draw two new circles.
 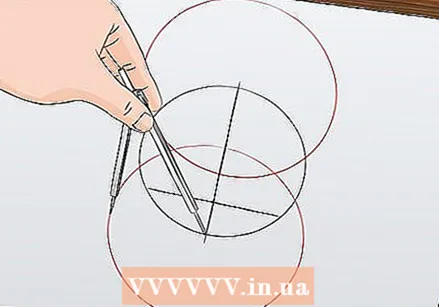 Sketch two new circles. Use your compass to draw two equal circles: one with point C in the center and one with point D in the center. These circles should also overlap each other like a Venn diagram. Remember: C and D are the points where the vertical line intersects the main circle.
  Draw a line through the points where these new circles intersect the first circle. This straight, horizontal line must go through the space of the overlap of the two new circles. This line is the second diameter of your original circle, and it must be exactly perpendicular to the first diameter line.
 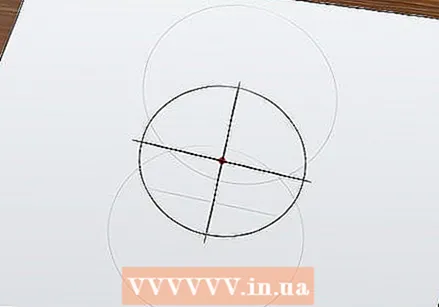 Determine the center. The intersection of the two straight diameter lines is the exact center of the circle! Mark this center point for checking. If you want to clean up the paper, erase the diameter lines and auxiliary circles.
Method 3 of 3: Using a compass and a protractor
 Draw two straight intersecting tangents on the circle. The lines can be completely random. However, the process will be easier if you make them roughly square or rectangular.
  Translate both lines to the other side of the circle. You end up with four tangents that form a parallelogram or roughly a rectangle.
  Draw the diagonals of the parallelogram. The point where these diagonal lines intersect is the center of the circle.
 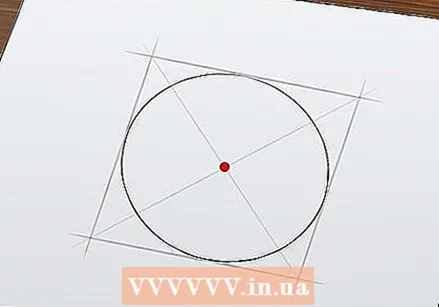 Check the correctness of the center with a compass. The center should be right in the middle, as long as you didn't make any mistakes while translating the lines or drawing the diagonals. If necessary, erase the lines of the parallelogram and the diagonals.
Tips
- Use graph paper instead of blank or lined paper. This will help you to draw perpendicular guides and boxes.
- You can also calculate the center of a circle in a mathematical way, by splitting off the square. This is useful if the equation of the circle is given, but you are not working with a drawn circle.
Warnings
- Do not use a measuring tape but a ruler so that you can work accurately.
- To true To find the center of a circle, you need a compass and a ruler.
Necessities
- Pencil
- Paper
- Ruler
- Compass
- Graph paper


