Author:
Frank Hunt
Date Of Creation:
15 March 2021
Update Date:
1 July 2024

Content
Learning to play the guitar is a lot of fun, although learning to play chords may seem a little intimidating at first. Fear not, because it is not much different than playing a few notes: you now only play them all at the same time! This article will show you how to position your fingers and how to play some standard chords. Grab your battle ax and rock it!
To step
Part 1 of 2: Understanding chords
 Getting to know the strings. The best way to start is to familiarize yourself with the strings on your guitar and how they relate to your fingers. To make this easier, we are going to number them both. The strings on your guitar are numbered like this:
 - Vertically, the strings are numbered 1 to 6; from the highest note to the lowest.
- Horizontal, the numbering is based on the position of the frets.
- Note that when the instructions say "put your first finger on the third fret," you are actually your finger between the second and third fret. It is the string itself that must come into contact with the third fret.
 Number your fingers. Take a look at your left hand and imagine numbers printed on your fingers. Your index finger is number 1, your middle finger is number 2, your ring finger is number 3, your little finger is number 4. We call the thumb D (or T for Thumb in English) but we will not use it for the chords in this article.
  Learn the C chord. The first chord we'll cover is the C chord - one of the most basic chords in music. Before we do that, let's explain what that exactly means. A chord, whether played on a guitar or piano, or sung by well-trained mice, is simply playing three or more notes at once. (We call two notes a "dyad" - these are also useful, but are not chords). Chords can also contain much more than three notes, but that misses the point of this article. A C chord on the guitar looks like this:
 - The lowest note is the third fret of the A string: C.
- The following note is played on the second fret of the D string: E.
- There is no finger on the G string. You play this string "open" when you strike a C.
- The highest note you play is the first fret of the B string: C.
- The highest and lowest strings of the guitar are not struck for a basic C chord.
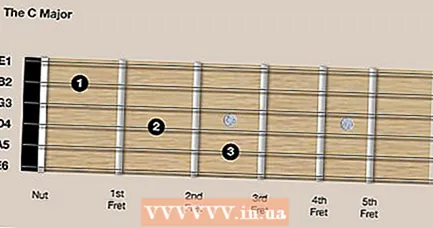 Try out the nuts. Play each note in the chord, from low to high, one by one. Take your time and act deliberately: press the fret well and strike the string. Keep the note sounding for as long as possible, then move on to the next.
 - Press your third finger on the third fret of the A string, as mentioned, strike the string and let it continue sounding for as long as possible.
- Press your second finger on the second fret of the D string, pick and sound for an E.
- Pause! Strike the open G string.
- Press your first finger on the first fret of the B string, and make that C note sound loud.
- Play the notes, one at a time, a few times in a row. When you're ready, quickly run your pick or fingers along all four strings. You just played a C chord!
- It may sting a bit at first, but if you develop calluses, the pain will go away on its own.
Part 2 of 2: Learning more chords
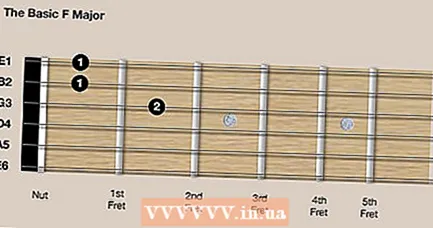 Expand your musical vocabulary. Playing a C chord is all well and good, and will also introduce you to the musical landscape, but of course there is a lot more music than just that C! Here are two other chords often played in C major. Play a basic F chord like this:
 - The notes in an F chord are F, A, and C. Note that the notes F and C are pressed by the same finger: the first finger is placed on the first fret of both the first and second strings.
- In general, chords are constructed so that the lowest note is the root note. In this case, the F will sound on the first fret of the first string. This will be "conversion" mentioned.
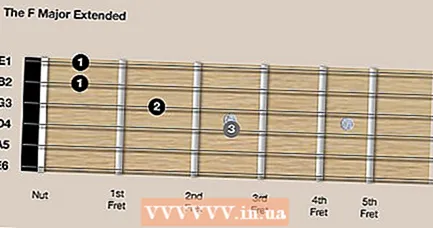 Extend the F chord. You can add an F as the root note by adding the F on the D string: place your third finger on the third fret of the D string. You will notice that the chord doesn't sound much different; or "fuller".
 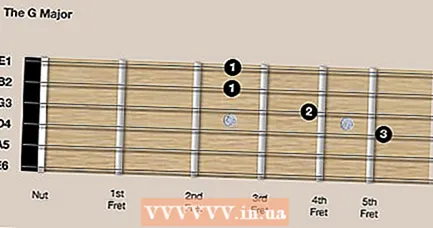 Play a G chord. Like the C and F, the G chord is one of the Big Three in the C major scale. There are several ways to play a G. We show two of them. The first way is easy: place your fingers the same as with the extended F, only two frets further.
  Play the G chord the easy way. Here's how to play the G chord with just one finger.
 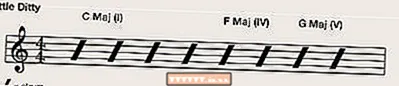 Put everything together. Now that you know three basic chords in the scale C, merge. You may recognize a trillion popular songs. Hit the C four times, followed by the F twice, followed by the G twice, then back to C.
 - There is a Roman numeral behind each chord. These numbers show what position the root of the chord is in - regardless of how you have your fingers. As soon as you know the basic chords of all keys, it is easier to only show a table, instead of all the chords being spelled out completely.
- Practice until your fingers get tired, then take a break. But come back: we'll also show you how to play the most important chords in E and A!
 Learn the key of E. There's a lot of rock 'n' roll written in E, and a lot of blues too. The three chords we learn here are E major (I), A major (IV), and B Maj (V). Here's the E chord:
 - This is one of the easier chords to play once you have some calluses on your fingers. You can play all strings at the same time. Set your Marshall wall to 11 with this chord, hit the strings hard, and you'll feel like a rock star right away!
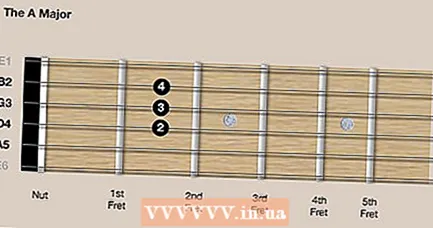 Play the A major. This is another "big deal". There are several ways to play this chord. You can use one finger to press the second fret of the B, G, and D strings (playing C #, A, and E), or any combination of fingers. In this example, use finger 4 on the B string, finger 3 on the G string, and finger 2 on the D string.
 - As you learn to play better, you will understand that switching chords quickly sometimes results in weird finger positions that still work. It is important to learn to use your fingers as efficiently as possible. Don't be afraid to experiment.
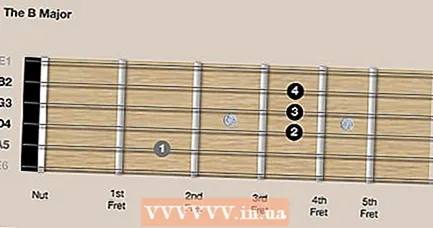 Play the B major. You can play these easily or hard. The easy way can be seen in the black numbers. You can also add the gray number as a note.
  Just give it a try. Here's a short stroke pattern to try out in E:
 - Also try out different beat patterns: don't stick to rules on paper.
 Learn the key of A. You are already two-thirds of the way! The key of A consists of A in the first position (I), D in the fourth position (IV), and our good friend E in the dominant fifth position (V). Here's how to play a D chord:
 - Notice that the first finger is placed over the first three strings: this is the beginning of a barre chord. A full barre chord uses one finger to press all the strings, and is often based on the basic chords in this article.
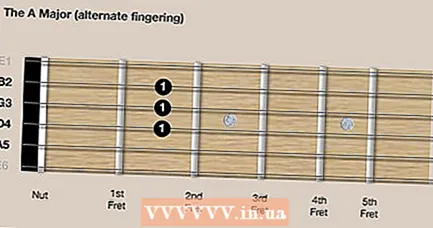 Learn the alternate version of the A chord. This is useful when you are playing the A in conjunction with the D and E chords.
 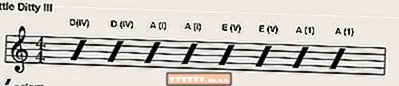 Try this. Here's another tune you can practice with your chords.
 - Now think about the song Down on the Corner from Creedence Clearwater Revival, and try again!
Tips
- Once you know all the basic chords, it may be easier to see them in the role they play within a key. For example, in E, the E (I) is the Tonica. The Tonica is where all other chords want to go - and is what gives Western music the sense of motion. The A (IV) in E is the Subdominant — it's kind of an in-between chord; it wants to go forward as much as it wants to go back to the Tonica. The Dominant sounds exactly like it is: it leads you where you want to go. In E that role is played by B (V), and will definitely want to bring you back to the Tonica. As you get more familiar with the chords, try writing a tune as I-IV-V (or variations thereof) instead of E-A-B. This makes it much easier to transpose the tune if, for example, your singer cannot sing that high or low!
Warnings
- As Ringo Starr once said after a lengthy studio session, "I've got blisters on my fingers!" Yes, you will get blisters on your fingers, and they will also hurt. But as guitarist George Harrison remarked, "all things must pass." Your blisters will also decay, and they will give way to calluses. Practice often, and the pain in your fingers will soon stop.


