Author:
Frank Hunt
Date Of Creation:
11 March 2021
Update Date:
1 July 2024

Content
- To step
- Part 1 of 4: Learning the basics of weather maps
- Part 2 of 4: Reading the air pressure
- Part 3 of 4: Interpreting the different front types
- Part 4 of 4: Interpreting other symbols on a weather map
- Tips
Knowing how to read a weather map can help you understand the weather and know what to expect. For example, high pressure areas (H) have clear skies, while low pressure areas (L) can be stormy.Blue cold front lines bring rain and wind in the direction of the arrows. Red warm front lines bring brief rain followed by warming in the direction of the semicircles. If you want more information about reading weather maps, keep reading!
To step
Part 1 of 4: Learning the basics of weather maps
 Understand the general concepts of precipitation. What most people care about most is precipitation. Within meteorology, this is any form of water that falls on the earth's surface. Some forms of precipitation are rain, hail, snow and sleet.
  Recognize a high pressure system. An important aspect of weather interpretation involves understanding the consequences of differences in air pressure. High pressure implies dry weather. A high pressure system is a mass of air with denser air, because the air is cooler and / or drier than the surrounding air. So heavier air falls down and away from the center of the pressure system.
 - In high pressure systems, the weather will tend to clear or clear up.
 Understand what a low pressure system is. Low pressure is usually associated with moist air and, in some cases, precipitation. A low pressure system is a mass of air that has less dense air because the air is more humid and / or warmer. Surrounding air pulls in, towards the center of the low-pressure system, as the lighter air rises which cools moist air, often creating clouds and precipitation.
 - You see this effect when air of invisible water vapor is forced to condense into droplets when it makes contact with the outside of a cold glass). But droplets form when the glass is even slightly cold ... so rising air from a low-pressure area will only produce rain if it can get where the air is cool enough to condense the water vapor into droplets that are too heavy to travel into the water. rising air to stay.
- In very low-pressure systems, storms are underway (if they have not already arrived). Clouds begin to form and move across the sky, and thunderclouds form when moist air is pushed very high. Sometimes tornadoes can form when very cold, dry air from a high pressure area collides with very warm, moist air from a low pressure area.
 Study a weather map. Look for a weather map on the news, online, or in the newspaper. Other sources may be magazines and books, but these are of course not up to date. Newspapers are a useful method of finding a weather map, and they are inexpensive, reliable, and can be cut up so that you can take them with you while learning the interpretation of the symbols.
 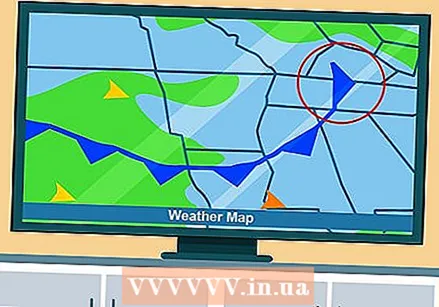 Analyze a small portion of the weather map. If possible, find a map for a smaller area - these are often easier to interpret. Interpreting a larger map for a larger area can be difficult for the beginner. Note the map, its location, lines, arrows, patterns, colors, and numbers. Every character counts and they are all different.
Part 2 of 4: Reading the air pressure
 Understand what air pressure measures. This is the weight or pressure that the air exerts on the ground and is measured in millibars. It is important to be able to read air pressure because pressure systems are related to certain weather patterns.
 - An average air pressure system is 1013 mb (76 cm mercury).
- A typical high-pressure system is about 1030 mb (77 cm mercury).
- A typical low pressure system is about 1000 mb (75 cm mercury).
 Learn the air pressure symbols. To read barometric pressure on a surface analysis weather map, view the isobars (iso = equal, bar = pressure) - regular, curved lines that indicate areas of equal air pressure. Isobars play an important role in determining the speed and direction of the wind.
 - When the isobars form concentric, closed (but not always round) circles, the smallest circle in the center indicates that there is a center of pressure. This can be either a high pressure system (an "H" in English, an "A" in Spanish) or a low pressure system (an "L" in English, a "B" in Spanish).
- Air does not flow through pressures, but around it due to the Coriolis effect. Hence, wind direction is indicated by the isobars, counterclockwise around the lows (cyclonic flow) and clockwise around highs (anti-cyclonic) in the Northern Hemisphere, creating wind. The closer the isobars are, the stronger the wind.
 Learn how to interpret a low-pressure system cyclone. These storms are characterized by increasing clouds, wind, temperature and the chance of precipitation. They are represented on a weather map by isobars that are close together and with arrows pointing clockwise (in the southern hemisphere) or left (in the northern hemisphere), usually with a 'T' in the middle isobar, forming a circular circle. (the letter may vary depending on the language in which the weather report is presented).
 - Radar images can show low-pressure systems. Tropical cyclones (South Pacific) are also called hurricanes around America or one typhoons in the coastal regions of Asia.
 Learn to interpret one high pressure system. These conditions indicate clear, calm weather with a reduced chance of precipitation. Drier air usually results in a wider range of high and low temperatures.
 - On a weather map, they are shown as isobars with an "H" in the middle isobar and arrows indicating which direction the wind is blowing (clockwise in the Northern Hemisphere, and counterclockwise in the Southern Hemisphere). Like cyclones, they can also be detected with radar images.
Part 3 of 4: Interpreting the different front types
 Observe the types and movements of weather fronts. These mark the boundary between warm air on one side and cold air on the other. If you are close to a front and you know that the front is moving towards you, then you know that a weather change is coming (such as clouds, precipitation, storm and wind) when the front passes overhead. Mountains and large bodies of water can disturb this path.
 - On a weather map you sometimes see some lines with semicircles or triangles on one or both sides. These indicate the boundaries for the different front types.
 Analyze one cold front. Within these weather patterns, pouring rain and high wind speeds are not uncommon. Blue lines on weather maps with triangles on one side represent cold fronts. The direction of these triangles point in the direction in which the cold front is moving.
  Analyze one warm front. These are often accompanied by a gradual increase in rainfall as the front approaches, followed by a sudden clearing and warming after the front has passed. If the warm air is unstable, the weather can be characterized by persistent thunderstorms.
 - A red line with semicircles on one side indicates a warm front. The side where the semicircles are located indicates the direction of the warm front.
 Analyze one Occlusion front. This is formed when a cold front takes over a warm front. It is associated with various weather types (possibly thunderstorms) depending on whether it is a warm or a cold occlusion. The passing of an occlusion front usually results in dry air (a lower dew point).
 - A purple line with semicircles and triangles both on the same side represents an occlusion front. The side they are on indicates in which direction the occlusion front is moving.
 Analyze one stationary front. This is a boundary between two different air masses that are not moving. These fronts bring with them long, continuous rainy periods that stay in place and move in waves. A semicircle along the boundary on one side and triangles on the other indicate that the front is not moving in any direction.
Part 4 of 4: Interpreting other symbols on a weather map
 Teach it to read the models of a weather station at any point of the observation. If your weather map uses models of a weather station, each will show the temperature, dew point, wind, sea level air pressure, air pressure trend and current weather through a series of symbols.
 - Temperature is generally indicated in degrees Celsius and rainfall in millimeters. In the US, temperature is in Fahrenheit and rainfall is in inches.
- Coverage ratio is indicated by a circle in the center; the degree to which that circle is filled indicates the degree of cloudiness.
 Study the lines on the weather map. There are many more lines on weather maps. Two of the main lines represent the isotherms and the isotaches.
 - Isotherms - These are lines on a weather map connecting points with the same temperature.
- Isotaches - These are lines on a weather map connecting points with the same wind speed.
 Analyze the pressure gradient. The number on an isobar, such as "1008", gives the pressure (in millibars) along that line. The distance between the isobars is called the pressure gradient. A large change in pressure over a short distance (the isobars are close together) indicates strong winds.
  Analyze the wind force.Wind vanes point in the wind direction. Lines or triangles at an angle to the main line indicate the wind force: 50 knots (1 knot = 1.9 km per hour) for each triangle, 10 knots for each full line, 5 knots for each half line.
Tips
- Isobars can be curved or with a kink in them, at high places in the landscape, such as mountains.
- Don't be intimidated by the apparent complexity of a weather map. Reading it is a valuable skill to take into account.
- If you are more interested in weather systems and their properties, you could join a local meteorological association.
- Weather maps can be based on satellite and radar images, recordings of instruments at weather stations, and computer analysis.
- Fronts often come from the center of one depression.


