Author:
Frank Hunt
Date Of Creation:
11 March 2021
Update Date:
1 July 2024
Content
- To step
- Part 1 of 3: Restore the data on your card
- Part 2 of 3: Repairing a memory card on Windows
- Part 3 of 3: Repairing a memory card on a Mac
- Tips
- Warnings
In this article, we will teach you how to recover photos or other data from a non-working memory card. We will also teach you how to reformat a memory card so that you can continue to use it after the card has been repaired.
To step
Part 1 of 3: Restore the data on your card
 Stop using your card immediately. If an error message appears on your camera saying "Card Error" or "Read Error" or similar, turn the camera off and remove the card. If you keep trying the card, the chances that you will be able to recover the data will decrease.
  Look for a data recovery program. Your card may not be salvageable, but you may still be able to recover the data on it. Here are some popular free programs that can help you recover data:
 - Recuva - After selecting the location of your hard drive (in this case your SD card), and checking the "Photos" option, Recuva will try to restore your data in the background. Recommended for most users.
- CardRecovery - After setting up the program, CardRecovery will scan the attached SD cards. When the demo period has ended, you have to pay to be able to use the services.
- Photo Rec - This program has a simple interface and requires some basic knowledge of the Command Prompt program, so it is not recommended for beginners.
 Download and install your selected data recovery program. You do this by going to the web page of the program in question, clicking the "Download" button and then double-clicking the downloaded installer.
 - The location of the button to download the program varies from site to site. If you don't see the button right away, look at the top or side of the website.
 Insert the memory card into your computer. Most PCs have a thin, rectangular SD card slot. Usually it has "SD" written next to it. In the case of a laptop, the slot will probably be on the side, on a regular computer you can search near the USB ports.
 - If your PC or Mac doesn't have an SD slot, you can buy an SD card reader that you plug into a USB port on your computer. These card readers often cost no more than 10 euros.
- You may need to give permission on your computer to use the SD card before opening the card.
 Open your data recovery program. The program can be found where you installed it.
  Follow the instructions on the screen. Usually you have to select the SD card as the location to be scanned and check the "Photos" option in the criteria before you can start recovering the SD card.
 - When the scan is completed, you will be given the option to restore or export the found photos to a location of your choice (eg your desktop).
Part 2 of 3: Repairing a memory card on Windows
 Insert the memory card into your computer. Most PCs have a thin, rectangular SD card slot. Usually it says "SD" next to it. in the case of a laptop the slot will be on the side, with a normal computer you look near the USB ports.
 - If your PC doesn't have an SD slot, you can buy an SD card reader that you plug into a USB port on your computer. These card readers often cost no more than 10 euros
- You may need to give permission on your computer to use the SD card before opening the card.
 click on ⊞ Win. You can find this in the bottom left corner of your screen.
  Type "My computer" in the search field. In Windows 8 and 10 it is called "This PC" or "My PC", but with the search term "My computer" you will find the right program for all versions of Windows.
  Press ↵ Enter. Now the "This PC" window opens.
  Look at the section "Devices and disk drives". This is in the bottom half of the "This PC" window. You will see a drive labeled "OS (C :)" (this is your primary hard drive) and all connected drives, including your memory card.
 - If you don't know which drive is the memory card, disconnect the memory card and see which drive disappears from the list. Just remember to put the card back in before continuing.
 Note the letter of the memory card. The default letter of your primary hard drive is "C", so the memory card is identified with a different letter.
  Press at the same time ⊞ Win and X in. Now a Windows shortcut menu will open above the start button in the lower left corner of the screen.
 - You can also open the menu by right-clicking on Start to push.
 Click on Command Prompt (Admin). This will open the Command Prompt program with which we will reformat the SD card.
 - You can only do this if you are logged in with your computer's administrator account.
 Type chkdsk m:/ r in a command prompt window. Replace "m:" with the disk drive letter of your memory card (eg "e:"). The "chkdsk" function checks the selected disk for errors and then formats the areas to be repaired.
 - There is only one space between "m:" and "/ r".
 Press ↵ Enter. Now the disk is being checked. If Command Prompt finds problems that can be fixed, they will be repaired immediately.
 - When Command Prompt asks for permission, press Enter to give consent.
- You might get an error saying "Cannot open volume for direct access" after clicking Enter presses. This message means that your drive does not need to be reformatted (i.e. the drive is not damaged) or that the drive cannot be repaired.
- In some cases, the error message "Cannot open volume for direct access" is caused by your antivirus program blocking formatting. Temporarily turn off your antivirus program and try again.
 Remove your SD card. When the process is completed, you can easily remove your SD card from your computer and put it in your camera.
Part 3 of 3: Repairing a memory card on a Mac
 Insert the memory card into your computer. You may need to purchase an SD card reader as not all Macs have an SD card slot.
 - If your Mac does have an SD card, you can find it on the side (laptop) or on the back (iMac).
- With some computers you must first allow drives to be used via USB, otherwise your computer will not recognize the card.
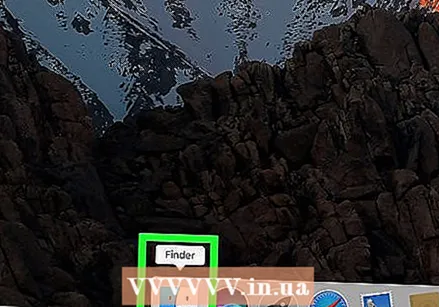 Open Finder. This is the icon with the blue face in your dock.
  Click Go. This is at the top of the menu bar.
  Click on Utilities. Now the Utilities folder will open.
 - Another way to open the Utilities folder is with the key combination ⇧ Shift + ⌘ Command + YOU.
 Double-click Disk Utility. This program can be recognized by a gray hard disk with a stethoscope.
  Select your memory card. Your card should be visible in the left column in the "External" section.
 - Remove your card and re-insert it into your computer if you don't see the card.
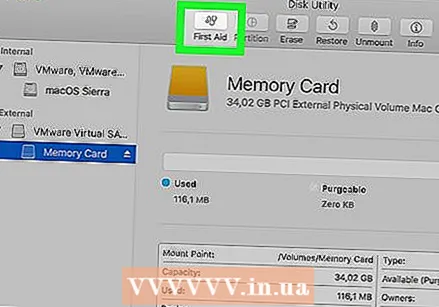 Click Disk First Aid. You can recognize Disk First Aid by the icon of the stethoscope at the top of the window.
  Click on Run. If a pop-up window appears saying "Your drive is about to fail", then you cannot repair the memory card.
  Wait for your memory card to be repaired. When you get the message that the process has been completed, you can remove your memory card from your computer and put it back in your camera.
 - You may get the following message: "The underlying task has reported an error". In that case, you can restart your Mac and try again.
Tips
- You can prevent damage to your memory card in a number of ways. Never remove the card while writing or reading, do not keep anything on the card when the battery is low, and if possible turn off your device before removing the card.
- Memory cards don't last forever. Flash memory normally has a life of ten thousand to ten million write and erase cycles, so it is recommended to always back up and replace the card every few years depending on how much the card is used.
- A new 8GB SD card now costs less than 10 euros.
Warnings
- Even if your card is repairable, it is better to buy a new card instead of reformatting it. Cards that have caused problems are less reliable than a new SD card.


