Author:
Roger Morrison
Date Of Creation:
3 September 2021
Update Date:
1 July 2024
Content
- To step
- Part 1 of 5: Preparing to build your treehouse
- Part 2 of 5: Make a detailed plan
- Part 3 of 5: Building and attaching a platform
- Part 4 of 5: Making the floor and railing
- Part 5 of 5: Finishing touch
- Tips
- Warnings
- Necessities
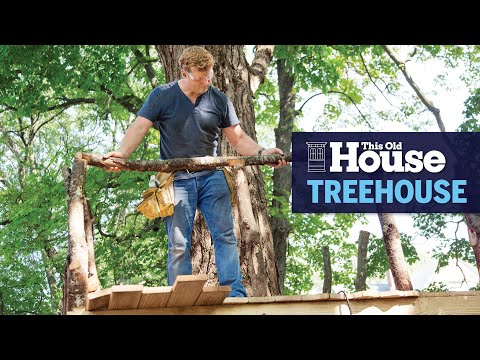
A tree house can be a magical hiding place, fortress or play area for almost any child and is also a fun project for any adult. Building a treehouse takes careful planning and construction, but your hard work is worth it. If you give the treehouse of your dreams the care and attention it deserves, you can create a wooden retreat that will last for years to come.
To step
Part 1 of 5: Preparing to build your treehouse
 Choose the right tree. The health of the tree you choose is absolutely critical to building a foundation for your tree house. If the tree is too old or too young, you will not have enough support for your tree house and put yourself and everyone else who comes into the tree house in great danger. Your tree should be sturdy, healthy, mature and alive. Ideal trees for tree houses are the oak, maple, spruce and apple tree. It's a good idea to hire an arborist to inspect your tree before you start building. An ideal tree has the following qualities:
 - A strong, robust trunk and branches
- Roots that are deep and well established
- No signs of disease or parasites that can weaken the tree
 Consult with the municipality. Take the time to learn about local rules or regulations that may be relevant to your treehouse project, such as height restrictions. You may even need a permit to build. If you have protected tree species on your land, there may be restrictions on building a hut in them.
  Talk to your neighbors. It's a good and neat idea to talk to your neighbors and let them know about your plans. If your treehouse is visible or overlooked from your neighbors' ground, they'll appreciate it if you consider their views. This simple step can prevent complaints and even possible lawsuits in the future. While your neighbors will likely agree anyway, this will help you understand your project a bit more.
  Talk to an insurance agent. Make a quick call to your insurance agent to make sure a treehouse is covered under your home insurance. If not, any damage caused by the tree house will not be covered by your insurance.
Part 2 of 5: Make a detailed plan
 Choose a tree. If you're building a treehouse in your backyard, you may only have a few trees to choose from. Once you have chosen a healthy tree, you can start thinking about the design of the house you will be making. You can also do it the other way around: first you come up with a design and then you look for a tree that is suitable. Here are some things to remember when choosing the tree for your treehouse:
 - For a standard tree house measuring 2.5 x 2.5 m you need a tree with a trunk with a minimum diameter of 12 cm.
- To calculate the diameter of your tree, measure its circumference by wrapping a length of string or tape measure around the trunk where you want the treehouse to be. Divide that number by pi (3.14) to find the diameter.
 Choose your design. It's important to have a clear idea of the design of your ideal tree house before you hit the first nail. You can find tree house designs online or come up with your own if you have engineering knowledge. You must determine the dimensions accurately to ensure that your design will fit the tree you have chosen.
 - You may find it helpful to make a small cardboard model of your tree and tree house to identify potential problem areas.
- When creating your design, don't forget to think about the growth of the tree. Leave enough space around the tree trunk for the tree to grow. It is smart to collect information about the growth rate of your specific tree species.
 Determine your support method. There are several ways to support your tree house. Whichever method you choose, remember that trees move in the wind. Cross beams and metal corner joints are essential to keep your tree and tree house from being damaged by the wind. Here are the three main support methods for your tree:
 - The pile method. In this method, you sink support pillars into the ground near the tree, rather than attach them to the tree itself. This will damage the tree the least.
- The bolted method. The traditional method of supporting a tree house is to secure the support beams or platform directly to the tree with screws. This method is most harmful to the tree. You can limit the damage by using good materials.
- The hanging method. In this method, you hang your tree house from strong, high branches with cables, ropes or chains. This method is not suitable for every design and is not ideal for treehouses that will have to support significant weight.
 Decide how to access the cabin. Before building your tree house, you need to determine how to enter the tree house, such as with a ladder that makes it easy for someone to climb inside. Your method must be safe and sturdy, so the traditional ladder made of planks nailed to the trunk is dropped. Here are some safer methods:
 - The standard ladder. You can buy or build a regular ladder to climb into your tree house. A ladder for a bunk bed or loft bed is also an option.
- The rope ladder. This ladder is made of rope and planks and hangs from the platform of the tree house.
- The stairs. A small staircase is the safest method of access, provided it suits your treehouse idea. If you choose this method, make sure to build a handrail for safety.
 Think about what you are going to do with branches that are in the way. How do you build around nuisance branches? Do you saw them away or do you incorporate them in the design of the tree house? If you decide to incorporate the branches into the tree house, do you build around it or make a window around it? Ask yourself these questions in front of you start building. That way, your tree house will reflect the builder's care and preparation when it's finished.
Part 3 of 5: Building and attaching a platform
 Pay attention to safety. Before you start building your tree house, remember that safety is the most important. Falling out of the cabin is one of the greatest dangers. There are a few precautions you can take to make sure everyone building a tree house is safe.
 - Don't build too high. Building your tree house too high can be dangerous. If your treehouse is mainly used by children, the platform should be no higher than 1.80 - 2.40 m.
- Create a secure balustrade. The purpose of your balustrade is of course to ensure that the residents of the tree house do not fall out. Make sure the railing around your platform is at least 90cm high and the bars are no more than 10cm apart.
- Mute a fall. Place soft natural materials, such as wood chips, under and around the tree house. This will not completely prevent injuries, but will provide some cushioning in the event of a fall.
 Find a sturdy tree with two branches in a "V" shape. You can use this tree to hang your tree house. The "V" shape offers extra strength and support and an anchor point in four instead of two places.
 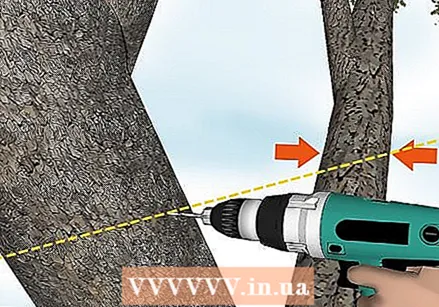 Predrill the tree at four different locations on each side of the "V". Drill a 9.5mm hole in each leg of the "V" making sure the holes are the same height.If the height differs, the structure may lean and the support will be less.
 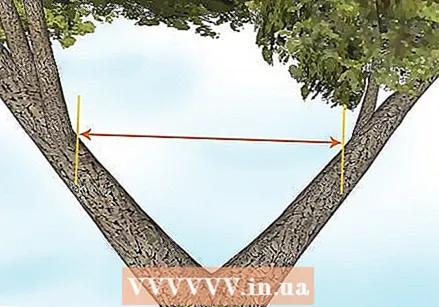 Measure the distance between the holes on each side of the "V". Depending on the tree, the holes are closer or further apart.
  Subtract what you measure from 3 m, halve the rest and mark the distance from one end of the 5 x 25 cm beam. On the other end, make a mark based on the original measured distance between the two holes in the tree. This will place the beam perfectly centered and distribute the weight evenly when you lift it onto the "V".
  At each mark, make a 10cm hole on both 5 x 25 beams to allow the trees to move with the wind without damaging the treehouse structure. Do this by drilling two 16mm holes, 5cm each on each side of your mark. Then use a jigsaw to cut a 10 cm hole between the holes, with your mark right in the middle.
 - If the tree now moves due to the wind, the platform actually moves a bit to make room for the movement. If the platform were simply screwed to the boom, it would move with the boom. This is not good for the platform as it can push it gradually or suddenly in different directions and cause it to tear.
 Attach two support pillars to the tree at the correct height. Choose two sturdy 5 x 25 cm beams (5 x 30 is fine too) and place them tight against your tree. Using a wrench, drive four galvanized collar screws 6 "to 8" in length and 16 mm in diameter into the four 4 "holes in the 5 x 25 bar. Place metal washers between the screw and the wood. Repeat this with the other plank on the other side of the trunk, making sure both planks are at the same height and fit tightly together.
 - Pre-drill both the tree and the 5 x 25 beams to easily screw in the screws and prevent cracks in your planks.
- Cut the planks for an aesthetic finish. Of course do this before you screw the support beams to the tree branches.
- Consider reinforcing each support beam with an additional 5 x 25 beam. You can use two 5 x 25 beams on each side of the tree trunk, tight together. This allows them to carry more weight. If you decide to double the number of support beams, use larger collar screws (minimum 8 '' long and 1 '' in diameter).
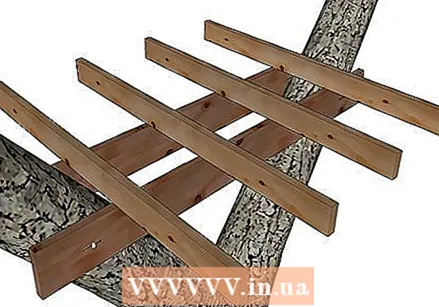 Place four 5 x 15 cm beams, evenly spaced and parallel to each other, on the support beams. Do not place them flat on the support beams, but place them on their sides so that they protrude 60 cm. Secure them with 3-inch deck screws.
  Attach two 5 x 15 beams to the beams listed above. Lay each beam tight against the four ends of the previously attached beams and nail them. Your platform should now be a square, attached to the support beams. Make sure your beams are centered and square.
  Secure the platform to the support beams with trowel carriers. Use eight galvanized trowel carriers to attach all four parallel beams to the support beams.
  Secure the center of the platform to the sides of the platform with beam supports. Use eight galvanized beam supports to attach the ends of the parallel beams to the perpendicular beams.
  Reinforce the platform with 5x10 beams. The platform is still a bit wobbly at the moment. To make the platform more sturdy, you need to add at least two reinforcement beams. These are attached to a lower part of the boom and then also on both sides of the platform.
 - Cut a 45 degree angle from the top end of each beam. You do this so that you can attach the beam to the inside of the platform.
- Form a "V" with your 5x10 beam so that they overlap at a straight part of the tree, but also fit neatly into the inside of the platform.
- Attach the top side of the reinforcement to the platform at the bottom and inside. Make sure both are tight before driving nails into them.
- Thread a 8-inch (8-inch) collar screw through the 5 x 10 overlapping beams in a solid spot on the tree. Use a metal washer between the joists and the screw for best results.
Part 4 of 5: Making the floor and railing
 Determine how to cut to fit the floorboards around your trees. Measure where the trees come through the floor and cut around the trunks with a jigsaw, leaving a 1 to 2 inch margin around the trunks.
  Screw the two screws into the end of each plank, using a minimum of 10 cm deck screws. Once you've cut the planks around the tree branches, it's time to screw them in. Use a ladder to hoist yourself up onto the platform and screw everything in with a screw drill. Leave 0.6 to 1.25 cm of space between each floorboard.
  Make an entrance from the main buttresses that line the platform. Create vertical bars and cover on the platform to create a rectangle. An awkward part that previously protruded from the platform is now a chic entrance.
  Use two 5 x 10 cm beams on each corner to create a balustrade. Nail the beams (they must be at least four feet high) together and screw them to the platform at each corner.
  Attach the railing to the vertical posts. Also use 5x10 beams here and miter the edges if you like. Then nail them to the vertical joists. Then screw the railings together at the miter cut corners.
  Attach side panels to the bottom of the platform and the bottom of the railing. Nail the available wood - planks or plywood are fine - firmly to the bottom of the platform. Then nail them to the top railing so that the whole thing becomes an effective fence.
 - Use whatever you want to finish the side. You can weave some twine just fine, as long as small children cannot slip through it. Safety is the number one priority, especially when it comes to small children.
Part 5 of 5: Finishing touch
 Build a ladder and attach it to the platform. There are a number of ways you can do this. Do something fun with this part of the project!
 - Build a rope ladder
- Build a ladder with two 3.65 m long beams measuring approximately 5 x 10 cm and 2.50 m long 5 x 7.5 cm beams. Place the 5 x 10 beams next to each other perfectly symmetrically and mark where each step should be. Make 5 x 7.5 notches about 2.6 cm deep in both sides of the 5 x 10 joists. Cut the 5 x 7.5 joists to the correct length and fix them in the notches with wood glue . Secure your steps with deck screws and wait for the glue to dry. Stain your ladder to give it a nice shade and protect it from the elements.
 Make a simple roof for your tree house. This roof is made from a simple tarpaulin, but you can also put in a little more effort to design and construct your roof. Turn one hook into both logs about 8 feet (2.5 m) above the platform. Stretch an elastic band between both hooks and hang a tarpaulin over it.
 - Then build four outriggers a few dozen inches high and attach them to the four corners of your railing. Nail the tarpaulin to the four corners of the outriggers and reinforce with a metal ring. Your roof should now hang properly over the platform.
 Paint or stain the wood. If you want to weatherproof your treehouse or just give it a nicer look, you can stain or paint it now. Choose a stain or paint that matches your home.
Tips
- Keep your construction as lightweight as possible. The heavier your tree house, the more support it needs and the more potential damage it can do to the tree. If you put furniture in your tree house, preferably buy lightweight furniture.
- If you're screwing everything directly to the tree, use a few large fasteners rather than a bunch of small ones. If you do not do this, the tree may experience the entire area to which the tree house is attached as a wound and it will rot completely.
- Most hardware stores don't sell bolts big enough for a treehouse project. Find this hardware online from someone who builds tree houses.
- Always test the cabin before you let your kids in!
Warnings
- Never climb on the roof of a tree house.
- Never jump to the ground from the tree house. Always use a ladder or stairs.
- Scrap wood is environmentally friendly, but may not be as strong as virgin wood. Be careful when choosing scrap wood and don't use it for load-bearing areas of your treehouse.
Necessities
- Measuring tape
- Level
- Drill and bits
- Hammer
- Ladders
- Wrenches and socket wrenches
- Safety glasses
- Nail gun
- Compressor
- Miter saw
- Circular saw
- Table saw
- Beams of 10x15 cm as support pillars
- 5x20 cm beams for frame and platform construction
- Plywood boards or other material for the floor
- 10 x 10 cm beams for the handrail posts
- 5x15 beams for the horizontal tracks
- 5 x 5 cm beams for the balusters
- Beam supports / corner brackets, bolts, screws and all other necessary hardware


