Author:
Eugene Taylor
Date Of Creation:
15 August 2021
Update Date:
1 July 2024

Content
- To step
- Part 1 of 4: Making the perfect pattern
- Part 2 of 4: Preparing the fabric
- Part 3 of 4: Preparing the ribbed fabric for the neckline
- Part 4 of 4: Sewing the T-shirt
- Tips
- Necessities
If you can work with a sewing machine, you can also make your own T-shirt. However, if you've never sewed a shirt before, it may be easiest to start with a simple T-shirt. Use a ready-made pattern or draw your own to get the job done.
To step
Part 1 of 4: Making the perfect pattern
 Find a T-shirt that fits you well. The easiest way to make your own pattern for a T-shirt is to copy the shape of a shirt that fits you well.
 - This article will only discuss how to draw a pattern for a T-shirt and how to sew a T-shirt, but you can follow the same simple steps to make patterns for shirts in other styles.
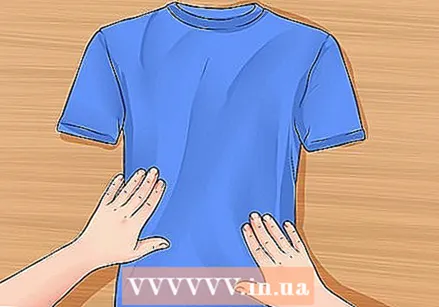
 Fold the T-shirt in half. Fold the T-shirt in half vertically with the front on the outside. Place the half shirt on a large sheet of paper.
 - Ideally, you should place the paper on a thick piece of cardboard before placing the T-shirt on it. The cardboard provides a surface that is strong enough to put on the T-shirt. You will also have to put pins in the paper, which is easier if you have a cardboard base.
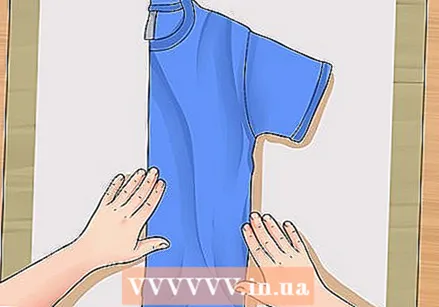
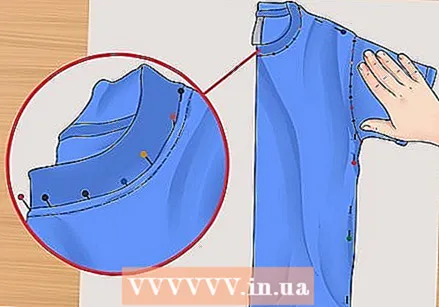
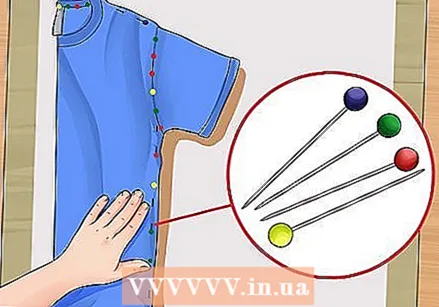 Pin the T-shirt at the back along the edge. Pin the T-shirt around the edge, focusing especially on the seam along the back neckline and sleeve seam.
 - Pins that you insert into the fabric along the shoulder seam, the sides and the hem at the bottom do not require precision, as they are primarily intended to hold the shirt in place.
- At the sleeve seam you put the pins straight through the seam and into the paper. Place the pins no more than an inch apart.
- At the neckline at the back, insert pins straight through the seam connecting the neckline to the collar. Space the pins an inch apart.
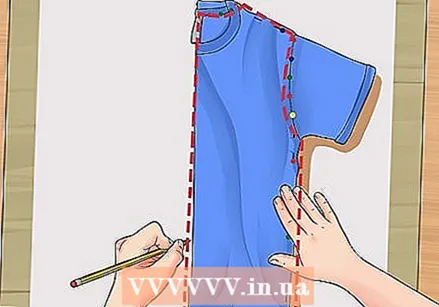 Put on the shirt. Use a pencil to lightly trace the entire shape of the shirt.
 - Trace the shoulder, sides, and bottom of the pinned shirt.
- After you have outlined these parts, lift the shirt and find the holes that mark the location of the sleeve seam and the seam along the neck opening. Draw lines along these holes so that you have completely covered the back of the T-shirt.
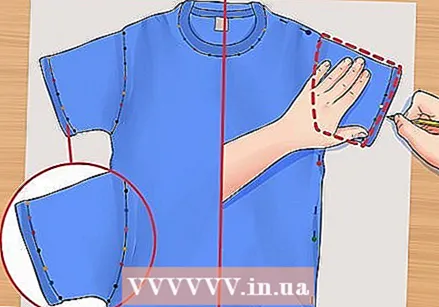
 Pin the T-shirt in the front. Place the folded T-shirt on a new piece of paper and pin it to the front instead of the back.
 - Follow the same steps you just did for the back of the T-shirt to insert the pins into the fabric along the edges and sleeves of the T-shirt.
- The neckline is usually lower at the front than at the back. Therefore, tuck the pins just below the front part of the neckline, just below the collar. Place the pins an inch apart and insert straight into the fabric.
 Put on the shirt. Trace the front of the shirt just as you just traced the back of the shirt.
 - Lightly trace the shoulder, sides and bottom with a pencil while holding the shirt in place with pins.
- Remove the shirt and draw lines along the holes of the pins you put in the neckline and sleeve to complete the shape.
 Pin the sleeve and pull it around. Unfold the shirt. Smooth out a sleeve and pin it to clean paper. Trace the shape of the sleeve.
 - Push the pins straight through the seam as before.
- Draw a line around the top, bottom and outer edge of the sleeve while holding the sleeve in place with pins.
- Remove the T-shirt from the paper and draw a line along the pin holes to complete the shape of the sleeve.
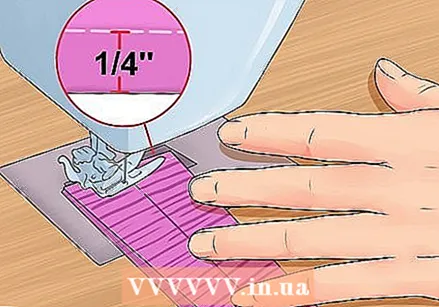
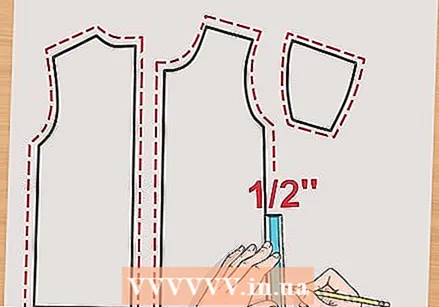 Draw seam allowance for all shapes. Use a flexible tape measure and a pencil to draw another line around the outline of each part of the pattern. With this second line you indicate the seam allowance.
 - You can know how much seam allowance you use. A rule of thumb is to use a 1.5 centimeter seam allowance. You should then have enough space and fabric to work with.
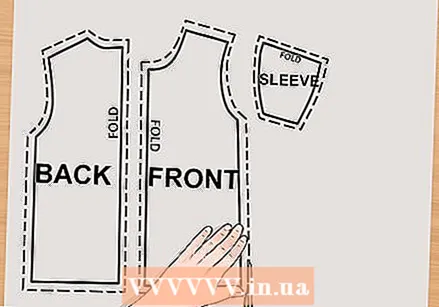
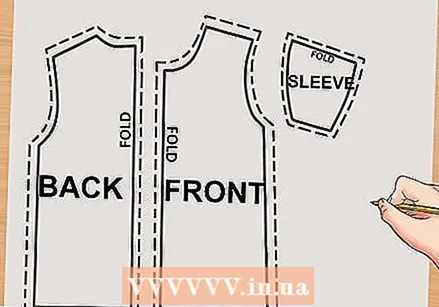 Mark the different parts of the shirt. Indicate for each part what it is (back piece, front piece and sleeve). Indicate the fold line of each part as well.
 - The fold lines of the front and back are formed by the straight, folded edge of the original shirt.
- The sleeve fold line is the straight top edge of the sleeve.
 Cut out the pieces and see if they fit. Cut out each part of the pattern neatly along the outer edge. When you are done with that, check if the parts are the right size and fit together.
 - When you put the open sides of the front and back pieces together, the shoulders and armholes should be exactly on top of each other.
- When you place the sleeve against the armhole of the front or back, the pieces should fit together neatly (without counting the seam allowance).
Part 2 of 4: Preparing the fabric
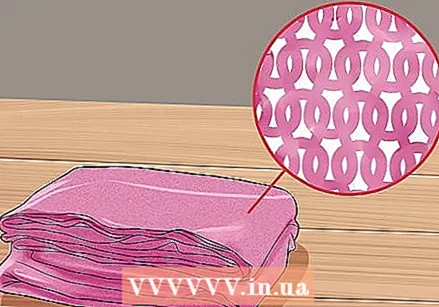 Select suitable fabric. Most T-shirts are made of a fine knit fabric, but you may want to choose a knit fabric that stretches very little to make it easier to sew the pieces together.
 - In general, however, it is easiest to use the shape of the original T-shirt you used as a template for your pattern if you are using fabric that is about the same thickness.
 Wash the fabric. Wash and dry the fabric as you normally do before you start working on it.
 - By washing the fabric first you can pre-shrink it and the dye will no longer come off. The pieces of fabric that you cut out and sew together will therefore be the correct size.
 Cut the parts of the pattern from the fabric. Fold the fabric in half and place the parts of the pattern on top. Pin the pattern, pull it over and cut out the parts.
 - Fold the fabric in half right side in, and lay it down as flat as possible.
- Make sure to fold the fabric in the same place as the fold lines on the parts of the pattern.
- When you pin the parts of the pattern, insert the pins straight through both layers of material. Trace the pieces completely with a textile pencil and cut the fabric without removing the pattern.
- After you have cut the pieces out of the fabric, you can take out the pins and remove the paper parts of the pattern.
Part 3 of 4: Preparing the ribbed fabric for the neckline
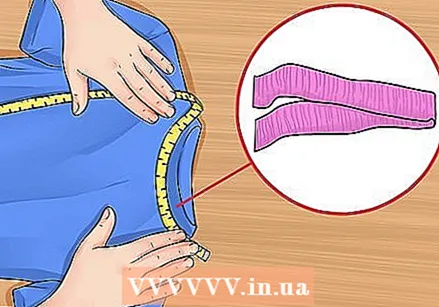 Cut a piece of ribbed fabric for the neckline. Measure the entire neckline of your T-shirt with a flexible tape measure or tape measure. Subtract 4 inches from the number and cut a piece of ribbed fabric to that length.
 - The neckline of a T-shirt is made of ribbed knit fabric with vertical ribbing. You can also use fine fabric that is not ribbed, but ribbed fabric is generally preferred because it is more elastic.
- Cut a piece of ribbed fabric that is twice the width of the final neckline opening.
- The vertical ridges should be parallel to the width of the neckline and perpendicular to the length of the neckline.
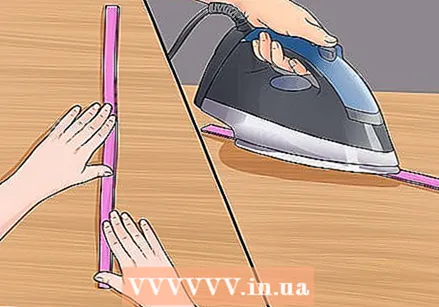 Fold and press the ribbed fabric. Fold the fabric in half lengthwise, then press the fold with an iron.
 - Make sure the right side of the fabric is facing out when you do this.
 Sew the ribbed fabric closed. Fold the ribbed fabric in half crosswise. Sew the ends of the strip together using a 5 millimeter seam allowance.
 - Make sure the right side of the fabric is facing out when you do this.
Part 4 of 4: Sewing the T-shirt
 Pin the front and back pieces together. Place the front and back pieces together with the right side of the fabric on the inside. Pin the pieces of fabric together only at the shoulders.
 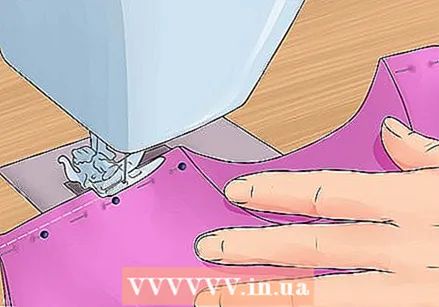 Sew the shoulders. Stitch straight over the first shoulder seam. Cut the yarn and then topstitch straight over the other shoulder seam.
 - You should be able to do this with a regular straight stitch on your sewing machine.
- Take into account the seam allowance that you have drawn on the different parts of the pattern. If you have followed this guide exactly, the seam allowance will be approximately 1.5 inches.
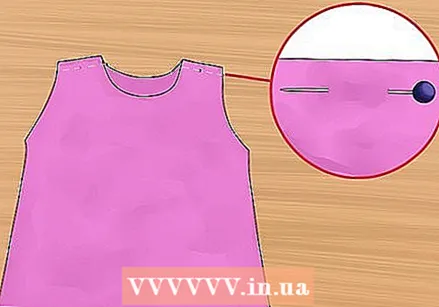
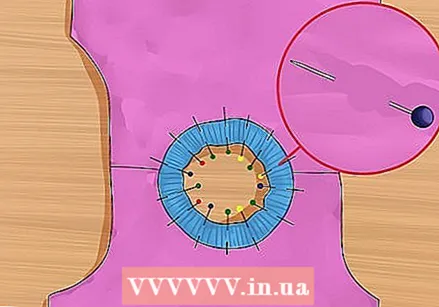 Pin the strip of ribbed fabric to the neckline. Unfold the shirt and lay it flat at the shoulders with the right side of the fabric facing down. Place the ribbed strip on the neckline and pin it down.
 - With the raw edge of the collar facing the neckline, place the fabric on top of the shirt. Pin the ribbed fabric in the center of the back and front of the shirt.
- The strip of ribbed fabric is smaller than the neckline opening, so you will need to gently stretch the strip as you pin it to the rest of the neckline. Try to pin the ribbed fabric evenly spaced.
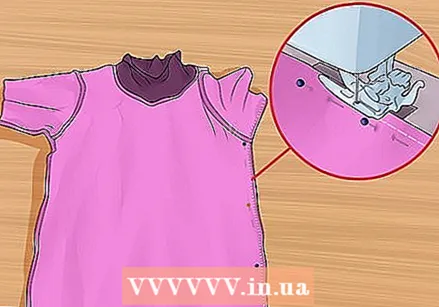
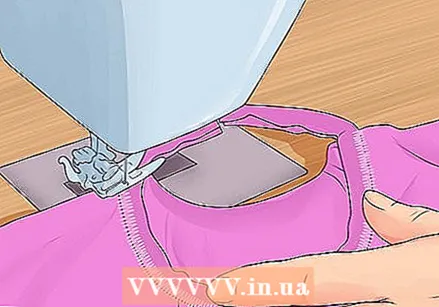 Sew in the ribbed fabric. Use a zigzag stitch and sew along the raw edge of the ribbed fabric. Use a seam allowance of about 5 millimeters.
 - You should use a zigzag stitch instead of a straight stitch or the yarn will not be able to stretch with the neckline when you pull the final t-shirt over your head.
- Use your hands to gently stretch the ribbed fabric as you sew the fabric to the shirt. Hold the fabric slightly taut so that there are no creases in the shirt fabric.
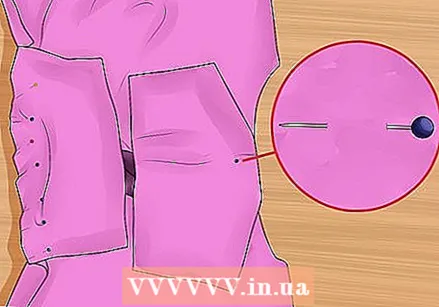 Pin the sleeves to the armholes. Lay the shirt open and flat at the shoulders, but turn it over so the fabric is right side up. Lay the sleeves right side down and pin them in place.
 - Place the rounded part of the sleeve against the rounded part of the armhole. Pin the round parts together in the middle.
- Place the rest of the round part of the sleeve in the right place piece by piece and pin the fabric in place. Work with one side of the fabric at a time.
- Repeat this process on both sleeves.
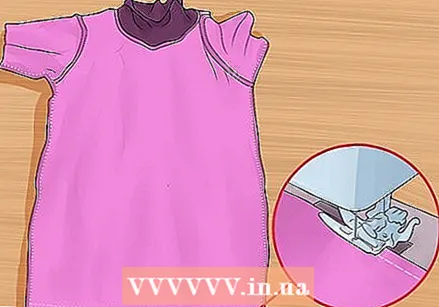
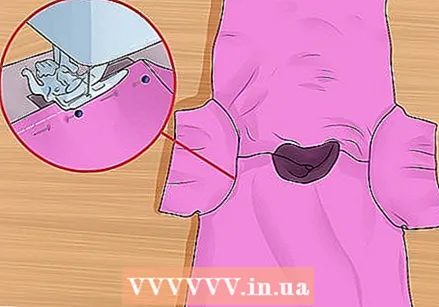 Sew on the sleeves. Make sure the sleeves are right side down and sew with a straight stitch along both sleeves, securing them at the armholes.
 - The seam allowance should be the same as the seam allowance you measured on your pattern. If you have followed this guide exactly, the seam allowance will be approximately 1.5 inches.
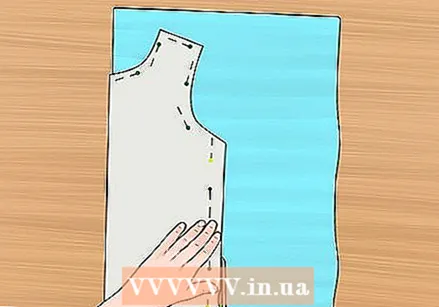
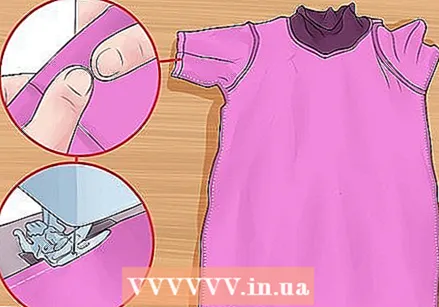
 Sew the sides of the shirt together. Fold the shirt with the right side of the fabric out. Sew with a straight stitch along the right side of the shirt, starting at the point of the seam under the sleeve and working your way up to the opening at the bottom.
 - Pin the sleeves together before sewing them together. Otherwise, the fabric may shift during sewing.
- Take into account the seam allowance that you have drawn on the different parts of the pattern. If you have followed this guide exactly, the seam allowance will be approximately 1.5 inches.
 Fold and sew a bottom hem. With the right sides of the fabric facing each other, fold the bottom edge of the shirt up, taking the seam allowance into account. Pin or press the fold to hold, then sew along the opening.
 - Make sure to only sew on the hem. Sew the front and back of the shirt not stuck.
- Most knit fabrics will not fray, so you may not need to hem the bottom. However, your T-shirt will look neater with a hem.
 Fold and sew hems to the sleeves. With the right sides of the fabric facing each other, fold the edges of the sleeves, taking the seam allowance into account. Pin or press the fold to hold, then sew along the opening.
 - As with the bottom edge, you will need to sew around the opening to avoid sewing the front and back together.
- You may not need to hem the sleeves if the fabric doesn't fray, but it will make your sleeves look neater.
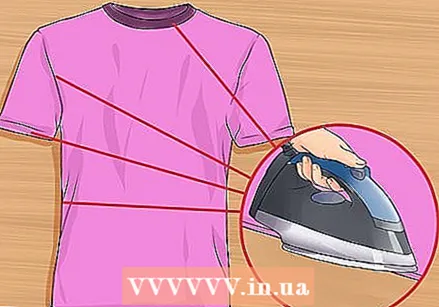 Iron the seams. Turn the shirt over with the right side of the fabric out. Smooth all seams with an iron.
 - Iron the seams along the neckline, shoulders, sleeves and sides. It may also be a good idea to press the hems if you did not do this before sewing.
 Try on the T-shirt. The T-shirt should now be ready and ready to be worn.
Tips
- If you prefer not to draw your own pattern, use a ready-made pattern. Most fabric stores (and craft stores that sell fabric) sell sewing patterns and probably patterns for simple T-shirts as well. You can also find free or cheap patterns for simple T-shirts on the internet.
Necessities
- T-shirt
- Pencil
- Textile pencil
- Cardboard
- Blank paper (blank newspaper, drawing paper, brown wrapping paper, etc.)
- Straight pins
- Scissors
- Fabric scissors or fabric cutter
- 1 to 2 meters of fine knitted fabric
- 25 centimeters of finely knitted, ribbed fabric
- Sewing machine
- Matching sewing thread
- Iron
- Ironing board


