Author:
Tamara Smith
Date Of Creation:
23 January 2021
Update Date:
1 July 2024

Content
- To step
- Part 1 of 3: Finding a chart
- Part 2 of 3: Drawing the heart
- Part 3 of 3: Colors and designation
- Tips
- Warnings
Are you fascinated by anatomy or do you want to improve your drawing skills? Drawing realistic anatomy is quite a challenge. Follow the steps below to draw the internal structure of the heart.
To step
Part 1 of 3: Finding a chart
 To find a good diagram, go to Google Images and type "The Internal Structure of the Human Heart." Find an image that represents the entire heart and click on it to enlarge it.
 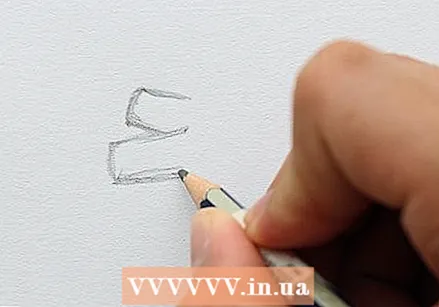 Find a piece of paper or something to write on. Start with the pulmonary veins. These are located to the left of the aorta. There are two of them. Draw the top vein a little bit smaller than the bottom vein.
 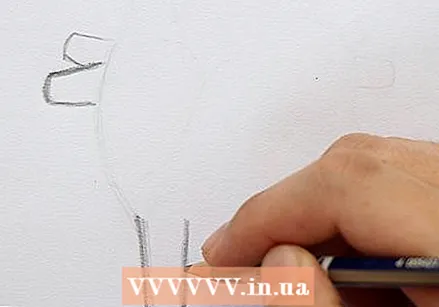 Below the pulmonary veins and a little to the right you can start drawing the lower vena cava.
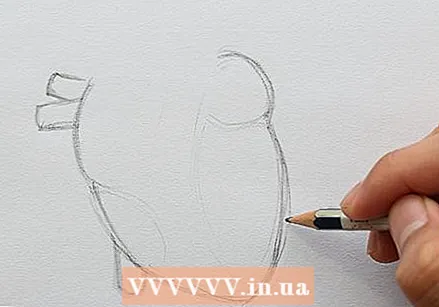 Begin to draw the bottom of the heart, including the left and right ventricles, and the left and right atrium. The pulmonary veins should be adjacent to the right atrium and the lower vena cava should be adjacent to the right atrium and the right carter chamber.
  If necessary, choose a different chart. If the diagram you are using is helpful for drawing the human heart, then you should keep using that diagram. However, if you are unsure of where certain parts of the heart are, then you should look for a new diagram.
Part 2 of 3: Drawing the heart
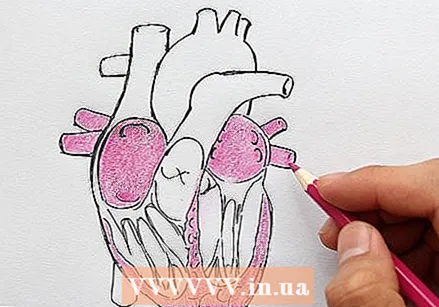
 Draw the other side of the pulmonary veins and add circles at the end.
 Begin to draw the pulmonary artery at the base of the right ventricle. The left and right sides should be slightly above the atriums and pulmonary veins. The pulmonary artery is shaped like a capital "t". It runs to the top of the right ventricle. Draw a circle at the bottom at the end.
  To draw the aorta, start by drawing a loop above and around the pulmonary artery and ending above the left ventricle. To draw the back of the aorta, use a single line to connect the right side of the pulmonary artery to the top of the left atrium. To complete the drawing of the aorta you need to draw three studs at the top of the loop. After drawing these, erase the lines connecting one side of the bottom of the stud to the other. Add tilted circles to the top of all studs. Draw another circle at the bottom of the aorta, next to the left ventricle.
  To draw the upper vena cava, draw a bubble that extends along the top of the right atrium, across the left side of the pulmonary artery to slightly above the left side of the pulmonary artery. Draw a circle at the bottom of the upper vena cava, next to the right atrium.
  Draw four circles in the left atrium and one circle in the right atrium, slightly below the upper vena cava.
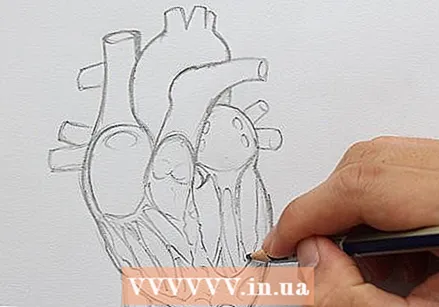 Draw the mitral valves between both atria and the aortic valves between the pulmonary artery and aorta.
Part 3 of 3: Colors and designation
 Color it in pink:
- Edge
- Left atrium
- Right atrium
- Pulmonary veins
 Color it in purple:
- Pulmonary artery
- Left ventricle
- Right ventricle
 Color it in blue:
- Upper vena cava
- Inferior vena cava
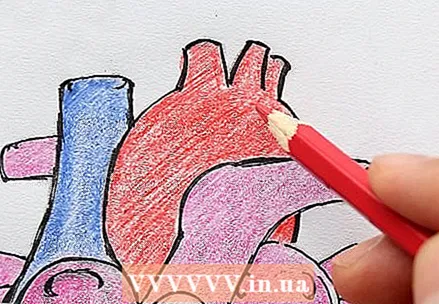 Color this in red:
- Aorta
 Make sure to indicate the following:
- Upper vena cava
- Inferior vena cava
- Pulmonary artery
- Pulmonary veins
- Left ventricle
- Right ventricle
- Left atrium
- Right atrium
- Mitral valve
- Aortic valves
- Aorta
- Lung valve (Optional)
- Tricuspid valve (Optional)
 To finish, write "The Human Heart" at the top of the drawing.
Tips
- Use a pencil
- Do not start coloring until you have drawn the entire diagram
Warnings
- If you don't use a pencil you may have to start over if you make a mistake.


