Author:
John Pratt
Date Of Creation:
14 April 2021
Update Date:
1 July 2024
Content
- Ingredients
- For the puri
- For the filling
- For the pani
- To step
- Part 1 of 4: Making the puri
- Part 2 of 4: Making the filling
- Part 3 of 4: Making the pani
- Part 4 of 4: The pani puri
- Tips
- Necessities
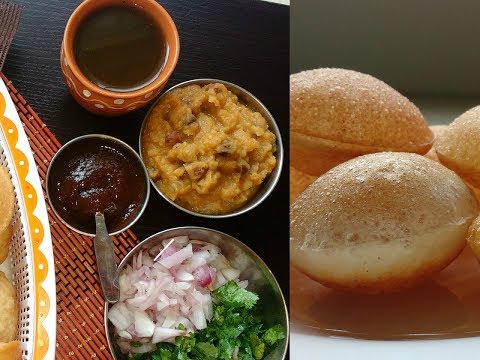
Pani puri, also known as phuchka, gol gappa or gup chup, is a popular snack in India, Nepal and Pakistan and is widely sold on the streets there. The name "pani puri" literally means "water in fried bread". The snack consists of a round hollow puri with a spicy potato filling. This is dipped in a watery sauce, or "pani", so that the cavity in the puri is further filled. Although there are regional variations, this basic pani puri recipe is an excellent way to learn how to make this dish.
Ingredients
For the puri
If you want to skip deep-frying the puri, you can buy the puri ready-made.
- 1 cup of whole wheat flour
- 1 tsp. flower
- Pinch of salt
- Warm water
- Vegetable oil
For the filling
- 2 potatoes, preferably Russet Burbank
- 1 finely chopped medium onion
- 1 cup of cooked chickpeas
- 1 tsp. red chili powder
- 1 tsp. chaat masala (mixture of cumin, coriander seeds, dried peppers and black peppercorns)
- 1 tsp. finely chopped coriander leaves
- salt
For the pani
- 1 tsp. tamarind paste in 1 tbsp. Water dissolved
- 2 tbsp. jaggery or white sugar
- 1 tsp. black salt or table salt
- 1 tsp. red chili powder
- 1 tsp. coriander powder
- 1 tsp. cumin powder
- 2-3 finely chopped green chilies
- 1/2 cup finely chopped mint leaves
- 1/2 cup finely chopped cilantro leaves
- Water
To step
Part 1 of 4: Making the puri
 Mix the flour and flour with a pinch of salt in a mixing bowl. Add a spoonful of warm water and mix it in with your fingers. Add another and mix some more. The dough is meant to feel coarse and loosely in texture, not soggy.
 - Add the water very slowly, in small increments so that you don't accidentally add too much at once. Puri dough should not be wet or sticky.
- If the dough is very moist, you can add some extra all-purpose flour so that the excess moisture can be absorbed.
 Knead the dough well with your hands for about 7 minutes until it is firm, stretchy and shiny. This releases the gluten in the dough, which is important for the texture of the final puris.
 - If the dough feels loose and falls apart, it is best to keep kneading it. The idea is that you can stretch the dough without breaking it.
- You can also knead the dough with the dough hooks on a hand mixer.
 Pour a teaspoon of oil over the dough and knead the dough for another three minutes. This improves the taste and texture of the dough.
  Make a ball of the dough and put it in a bowl. Cover the bowl with a damp kitchen towel. Place the bowl in a dry, warm place and let it rest for 15-20 minutes. This optimizes the texture of the dough.
 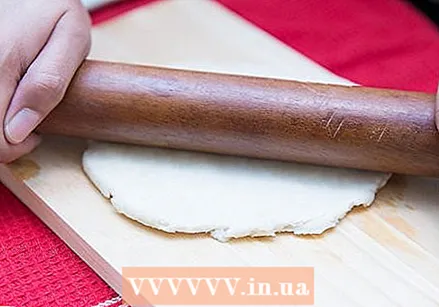 Place the dough ball on an oiled work surface and use a rolling pin to roll the dough into a circle no more than 0.8 millimeters thick. The dough should be easy to roll out without tearing. If the dough curls back during rolling out, you can still make a large circle of dough with some extra rolls.
  Cut the dough into as many smaller rounds as possible. You can use a cookie cutter or the rim of a glass for this.
  Pour 5 centimeters of oil into a stockpot or deep fryer. Heat the oil to 200 ºC or until a small piece of dough sizzles in the oil and turns brown.
  When the oil is hot enough, put a few dough rounds in the oil. After just a few seconds they will start to bulge and become crispy. When they are brown and crunchy, after about 20-30 seconds, place them on a paper towel plate with a large slotted spoon so that they can drain. Continue frying until you have completed all the rounds.
 - Because the puris are ready very quickly, it is necessary to stick with them during frying. Take them out before they turn dark brown or else they taste burnt and could fall apart.
- Only fry a few puris at a time. If you fry too many at once, it will be difficult to get all the puris out on time.
- Do not cover the puris when they are done as they will no longer be crispy.
Part 2 of 4: Making the filling
 Peel and dice the potatoes. Put them in a pan and put them under cold water. Bring the water to a boil and then let it simmer over low heat. Cook the potatoes until they are completely soft and until a fork slips through when you pierce them. Drain the potatoes and mash them roughly with a fork.
  Add the red chili powder, chaat masala and coriander leaves to the pan with the potatoes. Add a pinch of salt and use a fork to mix the spices well with the potatoes. Taste the mixture and add more spices or salt if necessary.
 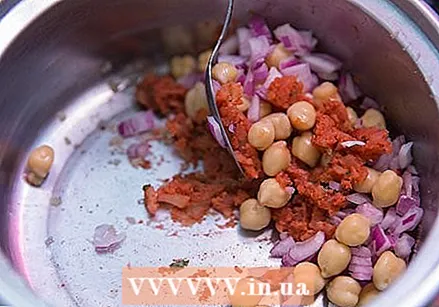 Stir in the onion and chickpeas with a spoon to mix well. If you like, you can add a few drops of oil to moisten the filling. However, that is not necessary because you will add the pani as a finishing touch.
Part 3 of 4: Making the pani
 Place all herbs and spices in a food processor or mortar. Mix them until you have a smooth paste. Add some water if the mixture is too thick or viscous.
  Mix the pasta with 2-3 cups of water. Taste the mixture and add more black salt or spices if necessary.
  If necessary, cool the pani by covering the bowl and putting it in the fridge until ready to serve. It is often served cold with the puri.
Part 4 of 4: The pani puri
 Lightly beat in the center of a puri to make a 1-inch hole. Do this with the tip of a knife or with your fingertip. Beat gently because the puri is crispy and brittle.
  Add a little mashed potatoes and chickpea filling. You can also add other fillings such as chutney, yogurt sauce or green sprouted mung beans. Fill about half the puri.
 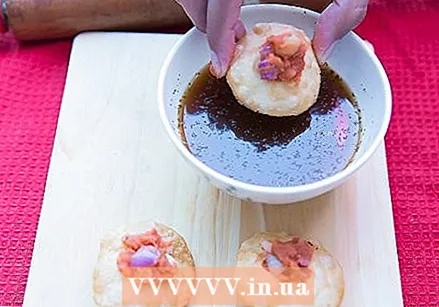 Dip the filled puri into the bowl of pani so that the extra space fills with the seasoned water. Do not submerge the puri for too long or it will become too soft.
  Eat the puri while it is still crunchy. It is necessary to serve and eat pani puri right away before it gets soggy and falls apart. Eat the whole puri in one or two bites. If you have guests, you can let them assemble the pani puri themselves so that they can fully enjoy the texture.
Tips
- 3-4 tsp. dissolved tamarind chutney or pani puri masala can also be used instead of chaat masala.
Necessities
- Deep fryer or deep pan for frying
- Colander
- Blender
- Damp cloth
[[1]]
- ↑ http://www.cookingandme.com/2013/07/puri-recipe-poori-masala-recipe.html
- ↑ http://www.vegrecipesofindia.com/pani-puri-recipe-mumbai-pani-puri-recipe/


