Author:
Christy White
Date Of Creation:
7 May 2021
Update Date:
1 July 2024

Content
- To step
- Part 1 of 3: Prepare to dance
- Part 2 of 3: Learning the basics of the barre
- Part 3 of 3: Practicing Plies, Tendus, and Extensions
- Tips
- Necessities
Ballet began at the royal courts in the early 1600s, and early forms of this elegant and refined art were accompanied by long skirts and wooden clogs. Ballet dancing is very popular all over the world, and learning this dance form can help develop a strong body, spatial and rhythmic awareness, and improve coordination. People who learn ballet also remain flexible throughout their adult lives, making this technique the basis for the training of all kinds of dance. While ballet requires dedication and serious training, you can learn the basics to prepare yourself for further study. Learn to prepare for the training, the basic postures and some of the first techniques you are likely to encounter in ballet.
To step
Part 1 of 3: Prepare to dance
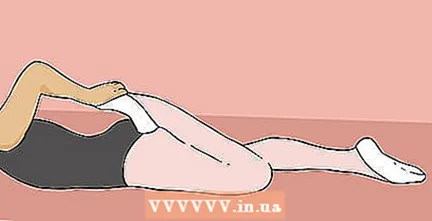 Stretch your muscles thoroughly. Stretching is important for loosening up muscles, strengthening muscles, and lengthening your posture. It is important that this is done at the beginning of every ballet session, including before a performance. When starting ballet, it is important to stretch for at least 15-30 minutes daily to give the muscles plenty of time to warm up, which reduces the risk of injury. You should also stretch to "relax" after the ballet dance.
 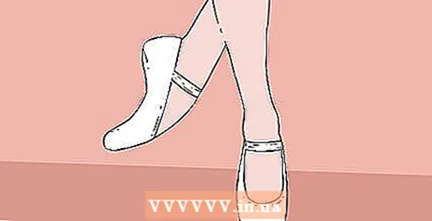 Always wear ballet shoes. Properly fitting ballet shoes should be tight, but not so tight that they impede blood flow and cause numbness in your feet. There are different styles and types of shoes, so ask your ballet teacher or a salesperson in the store for advice, indicating your dance goals.
 - Don't buy shoes to grow in, as your feet will look curved and flat when you point. They should fit so that the cord is tied a little loosely. If your cord is longer than your little finger, you should cut it to about the length of your nail. The lace is only for improving the fit. It is not designed to tie shoes that are too big.
- If you can't buy ballet shoes, that's okay. Use socks without soles so you can turn!
 Wear comfortable and tight-fitting sportswear. The most important thing is that you are comfortable and that you do not wear baggy or loose clothing, so that you can check your movements and postures in the mirror. A plain black leotard and pink tights are usually a safe choice. Pink or black ballet slippers are also suitable.
 - If you are signed up for a class, please contact your teacher about any mandatory kit. Some ballet schools want students to all wear the same thing and others may just require some sort of leotard and leotards and sometimes ballet skirts. They usually require tight fitting clothing so they can see your muscles are tightening properly, etc.
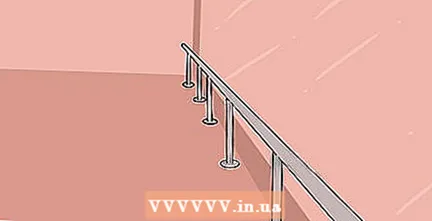 Find a suitable space to practice. Ballet is less about learning the movements than perfecting them. The movements themselves are relatively straightforward, but the taking of the positions, the timing and the elegance required a lifetime of practice. For this reason, it is always better to practice ballet in a ballet studio under the guidance of a good instructor, who can correct your postures and ensure that you dance correctly. A dance studio is equipped with mirrors for correcting your positions and to see exactly what you are doing, as well as a bar for practicing the positions.
 - If you want to practice at home, make sure you have plenty of open space to move around, preferably on a hardwood floor. The back of a chair can replace the need for a barre. Place a large mirror so you can check your postures and see what you are doing.
Part 2 of 3: Learning the basics of the barre
 Start each dance exercise at the ballet barre. At the barre you will learn the basics of ballet, which are important as you progress. If you are just starting out, practicing at the barre should be an important part of the dance class. This is essential for building your strength, agility and flexibility, so don't consider it wasted time. If you skip this, you will not be able to dance properly. Even professional dancers start every class at the barre.
  Learn the basic positions. The cornerstone of ballet, and the basis from which all more complicated movements are developed, are the five starting positions (and the "parallel position" that some consider the sixth position). You won't be able to learn anything else until you have practiced, perfected, and made these six starting positions a habit. These must be so ingrained in your muscle memory that they are part of your DNA.
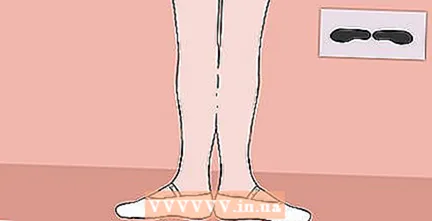
 - All positions should be practiced either towards the barre or with your left hand on the barre. Novice dancers usually start with the body facing the bar, and advanced or more advanced dancers usually start with the left hand on the bar while practicing positions.
 Practice first position. In the first position, your feet should be turned outward and meet at the heels. Your legs are straight and together, your back is straight and your head is held high. Maintain excellent posture and balance.
 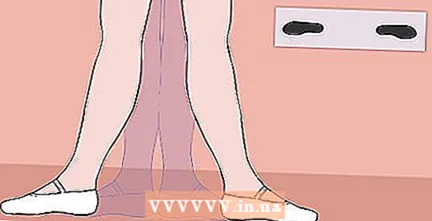 Practice second position. In the second position, your feet are at the same angle as the first, except that your feet are about shoulder-width apart. Widen your support base, but keep the same stance and poise in the second position as in the first. Practice moving from first to second position, without changing the angle of your ankles.
 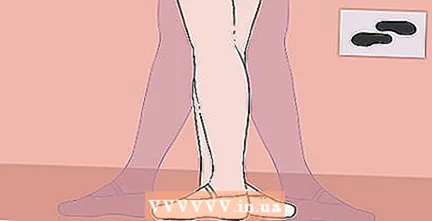 Practice the third position. To get to third position, bring the leading foot (usually your dominant foot or the foot you use for kicking) behind your other foot. The heel of your leading foot should be level with the ankle strap of your other ballet shoe. Push your hips forward and keep your balance. Your legs should be straight and your shoulders pulled back slightly.
 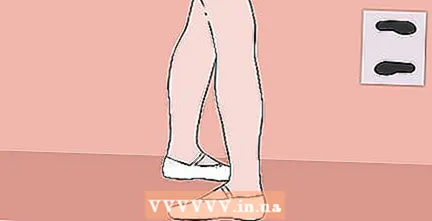 Practice fourth position. To go from third to fourth position, move your leading foot back, spread your weight in a backward direction, just like you did from first to second position.
 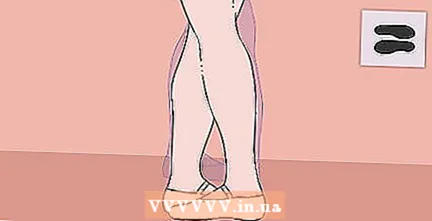 Practice fifth position. Here the positions get a little more complicated. To make the transition to fifth position, return your other foot to your leading foot, bending your ankle so that your heel is above the toe of your leading foot. Your knee should be slightly bent, but your back and shoulders should be very straight and balanced. Practice this transition often.
  End in the parallel position. Both feet come together, next to each other, like parallel lines.
Part 3 of 3: Practicing Plies, Tendus, and Extensions
 Go en pointe when you are done. The next step in your ballet education is "en pointe", which requires pointe shoes and balances on your toes. It is one of the most challenging and exciting parts of ballet study, and must be done with the help of an experienced instructor. This is usually only done after four or five years of advanced to advanced ballet study.
 - Never dance en pointe without your teacher's permission! In most ballet schools, the teachers don't even want you to go home en pointe. This is because you can sprain your toe and foot muscles without experience. Try to go short en pointe at first, and then slowly expand.
Tips
- A good way to practice your balance is to do a passé on the toes (relevé) every time you brush your teeth. Hold this for as long as possible and then switch.
- Don't go en pointe (toe shoes) until your ballet instructor says you're ready! You can do serious damage to your toes, foot bones, and legs if you're not ready.
- Getting used to new ballet shoes will hurt and it takes time to get them in. Don't always just use those shoes, but others too. If you only have one pair, alternate between wearing and no socks.
- One way to strengthen your ankles is to balance on one foot with your eyes closed. It is surprisingly difficult!
- Immediately choose another teacher if your current one does not emphasize the importance of correct hip and trunk placement.
- Only practice en pointe jumping when you have a partner to catch you.
- Use a training band to strengthen the muscles in your feet.
- Another way to strengthen your ankles is to stand on your toes 12 or more times a day.
- Do not force anything. The teacher has techniques to show you how to do it, or may even decide that at a certain stage your body is not yet able to do something.
- Never force it outward. This could otherwise injure your knees. The turning out comes from your hips.
Necessities
- Ballet shoes (flat to start with); pale pink is the usual color, but black or white are also possible (ask the school for their preference or requirement).
- Leotard or another costume required by the school
- Hair bands, clips and pins - most schools want your hair tied together or even in a bun.
- Ballet tights - usually pale pink / skin tone; These tights are different in texture compared to most regular tights.
- Ribbon - many ballet shoes you buy without a ribbon, in which case you will have to sew your own ribbon on it; this should be light pink, black or white; matching the color of the shoe. Some schools prefer shoes without a ribbon and only elastic; ask before you sew.
- A parent or trusted adult who can accompany you to and from classes, rehearsals and concerts.
- Water bottle - make sure you drink enough water; dehydration is very harmful to your health.


