Author:
Charles Brown
Date Of Creation:
9 February 2021
Update Date:
1 July 2024
Content
- To step
- Part 1 of 2: Measuring and cutting the acoustic foam
- Part 2 of 2: Hang the foam without damaging the wall
- Necessities
- Measure and cut the acoustic foam
- Hang the foam without damaging the wall
Sound waves bounce off surfaces and can make your music recordings sound less good. Fortunately, you can reduce this effect with acoustic foam panels so that the room echoes less. To hang acoustic foam, first find the best place on the wall to hang the panels. Then take the measurements and stick the panels to the wall with mounting strips. If you take the right steps, you can hang acoustic foam properly without damaging the wall.
To step
Part 1 of 2: Measuring and cutting the acoustic foam
 Hang the acoustic foam behind your recording equipment. Sound waves bouncing off the wall can affect your recordings and create unwanted effects. If you're making music on a mixer or desk, consider hanging acoustic foam behind it. If you cover an entire wall with acoustic foam, you will experience significantly less reverberation. However, you only need a single panel to notice the difference in your recordings.
 - Hang the foam between both studio monitors or speakers.
- Acoustic foam does not make a room soundproof.
- You hang the acoustic foam in the middle of the wall at ear height.
 Hang foam on the walls opposite your speakers. By hanging foam on the wall opposite your speakers, the sound will reflect less back to your recording equipment. Hang panels directly in front of your speakers to reduce echoing. You only need a single panel for this, but with more panels you can reduce the reverberation even more.
 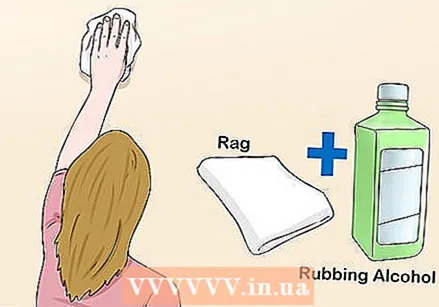 Wipe the walls with rubbing alcohol. Use a clean rag or cloth with rubbing alcohol to remove any dirt from the walls where you plan to stick the foam on. Cleaning the walls beforehand will help the foam stick better.
 - Do not use an ordinary all-purpose cleaner for cleaning, as this may prevent the foam from sticking well.
 Measure the foam panels and the wall you are hanging them on. Lay the foam panels side by side on a flat surface and use a tape measure to measure the total length and width and write on a piece of paper. Then take the measurements of the wall on which you want to hang the panels and mark the wall. This gives you an idea of how much space the panels will take up.
 - If you have a small recording studio, you only need a single foam panel behind the mixing console.
- If you don't have enough wall space, use fewer foam panels.
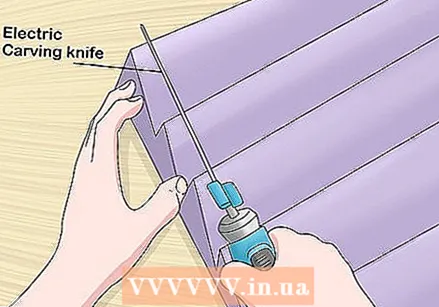 Use an electric carving knife to cut the foam panels to size if they don't fit. Cutting the foam with an electric carving knife will give you clean cutting edges. Hold the panel by the narrow part and cut through the acoustic foam with the carving knife. Gently pull the carving knife down through the panel to cut it to size.
 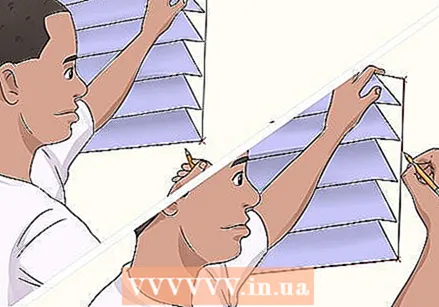 Trace the foam panels on the wall. Using the dimensions, draw an X in the corners where the panels should be. Hold a spirit level against the wall to draw straight lines between the corners where the edges of the panels should be. By doing this in advance you can mount the panels exactly right on the wall.
 - If you are not using a spirit level, the foam panels may be at an angle to the wall.
Part 2 of 2: Hang the foam without damaging the wall
 Spray the back of the foam panels with adhesive spray. Buy adhesive spray online, from a hobby or hardware store. Lay the acoustic panels on the floor with the bumpy side down. Spray the back of the panels with back and forth motions, but do not treat the edges to make it easier to trim the panels later.
 - You can skip this step if there is already an adhesive layer on the back of the foam panels.
- You can buy glue spray online, at hobby stores and at hardware stores.
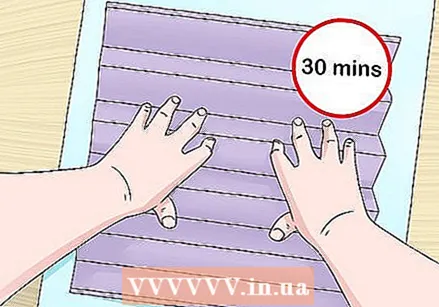 Press the foam glued side down onto a piece of cardboard. If you stick cardboard to the back of the foam panels, the mounting strips will stick better to the panels. Push the panels onto the cardboard for 30 seconds.
 - By using cardboard you can reuse the acoustic foam and your wall will not be damaged.
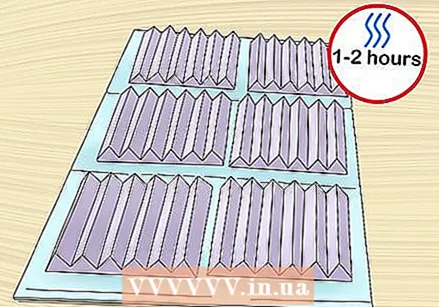 Let the glue dry. Leave the foam panels in a well-ventilated area for one to two hours, then check to make sure they are dry. The foam should stick well to the cardboard and shouldn't shift when you touch it.
 - You can put the foam in front of a window or fan to speed up the drying process.
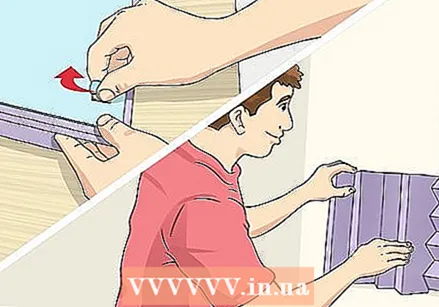
 Trim away the excess cardboard around the foam. Do not cut into the foam itself. Hold your scissors in place and cut along the inside edge of the cardboard. It's okay if the foam overlaps the cardboard.
 - No cardboard should be visible when looking at the bumpy side of the foam panels.
 Stick mounting strips on the back of the panels. Mounting strips are small self-adhesive squares. Peel off the paper backing from the mounting strips and stick them in the back corners of the foam panels. Push the mounting strips for ten seconds so that they stay on the cardboard.
 - You stick the mounting strips on the cardboard and not on the foam.
 Push the acoustic foam against the wall. Remove the protective liner on the other side of the mounting strips so that the adhesive layer can be seen and then hold the acoustic foam exactly in the corner of the square you drew earlier. Push the back of the foam against the wall and push it on for 30 seconds. In this way, the panel should remain stuck.
 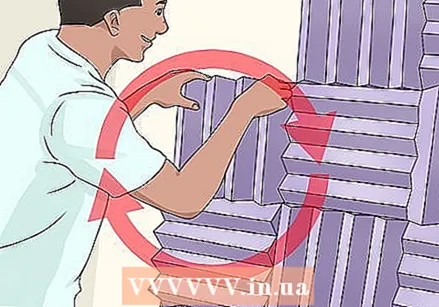 Stick the rest of the panels on the wall. Keep repeating the steps to stick a row of panels to your wall. Continue to apply more foam panels until the desired area is full. When all the panels are on the wall, erase the pencil lines you have drawn.
 - Hang the acoustic panels so that the pattern alternates to ensure that the panels work as well as possible and look good.
Necessities
Measure and cut the acoustic foam
- Tape measure
- Level
- Pencil
- Electric meat cleaver (optional)
Hang the foam without damaging the wall
- Glue spray
- Acoustic foam
- Mounting strips (four per foam panel)


