Author:
Judy Howell
Date Of Creation:
27 July 2021
Update Date:
1 July 2024

Content
- To step
- Part 1 of 3: Cutting with a nail clipper
- Part 2 of 3: Thinning and shaping the acrylic
- Part 3 of 3: Finish with nail polish
- Tips
- Warnings
- Necessities
Acrylic nails are a great way to lengthen and shape your own nails, but they can be frustrating when they are too long. To save some time and money, you can cut your acrylic nails yourself between salon visits. Make sure to follow a few simple guidelines to avoid damaging or breaking the acrylic.
To step
Part 1 of 3: Cutting with a nail clipper
 Decide how long you want your nails to be. Before you start cutting, think about how much you want to get off. If you don't want to cut the length much, you can skip the nail clippers and just file the nails.
 - Not sure how short you want them? Then start cutting a little bit. You can always cut or file your nails shorter later.
- If you prefer to file them, start by filing from the sides of the nail towards the center. Acrylic nails are quite hard, so you can use a coarse (about 100 grit) or medium (180 - 200 grit) file and opt for a cardboard or metal file to shorten your nails faster.
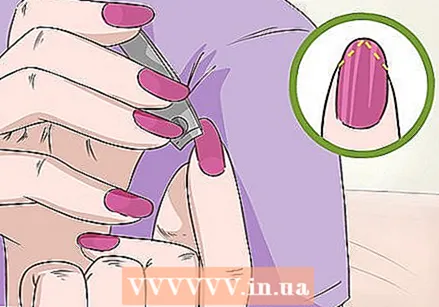 Place the nail clippers on the outside of the nail and cut towards the center. With the edge of the nail clipper on the edge of the nail, cut a little at a time towards the center. Point the nail clippers diagonally upwards towards the center of the nail, so that there is a small dot in the middle.
 - Don't use scissors, as they can apply uneven pressure to different parts of your nail, causing the acrylic to crack.
- If a regular nail clipper isn't strong enough to cut through the thicker acrylic nails, try a toenail clipper, which is generally larger and offers more leverage.
 Cut to the center of the acrylic nail on the other side. Use the nail clippers to mirror the cut on the other side of the nail, meeting at a point in the center of the nail. This two-step process will help prevent your acrylic nails from breaking or splintering.
 - The center of the acrylic nail is a stress point that, if cut immediately, can split the entire nail. By approaching it from both sides, you minimize the chance of ruining the nail.
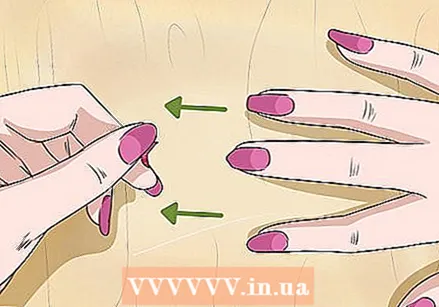 Remove the cut tip by pulling it with your fingers. The cut acrylic tip probably won't fall off on its own, despite being loose. Try to gently pull back or bend the cut part to remove it, but stop and go to a nail technician if you feel the nail start to crack vertically.
 - You may need to trim some areas of the acrylic again with the nail clippers if you see that it is still stuck in places.
Part 2 of 3: Thinning and shaping the acrylic
 Thin your nails with a nail file or an electric nail sharpener. After you cut your acrylic nails, they are likely to be thicker than you would actually like. You can make them thinner with an electric nail sharpener if you have one, or with a regular nail file that will give you similar results.
 - Use the sharpener or file on the acrylic nail and not underneath.
 File the jagged edges smooth with a nail file. Just like with the nail clipper, file from the sides of the nail towards the center. Acrylic nails are pretty tough so go quick at first. You need to slow down when you focus on shaping.
 - Acrylic nails are much thicker than real nails, so it also takes longer to file them. Be patient and don't rush or you risk uneven or too short nails.
- Choose a cardboard or metal file rather than a glass file. The rougher texture of these files allows you to work on acrylic much faster.
- Use a coarse file (about 100 grit) to quickly shorten the length of acrylic nails or try a medium file (180 - 220 grit) for more control.
 File the ends of your acrylic nails into the desired shape. Use a medium (180 - 220 grit) or fine (400 - 600 grit) file to shape the ends of your acrylic nails. Three of the most common nail shapes are square, oval, and "squoval" (a mix of oval and square), but you can also try a classic round, trendy stiletto, or an interesting almond shape.
 - To find out which nail shape suits you best, look at the shape of your cuticles. If they are round or curved, a round nail is a good choice. If they are angular, a square shape will probably look nice.
Part 3 of 3: Finish with nail polish
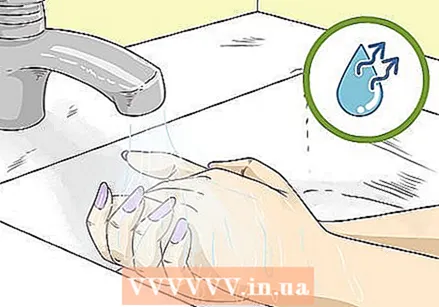 Rinse and dry your hands to remove acrylic dust. Filing acrylic can leave a fine dust on your fingers. Rinse your nails with warm water before painting them so you don't end up with a bumpy manicure.
 - Your nails must be completely dry to prevent moisture from getting underneath the polish, causing the polish to peel off or peel off.
 Apply a coat of nail polish in a color that matches the acrylic. Apply an even coat over the nail and along the outer edge to seal and strengthen nails. This will also help cover up minor imperfections caused by cutting or shaping.
 - If you don't have a color to match the acrylic paint, apply a clear topcoat for a similar finished effect.
- To make your nails look longer, apply the polish all the way to the cuticle. Clean up the nail polish that gets on your skin with a cotton swab.
 Let the polish dry completely to avoid stains and dents. Allow 20 minutes to an hour for your nails to dry completely and be careful not to ruin your freshly painted manicure. Nail polish older than six months can take even longer to dry completely, so try using newer bottles for a faster drying time.
 - Are you in a hurry? To make painted nails dry faster, you can dip them in a bath of ice water, blow them on the cold setting with a hair dryer, or use a drying liquid.
Tips
- If you have gel on your acrylic nails, don't cut or file them yourself. Cutting in gel polish removes the seal and allows water to get between the polish and your nail. This can cause the gel to come off and ruin your entire manicure. Instead, go back to the nail salon where they can safely remove the polish and cut your nails.
- When you're done, rub cuticle oil into the skin around your nails to keep them hydrated and looking healthy.
Warnings
- If while trimming your acrylic nails you feel that they are starting to split vertically, stop and go to a nail technician for a repair. Otherwise, you risk ruining your manicure and possibly damaging your natural nail.
- Don't stress your acrylic nails unnecessarily so they don't break.
Necessities
- Nail or toenail clippers
- Cardboard or metal nail file
- Matching nail polish or transparent top coat


