Author:
Gregory Harris
Date Of Creation:
11 August 2021
Update Date:
22 June 2024

Content
Learn how to putty the joints around the sink and tub with silicone or sealant. The plastering process seals the seams around the sink, bathtub or shower tray.
Steps
 1 Surface preparation. Remove old silicone from the work surface.
 - This can be done with a knife or a retractable cutting knife.

- Any contaminants such as oil or grease can prevent the silicone from adhering to the surface, so wipe the surface thoroughly with solvent (or alcohol).

- This can be done with a knife or a retractable cutting knife.
 2 Load the gun with silicone. Using a knife, cut off the tip of the silicone tube at a 45 degree angle, leaving a small hole. This will give you better control over the silicone flow. The hole should not be too large to prevent droplet formation, but not too small to create high sealant pressure in the tube.
 - Print out the silicone tube. Most tubes have a thin baffle to prevent the sealant from hardening. Many pistols have a built-in baffle punch tool. But if your pistol doesn't have that, a long nail or something like that will do.

- Insert the silicone tube into the gun.

- Print out the silicone tube. Most tubes have a thin baffle to prevent the sealant from hardening. Many pistols have a built-in baffle punch tool. But if your pistol doesn't have that, a long nail or something like that will do.
 3 Practice. Sealing with silicone is not easy. Holding the gun over the bin, pull the trigger to start dispensing the sealant, filling the nozzle of the tube with it. The sealant should flow evenly and not splash or drip. Release the trigger to relieve the pressure in the tube a little. If you haven't worked with a gun before, practice on a trial area or unnecessary material - a corner of a cardboard box will do, for example. This will help you "feel" the gun and adjust the silicone feed.
 - The tip should not touch the surface, but should be slightly above it. Watch the sealant stream when pulling the trigger. Move the gun in an even motion along the seam, creating a bead. Without letting the jet stop, quickly release and pull the trigger again, forming a continuous bead along the entire length of the seam. Don't stop until you reach a corner.

- The tip should not touch the surface, but should be slightly above it. Watch the sealant stream when pulling the trigger. Move the gun in an even motion along the seam, creating a bead. Without letting the jet stop, quickly release and pull the trigger again, forming a continuous bead along the entire length of the seam. Don't stop until you reach a corner.
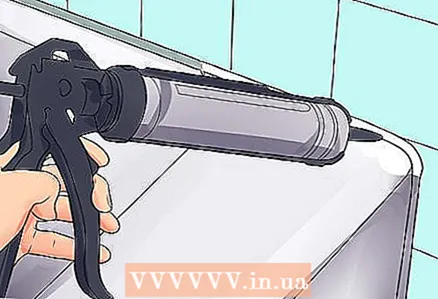 4 Begin gradually applying the sealant to the desired area. For best results, hold the gun at a 45 degree angle. It is advisable to apply the sealant smoothly and evenly. Do not overdo it with the amount of sealant, as it is not always easy to remove the excess. When you get to the edge of the area you want to seal, release the trigger and pull back sharply to avoid dripping.
  5 Smooth out the seam. The smoothing process creates an even, gap-free seam. To distribute and smooth the silicone, soak your finger in the soapy water and run it over the joints. If desired, this can be done with rubber gloves. Start at the corner and work your way up to about the middle. Then start aligning from the opposite corner. When you get to the already smoothed area, slightly lift your finger so that there is no tubercle. When finished, wipe off any remaining silicone from your fingers and let the seam dry.
Tips
- To remove fresh silicone from your fingers, wipe them off with a plastic bag.
- Let the sealant harden! The full cure time is usually indicated on the sealant packaging.
- Use a sealant designed for bathrooms and kitchens. They are available in a wide range of colors and price ranges. These sealants contain an anti-fungal component.
- If you are sealing the seams at the bathtub, fill the bathtub three-quarters with water to let it sink and let the silicone dry. Otherwise, the tub will sag when you fill it later, pulling the seam with you, which will most likely cause the seam to break and crack.
- Wash your hands with soap and water immediately after smoothing. If the sealant won't wash off, try removing it with vegetable oil. Afterwards, lubricate your hands with moisturizer so that the skin does not dry out.
- If you have any sealant left in the tube, plug the tip of the tube with a stick or match and wrap it with tape. The sealant will last a little.
- You can use masking tape to glue the area along the seam so as not to stain the adjacent surface. This will create a beautiful, thin seam. After removing the excess sealant as much as possible, remove the tape immediately after the end of work. Use a damp finger to smooth the edge of the sealant so that there is no protrusion, otherwise dust and dirt will accumulate on it.
You will need
- Silicone or sealant
- Silicone gun
- Knife (assembly)
- Rag and solvent or alcohol


