Author:
Carl Weaver
Date Of Creation:
21 February 2021
Update Date:
1 July 2024
Content
- Steps
- Method 1 of 3: How to create a pronounced cleavage in the chest with a patch
- Method 2 of 3: How to use a patch to lift your breasts and reduce their mobility
- Method 3 of 3: How to remove the patch
- Tips
- Warnings
An unexpressed groove on the chest or its complete absence can sometimes be a cause for grief, especially when you are constantly surrounded by owners of magnificent busts. Nevertheless, with the help of a patch, you can visually enlarge your own breast without much difficulty. Moreover, the methods mentioned in the article will help you not only create the illusion of volume, but also allow you to wear tops, dresses and jumpsuits with an open back.
Steps
Method 1 of 3: How to create a pronounced cleavage in the chest with a patch
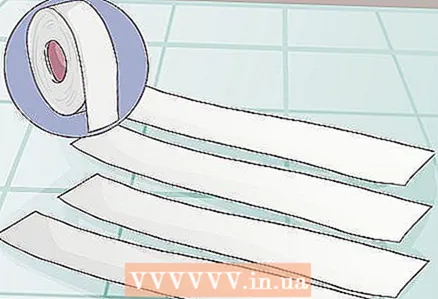 1 Cut off four strips of adhesive. It is best to take a wide medical patch. But it is also permissible to use a sports tape or cloth tape. Sealing tape is also often used, but this is quite risky for sensitive skin. All strips of the patch should be slightly narrower than the width of your chest. You may only need three strips, but prepare four at once just in case.
 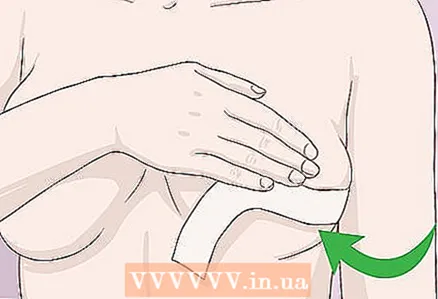 2 Glue half of the first strip. Begin applying the patch from the outer edge of the lower side of your left breast. Use your right hand. Stick the strip only halfway. Smooth out the bonded area with both hands to secure the patch securely.
 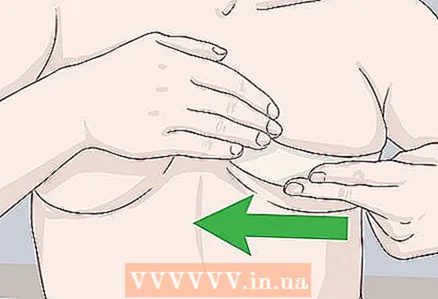 3 Pull across your chest and glue on the other half of the strip. With your left hand, hold the end of the patch that is already glued to your body. Pull the free end of the strip firmly with your right hand. Release your left arm and use it to pull your right chest as close to your left chest as possible. Place the free end of the patch under your right breast to secure it.
 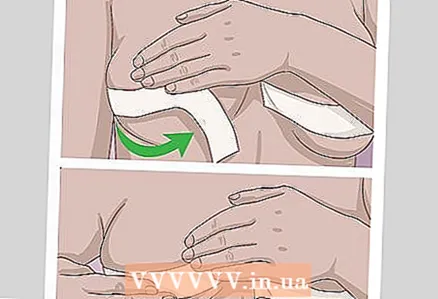 4 Apply the second strip of adhesive in the same way. This time, start working on the right chest. Following the same principle, stick the second strip halfway over the first strip and half above it. Pull your breasts even tighter as you tape over them. This will raise the bust more to form a hollow.
 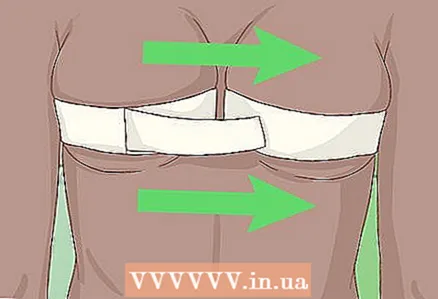 5 Use the third strip of patch. This strip of patch is only needed to fix the previous strips. Start on the left side and stick the first end of the strip, protruding about 1 cm beyond the patch previously applied (onto the skin). Pull the strip down to the right side and stick. If the third strip is not long enough for the similar protrusion on the right side, use the fourth strip of adhesive to complete the fixation.
 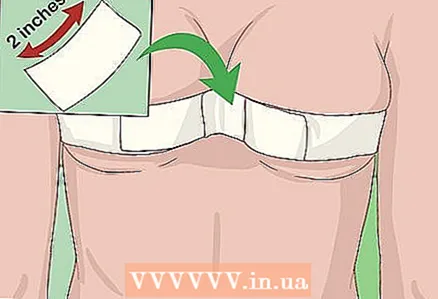 6 With a small piece of tape in the middle, gently grip the tape that holds your breasts. Cut a small piece of tape no more than 5 cm long. Pinch the middle of the chest patch (just below the cleft). Wrap a small piece of tape around the gathering to secure it in place.
Method 2 of 3: How to use a patch to lift your breasts and reduce their mobility
 1 Cut six strips of patch to the width of your chest (no more). To achieve the desired effect, you will need to create a kind of bra from the patch.Four strips will form its base, two more will play the role of straps and lift the chest. This method is great for providing extra bust support for open back tops. In addition, in this case, the patch is placed lower on the chest than in the previous method, so this method is also suitable for tops with a deep neckline.
 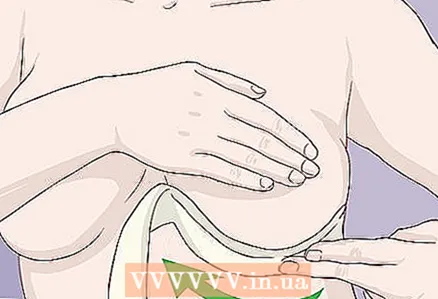 2 Stick on the end of the first strip of patch. Take the first strip of patch and glue the end of it to the bottom corner of your left breast. Place it horizontally just above the ribs. Secure the patch well by smoothing it out with both hands. Hold this end of the strip with your left hand.
  3 Pull the patch across your chest to adhere the other half of the strip. Once you are sure that the patch is firmly in place, release your left hand and use it to pull your right chest towards your left. When the groove you want appears in the front, glue the free end of the patch under the right breast.
 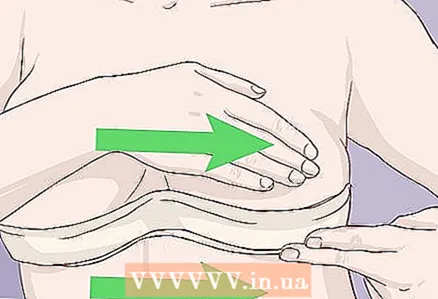 4 Place a second strip of tape over the first. Take the second strip of patch and secure the end under your right breast. Pulling the chest until the desired groove is obtained, pull the patch across the chest at the other end and stick it over the first strip of the patch. To get a pronounced hollow on the chest, you need to pull the patch tight enough.
 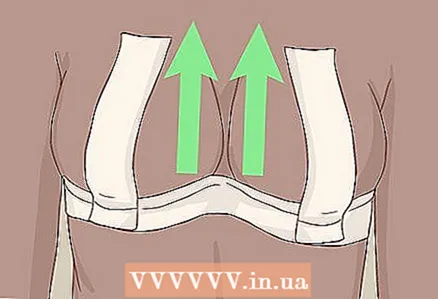 5 Lift your chest with the tape straps. Now you need to create the webbing. However, these straps will only extend to the collarbone and not over the shoulders. Take a new strip of patch and tape the end vertically under your left breast. Pull the patch up and stick to the skin up to the collarbone. Do the same on the right side. This will lift your breasts and visually enlarge them.
 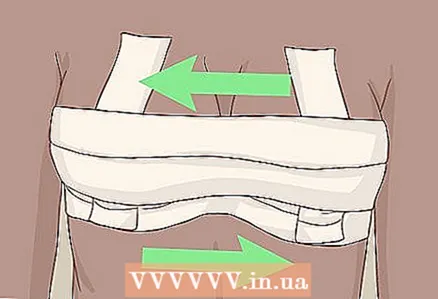 6 Secure the resulting structure with the remaining strips of adhesive. Use the last strips of patch to secure everything. Be sure to cover the straps with them and try to close any gaps between the other strips of the patch. Pull the patch firmly to provide additional support for your breasts.
Method 3 of 3: How to remove the patch
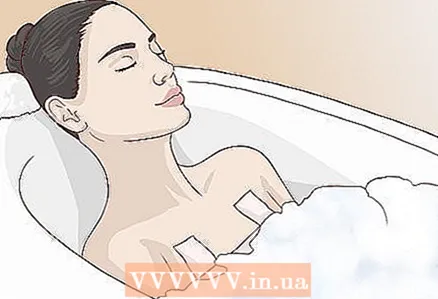 1 Soak the patch with warm water. To loosen the adhesive properties of the patch, it is helpful to take a bath or shower. If the bathroom is not available or you simply do not want to shower, you can use a wet towel. Just wet it with warm water, lie on your back and throw a towel over the patch. This will make it much easier for you to peel off the patch.
 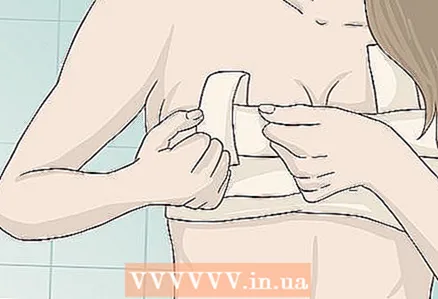 2 Slowly remove the patch from your skin. When it's time to remove the patch, do it slowly and carefully. Pulling the patch sharply can injure your skin. Even if you have used a patch specifically for the skin (medical or sports), you should also take your time. While removing the patch, hold on to the surrounding skin. Be careful not to accidentally stretch the skin.
 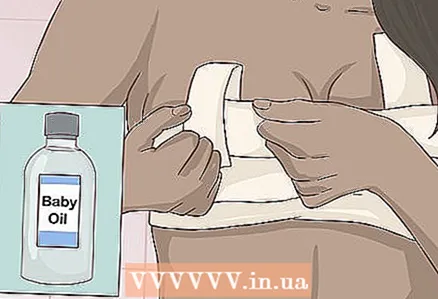 3 Use baby oil. If you can't just remove the patch, use baby oil. It will help reduce the adhesive properties of the patch. Take a cotton ball and dip it in baby oil. Lubricate the adhesion of the patch to the skin with oil and gradually remove it.
Tips
- It will be easier if you call a friend for help.
- Be careful not to tear the strips of the patch or the result will be uneven.
- Try to use a patch made specifically for the skin (medical or sports).
Warnings
- Don't glue your nipples. Chances are that you will severely injure them when you remove the patch.
- Do not use sealing tape as it is made from materials that are not suitable for leather. And even if you additionally use baby powder or something else, irritation may develop on the skin, which will cause severe discomfort.
- Do not tape the entire circumference of the chest with tape.If the bandage is too tight, it can make breathing difficult.
- Do not apply the patch to injured, damaged, or sunburned skin.


