Author:
Ellen Moore
Date Of Creation:
13 January 2021
Update Date:
1 July 2024

Content
- Steps
- Part 1 of 4: Start growing peanuts at home
- Part 2 of 4: Transplanting a Peanut
- Part 3 of 4: Daily Care
- Part 4 of 4: Harvesting and Storage
- What do you need
Peanuts are surprisingly easy to grow at home. Most gardeners are more successful if they start growing the plant indoors at the beginning of the season, and then, when the soil warms up, transplant the seedlings to the site. To learn more about how to grow peanuts properly, read on.
Steps
Part 1 of 4: Start growing peanuts at home
 1 Know the benefits of starting home growing peanuts. Peanuts have a long growing season and require 100 to 130 frost-free days to ripen.
 - If you live in the colder northern region, then you need to plant the plants at home about a month before the last expected frost.
- If you live in a warmer southern region, you can either plant peanuts right in the garden after the last frost, or start growing them indoors two weeks before the last frost.
 2 Choose good peanut seeds. You can plant raw peanuts purchased at the grocery store. But you may find it easier if you plant peanut seeds purchased from a gardening store.
 - Note that peanuts used as seeds must remain in their skins until planted. Otherwise, the seeds will dry out quickly and will not sprout.
- Never use roasted peanuts. It will not germinate.
 3 Fill a clean container with damp potting mixture. Take a seedling bowl or pot about 10 cm deep and fill it 2/3 full with the potting mix.
 - If the soil is not yet wet, water with a watering can before planting peanut seeds.
- The safest containers are paper or peat pots, since when transplanting, you can plant the seedlings along with the whole pot. However, if you have no choice, you can use a plastic bowl or pot.
- Make sure the containers are clean before planting the peanuts, especially if you are using plastic containers. Wash it with soap and water, rinse well and pat dry with clean paper towels.
 4 Place a few peanut seeds on the ground and cover them. Place four peanut seeds at an equal distance from each other by removing the skins and gently pressing them into the ground. Cover them with a layer of damp, loose earth, about an inch thick.
 - When peeling peanuts, do not remove the brown papery layer that protects each nut seed. If you remove or damage it, the peanuts may not sprout.
- You can plant peanuts without removing the skin first, but they will sprout faster if you remove them.
- If the soil is not moist enough when adding, lightly dampen it with a watering can or spray so that it is damp to the touch, but not wet.
- If you are planting seeds outdoors, plant them 2 cm deep and 20 cm apart.
Part 2 of 4: Transplanting a Peanut
 1 Choose a sunny spot. To grow well, peanuts require the highest intensity of sunlight.
 - The sun is important for photosynthesis, however, the most intense solar radiation is recommended because areas that receive a lot of sunlight are likely to be the warmest in the garden. Peanuts thrive in warm soil.
 2 Wait until the last frost has passed. Peanuts are quite frost-sensitive, so you should wait at least two to three weeks after the last expected frost is over before replanting indoor-grown seedlings into your garden.
 - The same principles apply if you plant peanuts directly in your garden. Wait a few weeks since the last frost. Otherwise, the peanuts will not sprout.
- The soil temperature must be at least 18.3 degrees Celsius.
 3 Improve soil quality if necessary. The soil should be loose and well-drained. If the soil is too hard, add a few handfuls of sand to it to improve the quality of the soil and reduce its density. Dig and mix the sand with a small garden trowel
 - Avoid clay soils that are difficult to improve to the required degree.
- You can use aged compost, but you need to limit it as it can release nitrogen. This is beneficial for many plants, but peanuts produce their own nitrogen, and adding nitrogen can lead to excess nitrogen, which can ultimately lead to stunted plant growth.
- In case the soil is too acidic, you may need to adjust its pH by adding a little agricultural lime to the soil and stirring it thoroughly.
 4 Dig deep holes in the soil. Dig holes at least 15 cm deep, even if the plant does not have such a deep root system.
 - Roots need a lot of space to grow. Digging the soil deeper helps break up dense areas of the soil, ultimately making it looser and giving the roots the space they need.
- When you're done digging, fill the bottom of each hole with about 5 centimeters of loose earth, or you might accidentally plant the seedlings too deep.
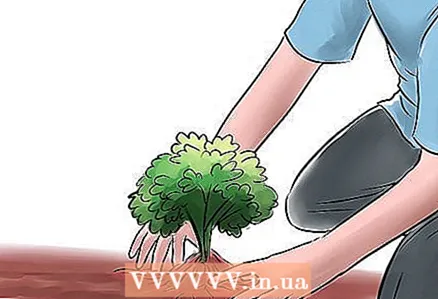
 5 Plant the seedlings 25 cm apart. The stem and leaves should be above the ground, and the root system should be completely underground.
 - Gently fill the rest of the hole with loose soil.
- If you are using a decaying seedling container, place it entirely in the soil. If not, gently grasp the sides of the container to release its contents. Tap the container lightly so the plant, roots, and soil fall into your hands. Transfer the entire breast to the site.
- Avoid exposing sensitive roots.
- If you have planted peanut seeds directly in the garden bed, it may be a good idea to initially plant 2-3 seeds in one hole. However, in the future you will have to thin out the plants, leaving only the strongest of them in each hole.
 6 Water the soil well. Use a gentle hose or watering can to moisten the soil so that it feels damp to the touch when touched.
 - Note, however, that the soil should not be wet through. If there are puddles on the surface of the bed, then you probably added too much water.
Part 3 of 4: Daily Care
 1 Loosen the soil after a few weeks. Once your plants are 15 cm tall, you must carefully dig up the soil around the stem to loosen the soil.
 - When the plant grows up, it will put out antennae, and flowers will appear on each of them. These flowers will wither and wilt, but they should not be plucked.
- These downward stems are called shoots. Your peanuts will sprout these sprouts, and the stalks will need to go underground in order for the peanut beans to grow.
- By loosening the ground, you will make it easier for the scions to fall into the ground.
 2 Tuck the ground at the base of the plant later. After the shoots are underground and the plants grow up to 30 cm in height, you should carefully make small mounds around each buried shoot and the base of the plant.
 - This will provide extra warmth and protection to the growing peanuts at the tips of the buried shoots.
 3 Lay a layer of light mulch. Spread a 5 cm layer of chopped straw and grass over the area immediately after hilling.
 - Mulch prevents weeds from growing.
- Plus, it keeps the soil warm, moist and soft.
- Do not use heavy mulch such as wood shavings. Additional cuttings can make their way through the ground, but they will not be able to do this if they have heavy mulch in the way.
 4 Water your plants regularly. Use a gentle watering can or garden hose to provide your plants with 2.5 centimeters of water each week.
 - Ideally, peanuts should be watered with small amounts of water. It feels better when the ground is slightly dry at the surface, but moist at a depth of about 2.5 cm. This can be determined by sticking your fingertip into the ground and noting how deep it sinks before you feel the moisture.
 5 Avoid fertilizers with high nitrogen levels. You usually don't need fertilizer to grow peanuts, but if you do decide to use fertilizer, make sure it doesn't contain large amounts of nitrogen.
 - Peanuts are self-sufficient in nitrogen. The addition of additional nitrogen will lead to the development of plants with bushy shoots with thick leaves and low fruit yields.
- Once the plants start to bloom, you can start adding calcium-rich fertilizers to them. This will help you maximize nut formation.
 6 Protect your plants with a mesh fence. The most dangerous threats to your peanuts are squirrels, chipmunks and other animals looking for a place to eat. Setting up a mesh fence around your plants is a simple and surefire way to keep such intruders away from your crops.
 - Press the fence 5–8 cm underground to protect the peanuts as they grow downward. Mice and squirrels will try to dig up the plant after the nuts start to form, and if the net is not extended underground, they may succeed.
 7 Use insecticides only when needed. Peanut plants are usually not prey when it comes to insect pests. However, some insects sometimes cause certain troubles, these include winter worms, leaf beetles and aphids. These insects usually attack by eating plants.
 - For best results, spray the leaves with a pyrethrin pesticide.
- If you want to use natural ingredients, treat the leaves with ground red pepper.
Part 4 of 4: Harvesting and Storage
 1 Dig up all the plants with an earthmoving pitchfork. You must harvest the peanuts before the first frost of autumn, as they are still frost-sensitive at this stage.
 - When the plant is ready to be harvested, it will turn yellow and begin to wilt.
- Carefully dig up the entire plant with an earthmoving pitchfork, lifting it up from the roots. Shake off most of the soil that is trapped by the roots.
- A healthy plant can produce between 30 and 50 peanut grains.
 2 Dry the plant. Hang the plant in a dry place for about a month.
 - Let the peanuts dry on the plant in a warm, dry place for one to two weeks.
- For the remaining two weeks in the same warm and dry place, dry the nuts you torn from the plant.
 3 Roast or save the plants. You can enjoy the peanuts raw or roasted, or you can save the grains for later.
 - To toast peanuts, place them in an oven heated to 180 degrees Celsius for 20 minutes.
- To preserve peanuts, leave them in the skins and place them in an airtight container in the refrigerator for up to 6 months.
- If you cannot freeze peanuts, they can remain edible for up to 3 months if stored in a dry, dark place.
- Peanuts can also be frozen for a year or more.
What do you need
- Potted land
- 10 cm container
- Sand
- Agricultural lime
- Peanut seeds
- Garden shovel or small shovel
- Garden pitchfork
- Watering can or garden hose
- Pieces of straw, grass or other light mulch
- Airtight container


