
Content
- Steps
- Part 1 of 3: Preparing the garden
- Part 2 of 3: Planting and Caring for Sweet Onions
- Part 3 of 3: Collecting and storing onions
- Tips
There are many varieties of sweet onions such as Vidalia, Sweet Spanish, Bermuda, Maui, Valla Walla. Although these types of onions are generally less pungent than others, the flavor of the onion is also highly dependent on the soil in which it grows. When growing sweet onions, it is best to use onion sets rather than seedlings, as they are less susceptible to frost. Also, remember that sweet onions require plenty of sunshine and fertile, well-drained soil.
Steps
Part 1 of 3: Preparing the garden
 1 Plan to plant the onions in early or mid spring. Onions can be planted 4-6 weeks before the last frost. When the soil is ready for cultivation in March or April, start preparing the onion bed.
 - Do not plant onions until the temperature has stopped dropping below -7 ° C.
- The date of the last frost expected in your area can be found in the weather forecasts (including on the Internet) or the gardener's almanac.
 2 Choose a sunny spot to plant your onions. Sweet onions should be grown in a well-lit area where they will receive 6-8 hours of sunlight per day. It is best to choose a place for the garden where the bow will not shade trees, other plants or buildings.
  3 Correct the soil with compost. Onions prefer loose, fertile and well-drained soil with a pH of 6.0-6.8. Loosen the soil in the garden bed with a cultivator. Spread a 5 cm layer of aged compost or rotted manure on the ground and mix it with the soil with a cultivator.
 - Soil pH can be checked with a household acidity kit or a pH meter. Use lime to increase the soil pH and sulfur to lower it.
- Compost will enrich the soil with nutrients and help it pass water better.
- The soil must be loose enough to drain off the sulfur, or the onions will not be as sweet.

Steve masley
Home and Garden Specialist Steve Masley has over 30 years of experience in the creation and maintenance of organic vegetable gardens in the San Francisco Bay Area. Organic Consultant, Founder of Grow-It-Organically, which teaches clients and students the basics of growing organic gardens. In 2007 and 2008 he led a field workshop on Local Sustainable Agriculture at Stanford University. Steve masley
Home and Garden Care SpecialistCompost enriches the soil with essential nutrients for plants. The Grow it Organically team advises: "In organic gardening, there is a rule of thumb:" Feed the soil to feed the plants. " If you take good care of the soil, you can grow healthy plants. Of course, there are other factors, such as choosing the right variety, the right spacing between the plants and the right watering, but good soil is about 70% of success. ”
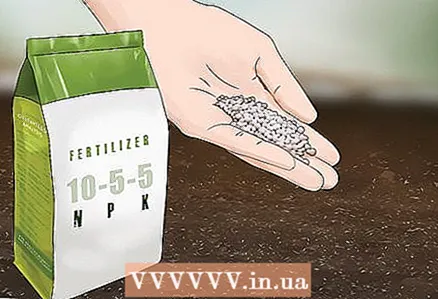 4 Add fertilizer to the soil. Onions grow best in soil with excess nitrogen. Sprinkle the soil with a nitrogen-rich fertilizer such as blood meal. Use a rake to stir the fertilizer into the soil.
 - When growing sweet onions, do not use sulfur-based fertilizers, as these will make the onions spicier.
Part 2 of 3: Planting and Caring for Sweet Onions
 1 Row the soil. Use your hands or a shovel to divide the soil into rows about 10 centimeters high. The distance between adjacent rows should be 40 centimeters. Making onion rows is especially important if you have clay soil.
 - You can also plant onions not in rows, but grow them in raised beds, which are filled with compost and fertilizer.
- Sweet onions should be planted in rows or in raised beds, as this will help drain water better and result in sweeter onions.
- If you are going to grow onions in pots or boxes, you will have complete control over the soil environment in them, so that in this case there is no need to row before planting.
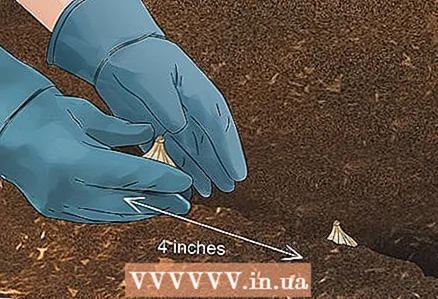 2 Plant the onions in rows. Use a shovel to make holes in the rows 2.5 centimeters deep, 15 centimeters apart. Place an onion in each hole and dust the roots with soil. Do not plant the onions deeper than 2.5 centimeters, otherwise the stems may rot and the bulbs will turn out to be smaller.
 - Onion sets are small bulbs that were grown from seeds last year and dried.
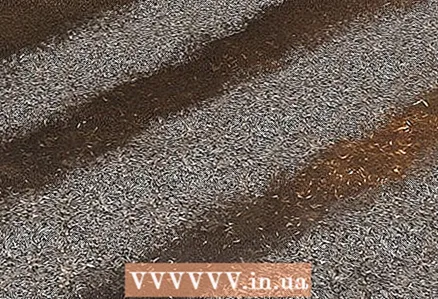 3 Sprinkle a thin layer of mulch on the soil. Mulch will protect the garden from weeds and keep the soil moist, which is very important for onions. A thin layer of cut grass or straw works well as mulch.
 - When the bulbs begin to sprout, sweep the mulch from the garden to keep the onions dry.
 4 Water the onion. Onions have very shallow roots, so they need regular watering to keep the soil moist. Water the onions so that they receive about 2–3 centimeters of water per week (keep rain in mind).
 - The onion will need even more moisture if you don't cover it with a layer of mulch.
- Water the onion less if its stems start to turn yellow ahead of time - this is a sign that it is getting too much moisture.
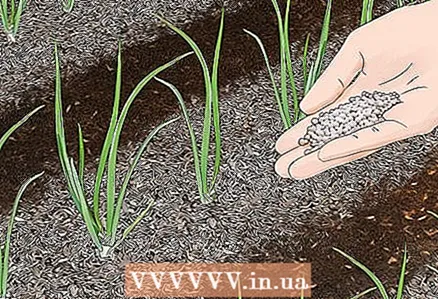 5 After the bulbs have germinated, fertilize the soil around them. When the bulbs have sprouted about three weeks after planting, add a tablespoon (about 15 grams) of granular fertilizer about 15 centimeters from the stem of each plant. Use a rake to mix the fertilizer into the soil, then water the garden bed.
 - Fertilize the soil around the bulbs again when the shoots are about 20 centimeters tall.
- Use a nitrogen-rich fertilizer such as blood meal.
 6 Remove blooming onions. If the onion has started to bloom, it means that it has stopped growing and is about to give seeds. Do not leave flowering bulbs in the garden, otherwise they will start to rot. Dig up these bulbs right away and eat them as they won't last long.
Part 3 of 3: Collecting and storing onions
 1 Collect the green onions shortly after planting. Chives are unripe onions that are harvested before bulbs form. You can start harvesting it within a few weeks after planting, or when it grows to the size you need. Grasp the base of the stem and gently pull the onion out of the ground.
 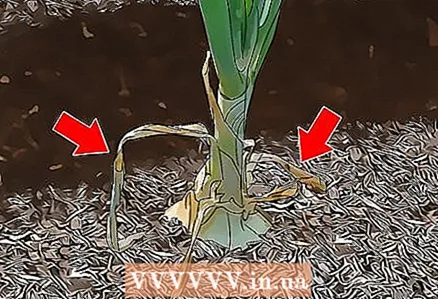 2 Wait for the stems to dry for the onions to ripen. If the onions are left in the ground, they will eventually begin to form mature bulbs. When the bulbs are ripe, the stems will begin to turn yellow and fall off. This means the bow can be harvested.
 - Depending on the variety, onions ripen 90–110 days after planting.
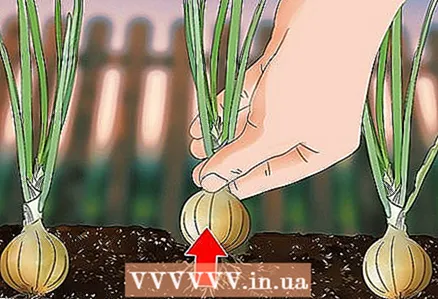 3 Harvest onions on a sunny morning. Squeeze the stem of the onion at the base and gently pull it out of the ground. Shake the onion lightly to remove excess soil from the roots.
 - Collect the onions before the end of summer, as they can deteriorate during the fall cold snap.
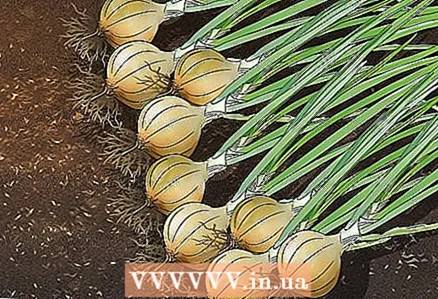 4 Dry the onions. After you have collected all the bulbs, spread them out on the ground in fresh air and sun. Dry the onions in the sun for about three days, until the top and rind are dry. After that, the peel should have a uniform texture and color.
 - Dry onions in a well-ventilated area in rainy weather.
- After drying, onions have a longer shelf life. However, sweet onions do not last as long as hot ones, so they can be dried for less time.
 5 Trim the onion before storing. After drying the onions, take a sharp pair of scissors and trim the roots and tops to about 2–3 centimeters. Place the onions in nets or paper bags and store them in a cool, dry, well-ventilated place.
 - As a rule, sweet onions have a shorter shelf life than regular onions, so it is best to use them within six weeks.
- To extend the shelf life of onions to 8 weeks, wrap each onion in a paper towel and refrigerate.
Tips
- Onions can also be grown in pots at least 20 centimeters deep and wide. Place the potting soil in the pot and place it in a sunny spot. Plant 8-10 onions in each pot.


