Author:
Carl Weaver
Date Of Creation:
21 February 2021
Update Date:
1 July 2024

Content
- Steps
- Part 1 of 3: Preparing for Installation
- Part 2 of 3: Installing gutters
- Part 3 of 3: Maintaining Your Gutters
- Tips
- Warnings
- What do you need
Large amounts of water can not only damage your roof. It can damage the exterior cladding and foundations of your home. The best way to protect outdoor cladding and foundations is to install gutters and direct the water flow away from the house. Gutters can be made from many materials, including wood, steel, aluminum, and copper. The most popular and long lasting type of gutter is vinyl. Vinyl gutters are inexpensive and easy to use and install. See method 1 for more detailed instructions.
Steps
Part 1 of 3: Preparing for Installation
 1 Decide where you want the water to flow. Do you want it to be collected in a rainwater barrel or drained away from the foundation to avoid leakage problems? Consider the landmark and landscape of your home to decide what you want to happen to the water flowing from your roof before installing the gutters.
 - If you want water to drain 1-2 meters from the base of the house into the yard, then you need to install gutters. Is there enough room for this in your yard? You also need to make sure that there are no heavy slopes and potholes in the ground that are at opposite angles to your base, as this could damage your base from water.
- 2 Measure the mileage of the gutter. To determine how many gutter sections and accessories you need to buy, measure the length of the house that will contain the gutters. This is called measuring the gutter run.
- It may be easier to take a rough ground measurement, but to be sure, step on a ladder and ask a friend to help you get the correct section measurements. This way, you will have more confidence.
- Sketch a layout for installing gutters to take with you to the store. Include a rough description of the shape with the correct measurements for a little consultation.
- 3 Choose between a set of vinyl gutters and individual pieces. At most home repair shops, you can buy an all-in-one (or multiple) installation kit that includes all the necessary connectors, corners, plugs, and gutters to make your work easier. These kits are usually expensive, so if you want to purchase a more customizable and cheaper project, then you can buy all the parts separately.
- If you decide to buy everything piece by piece, plan to purchase everything for 3 meter long vinyl gutters. If you end up with extra material left over, you can use it for other needs. Better to buy more than go back to the store.
- You will also need connectors, corners, plugs and gutter holders for every 1/2 meter of gutter.
- You will need a downpipe, elbows, holders and gutters for every 9-11 meters of gutter. If you are not sure how to use these parts, talk to your home improvement store salesperson or read the instructions for one of the assembled kits for each part and follow it as a guide.
 4 Mark the slope of the horizontal planks with chalk lines. You don't want to measure the distance every ten seconds during installation. So before you start, mark the angular slope of the water with chalk lines to make it easier to work with. Tilt vinyl gutters approximately 0.6-1.3 cm for every 3 meters of short run gutters less than 9 meters.
 - Drains need a slight slope so that water flows out of them, rather than creating puddles out of the water. Place the highest point in the middle of the run, leaning the same amount in either direction for longer runs from 9 meters.
- For gutters longer than 12 meters, tilt the gutter downward from each end of the mid-run gutter, essentially making a "reverse tilt". Think about what will be best for your home before ordering parts and drawing your sketch.
Part 2 of 3: Installing gutters
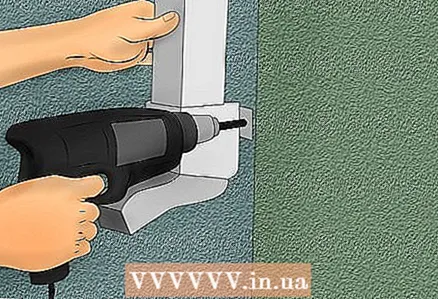
 1 Install pipe drains around the edges of the house. Using a drill or power screwdriver, attach the drains with 3 cm screws. The gutters themselves will be attached to these drains, so it is important to attach them first and use them as a guide to continue with the installation.
 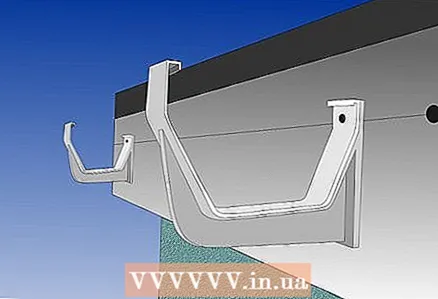 2 Attach the gutter holders along the chalk line on the bezel of the boards. Attach screws every 60 centimeters, about 2.5 centimeters from the edge of the roof.
 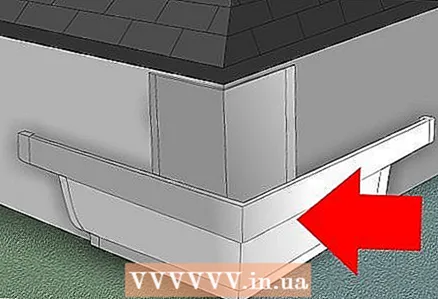 3 Reinforce the corners of the gutters at the corners of the house where there will be no gutters. Water should easily pass through the gutters, heading towards the downpipes. You probably don't want water to flow from every corner, so use corners for gutters in intermediate areas.
  4 Hang the gutter sections. First insert the gutter sections into the gutters using the holders to support the individual sections. Use plastic sliding hinges at the end of each 3m length, connecting gutter sections to each section using connectors. Add an end cap in areas where there are no drains to allow water to flow towards the downpipes.
 - If you need to resize gutter sections to fit your walls, cut them off with a saw.
- To make things easier, have one person hold one end of the gutter while the other takes the other end and attaches the vinyl gutters from the outside with the holders.
 5 Attach downpipes to your home. First, provide an outlet for the downspout to the ditch. Connect the elbow pipes to the drains and downpipe coming out of the gutter. Fasten the downspout section of the correct size to fit between the elbow pipes.
 - Secure the downpipe to the wall using the same brackets used to secure the gutter sections.
 6 Install drain barriers or covers. Kits often include covers made of metal mesh to attach to vinyl gutters to complete the installation. They keep gutters from clogging and allow water to flow smoothly.
Part 3 of 3: Maintaining Your Gutters
- 1 Clean your gutters once in the spring and fall. Keeping an annual gutter cleaning schedule will ensure that the system is functional when you need it, and you won't have to worry about urgent repairs during a big flood. Remember to mark your regular cleaning on your calendar and the job shouldn't take more than a few hours to complete.
- 2 Remove leaves from the chute. The biggest problem for gutters is filling and sticking of leaves in them during the autumn period. While standing on the stairs, carefully clean up any clumps of branches and leaves around the house that have accumulated and may be preventing water from flowing properly.
- Always work on a ladder, not on a roof. You may find it easier to climb onto the roof and avoid constantly rearranging the stairs every meter. But it is dangerous to be on the edge that slopes in the direction of the gutter. Consider safety and work with a ladder and an assisting observer.
- Don't neglect downpipes.When you're done lining the roof gutters, remove any large debris from the gutter as well.
- 3 Flush the gutters. Run water through the hose, using gutter cleaning accessories, if available, and clean up any leftover debris you may have missed.
- If you have had trouble with blockages, or possibly leaks, with the help of a partner, flush the drain sections and see if there are leaks or places where water accumulates and does not leak. Reinstall the weak sections and secure them with roof screws or other fasteners to maintain good gutter performance.
Tips
- Test sections with water movement when installing gutters. Install the hose on the highest slope and run the water to the end of the gutter.
Warnings
- Self-assembled gutter kits are sold in sectional systems. These systems are not permeable to water like seamless gutters.
What do you need
- Stepladder at least a meter above the edge of your roof
- Roulette
- Chalk line for marking
- Screwdriver or cordless drill
- 3 cm screws
- Hacksaw or reciprocating saw
- Vinyl gutter set including the following items:
- Gutter sections to fit your gutter run
- Internal and external corners for each corner without downspout
- Connectors
- End caps
- Gutters
- Elbow pipes
- Downpipes and holders
- Drainage fences


