Author:
Joan Hall
Date Of Creation:
6 July 2021
Update Date:
1 July 2024

Content
1 Make sure your camera has a tripod mount. Most modern cameras have a tripod mount, but some smaller cameras may not. The tripod mount is a small threaded hole located on the bottom of the camera. Typically, the diameter of the mounting hole is a quarter inch. If your camera does not have a tripod mount, then you cannot mount it on a classic tripod (with a screw).- Most small hobby cameras have a quarter-inch mount hole. Some larger professional cameras may have a mounting hole as small as three-eighths of an inch.
 2 Remove the mounting plate (if present) from the tripod. The mounting plate is the platform that connects the camera to the tripod. Look for a latch or quick release lever for the plate to detach it from the tripod. There are many ways to attach your camera to tripods. However, almost all modern tripods have a removable mounting plate, which makes it easier to mount the camera on a tripod.
 - Technically, it is not always necessary to remove the mounting plate from the tripod in order to mount the camera. However, this step will greatly simplify the task of attaching the camera to a tripod.
- Make sure the diameter of the fixing screw on the tripod plate and the diameter of the fixing hole on the camera match. Not all cameras are compatible with all mounting plates. Sometimes you need to buy another mounting plate that will fit both the tripod and the camera.
 3 Level the tripod. Adjust the length of the tripod legs so that it is firmly on the ground. To do this, unclip the clips on the telescopic legs and pull them out to the required length, and then fix. You can technically fix the camera on a tripod before setting the tripod to a level; but it will be safer for the camera if you set up the tripod first. If you have extended the tripod legs, be sure to make sure they are firmly locked before attaching the camera to the tripod.
 - The tripod doesn't have to be perfectly level. However, it must be sufficiently balanced so that the existing slope is not noticeable. Leveling is more important for creating panoramic images that require stitching together a large number of scattered frames.
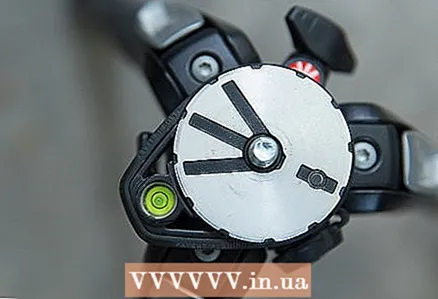
- Some tripods have a built-in bubble level to help you align your equipment. But if necessary, you can always buy or borrow from someone a separate small level.
Part 2 of 2: Mounting the Camera on a Tripod
- 1 Screw the camera directly to the tripod. The camera can be screwed directly to a tripod, secured to it with clamps (which are sometimes tightened with screws to hold the camera stable), or secured with a removable mounting plate. When a tripod has a fixed mount, there is usually a screw to mount directly to the camera. Look for the corresponding threaded hole on the bottom of the camera. Screw the tripod to the camera until it is firmly connected.
- In some cases, the head of a freely rotating screw protrudes from the bottom of the tripod mounting plate. In this case, it is not necessary to rotate the tripod itself, screwing it to the camera, but only the screw head.
- The resulting joint should be tight, but not too tight. An overtightened screw places additional stress on the mount, which could damage the camera or tripod.
 2 Secure the camera to a tripod with a clip. Sometimes cameras are attached to the tripod head with a clamping mechanism rather than a screw. In some cases, a clamping mechanism is used in addition to the screw. Place the camera carefully in the clamp and locate the tightening mechanism. You will most likely need to tighten the screws or turn the levers to securely grip the camera. Be sure to check that the camera is firmly held in place.
 - 3 Mount the camera to a tripod using the quick release mounting plate. If the tripod is equipped with a quick release mounting plate, screw it onto the camera first and then attach it to the tripod. To do this, pull back the quick release lever of the plate, insert the plate into the corresponding slot on the tripod head and simply release the lever. If you have difficulty doing this, try to reverse the steps you took earlier to remove the mounting plate from the tripod.
 4 Start taking pictures! You can rotate the camera on the rotating tripod head to take panoramic images. Also, if necessary, you can move all equipment to a more convenient location. Before taking pictures, be sure to check through the viewfinder that the shooting angle matches your intentions. Also, always make sure that the tripod itself is level and secure when shooting.
Problem solving
- 1 Make sure you are using the correct quick release mounting plate. Check that the quick release mount plate you have attached to the camera is suitable for the tripod you are using. If you are having difficulty securing the plate to a tripod, it may simply not fit this tripod. Most tripod manufacturers use their own (non-standardized) mounting plate sizes. You simply won't be able to fix the mounting plate on the tripod that was not provided for it.
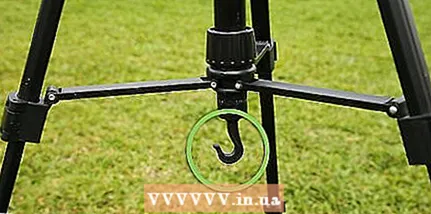 2 Hang your camera bag from the center hook of the tripod to stabilize it. If you are having trouble getting sharp shots due to unstable ground under the tripod, try hanging a bag with additional photographic equipment or something similarly heavy from the tripod center key for stabilization. This will make the tripod more stable, which should minimize rocking.
  3 If possible, do not mount the camera directly to the tripod legs. Most professional tripods are equipped with a detachable tripod and head. This allows photographers to mount their photographic equipment in a variety of ways exactly as they need it.
 - If your existing tripod does not allow you to rotate the camera on it, then you will have to rotate it with the tripod. In this case, it is better to consider purchasing an additional rotating head for the tripod.
Tips
- If you don't have a tripod or can't use it for some reason, be aware that the way you hold the camera in your hand affects the quality of your shots. Hold the camera with both hands, with one hand holding the body and supporting the lens with the other. For added stabilization, press the camera firmly against your face. You can also stabilize the camera by placing it sideways against a wall, placing it on a stable ground object, a bag, or a small bag of beans.
- If you have properly secured your camera to a tripod but still get blurry images, consider using a remote shutter release system. Try using the delayed shutter release. You can also check your camera's image stabilization settings. Consider setting a higher ISO, a faster shutter speed, or using a flash as these all help you get sharper shots.
- Try making a tripod analog. Even if you cannot mount the camera on a real tripod, you can stabilize your shots by placing the camera on other stable objects.You can even build your own tripod counterpart. Try to create a rotating panoramic head yourself, make a camera stand from a bag of beans, or construct a kind of tripod from a weighted bottle with a screw cap.
What do you need
- Camera
- Tripod mounting plate
- Tripod


