Author:
Janice Evans
Date Of Creation:
28 July 2021
Update Date:
1 July 2024
![[How To] Install FTP Server (VSFTPD) on Ubuntu 20.04 (2020) #1](https://i.ytimg.com/vi/1WVBC0KBOeE/hqdefault.jpg)
Content
- Steps
- Part 1 of 2: How to Install the Required Software
- Part 2 of 2: How to set up an FTP server
- How to add usernames to the CHROOT list
- How to access the server
- Tips
- Warnings
This article will show you how to set up and connect to an FTP server on your Ubuntu Linux computer. FTP servers are designed to store your files and allow other users to view them. To set up an FTP server on your computer, you need an FTP server host that you can connect to. We also recommend that you update your Ubuntu software to the latest version available.
Steps
Part 1 of 2: How to Install the Required Software
 1 Update Ubuntu. In Ubuntu 17.10 and newer versions of this system, the file paths are different from previous versions, so be sure to update the system to the latest version:
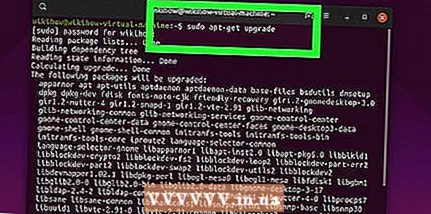
 - open a terminal;
- enter sudo apt-get upgrade and press ↵ Enter;
- enter your password and click ↵ Enter;
- enter ywhen prompted, then press ↵ Enter;
- wait for the system to update and then restart your computer (if prompted).
 2 Open a terminal. Open the Applications menu, scroll down and click on the black and white icon next to the Terminal option.
 - You can also click Alt+Ctrl+Tto open a terminal.
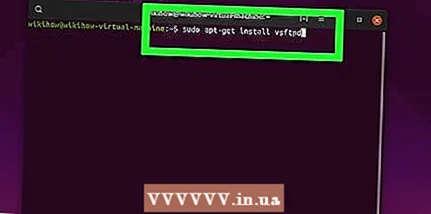 3 Enter the VSFTPD (FTP Server) installation command. Enter sudo apt-get install vsftpd in terminal and then press ↵ Enter.
 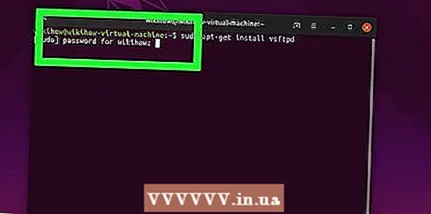 4 Enter password. Enter the password you use to log in and then click ↵ Enter.
 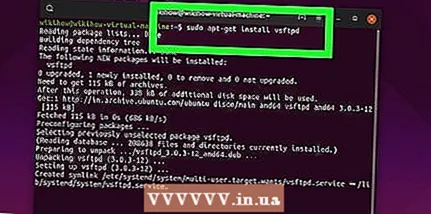 5 Wait for VSFTPD to be installed. This will take 5 to 20 minutes depending on your current FTP settings and internet connection speed.
  6 Install FileZilla. With this program you will gain access to the server and transfer files to it. To install this program:
 - enter sudo apt-get install filezilla;
- enter the password if prompted;
- wait for the installation to complete.
Part 2 of 2: How to set up an FTP server
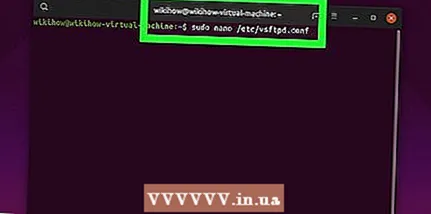 1 Open the VSFTPD configuration file. Enter sudo nano /etc/vsftpd.conf and press ↵ Enter... You need to edit this file to enable (or disable) some of the VSFTPD features.
 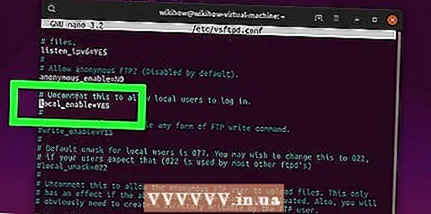 2 Allow local users to log on to the FTP server. Use the arrow keys to scroll down the file to the line # Uncomment this to allow local users to log in. (Remove the comment character to allow local users to connect to the server) and then remove the "#" character from the next line local_enable = YES.
 - To delete a "#" character, use the arrow keys to move the cursor directly behind that character and press ← Backspace.
- Skip this step if the specified character is not present in the local_enable = YES line.
3 - Allow the FTP server to write commands. Scroll down to the line # Uncomment this to enable any form of FTP write command. (Remove the comment character to allow writing commands) and then remove the "#" character from the next line write_enable = YES.
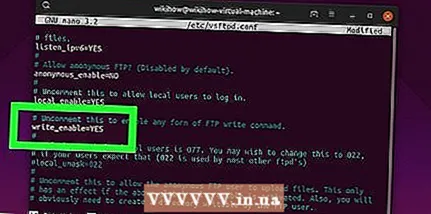
- Skip this step if the specified character does not appear in the write_enable = YES line.
- Disable character decoration. Scroll down to the line # ASCII mangling is a horrible feature of the protocol. (Decorating characters is a bad feature) and then remove the "#" character from the following two lines:
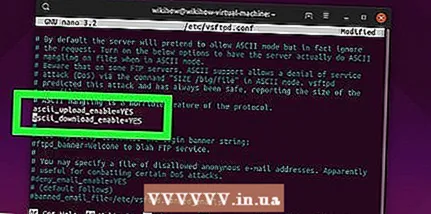
- ascii_upload_enable = YES
- ascii_download_enable = YES
- Change your chroot settings. Scroll down to the line # chroot)and then add the following lines:

- user_sub_token = $ USER
- chroot_local_user = YES
- chroot_list_enable = YES
- If any of these lines already exist, simply remove the "#" character from them.
- Change the default chroot settings. Scroll down to the line (default follows)and then add the following lines:
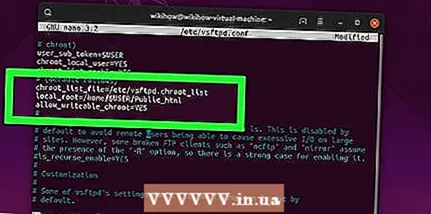
- chroot_list_file = / etc / vsftpd.chroot_list
- local_root = / home / $ USER / Public_html
- allow_writeable_chroot = YES
- If any of these lines already exist, simply remove the "#" character from them.
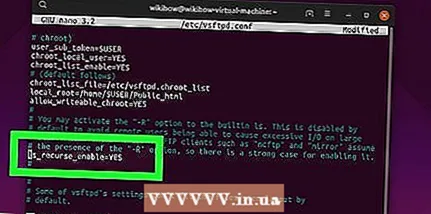
- Enable the ls recurse option. Scroll down to the line # You may activate the "-R" option ... (You can activate the "-R" option) and then remove the "#" character from the next line ls_recurse_enable = YES.
- Save your changes and close the text editor. For this:
- click Ctrl+X;
- enter y;
- click ↵ Enter.
How to add usernames to the CHROOT list
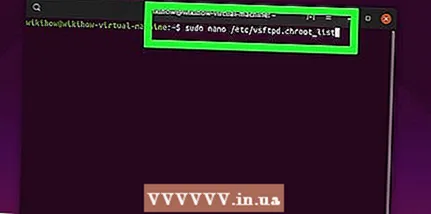
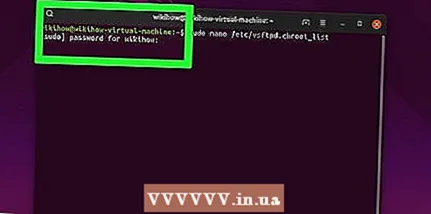
- Open the text file "chroot". Enter sudo nano /etc/vsftpd.chroot_list and press ↵ Enter.
- Skip to the last step of this section if you don't want to specify people who can access your FTP server.
- Enter password. Enter the password you use to log into Ubuntu and click ↵ Enter... The "chroot" text file will open.
- Skip this step if you are not asked for a password.
- Add usernames to the list. Enter your username and click ↵ Enterand then repeat this process for all usernames that can access their directories on your server.
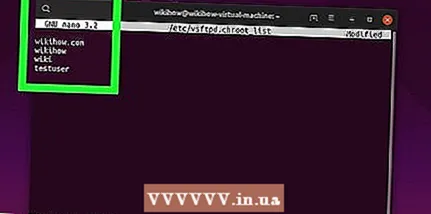
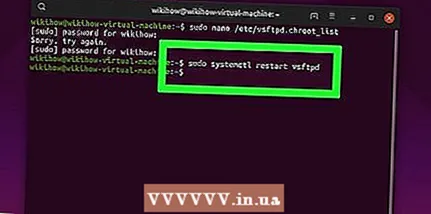
- Save the list. Click on Ctrl+X, enter y and press ↵ Enter... The list will be saved.

- Restart VSFTPD. Enter sudo systemctl restart vsftpd and press ↵ Enter... VSFTPD will be restarted and the changes made will be saved. You will now be able to access your FTP server.
How to access the server
- Find out the address of your server. If you pay for an FTP server through a hosting service (like Bluehost), find out the IP address of the service or a regular address in order to connect to it.
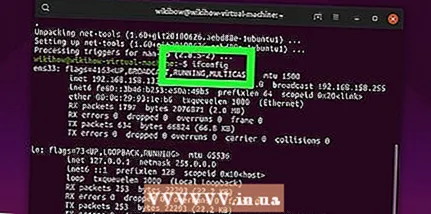
- If the server is on your computer, use the IP address of your computer; to do this, in the terminal enter ifconfig and find the IP address in the "inet addr" line.
- If the "ifconfig" utility is not installed, install it; to do this, in the terminal enter sudo apt-get install net-tools.
- If the server is on your computer, use the IP address of your computer; to do this, in the terminal enter ifconfig and find the IP address in the "inet addr" line.
- Set up port forwarding on your router. Once you know the IP address of your server, configure port 21 forwarding of the router to this address; make sure the port is using TCP (not UDP or UDP / TCP).
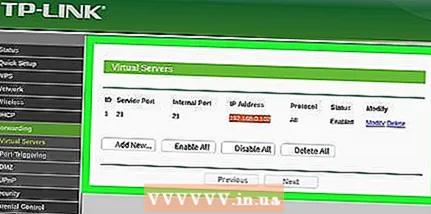
- The process for setting up port forwarding depends on the router model, so read the manual for your router or find the corresponding instructions on the Internet.
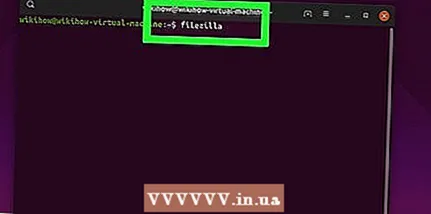
- Open Filezilla. Enter filezilla in terminal and press ↵ Enter... After a while, FileZilla will open.
- If you want to connect via terminal, try typing ftp [address]... If the server is running and you have Internet access, an attempt will be made to connect to your FTP server; keep in mind that in this case you will not be able to transfer files to the server.
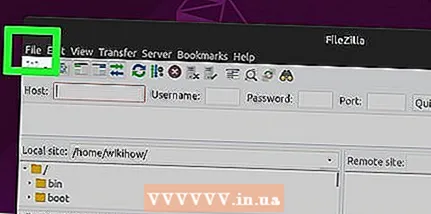
- Click on File. It's in the upper-left corner of the FileZilla window. A menu will open.
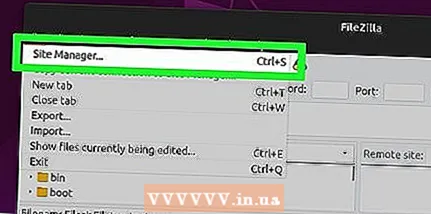
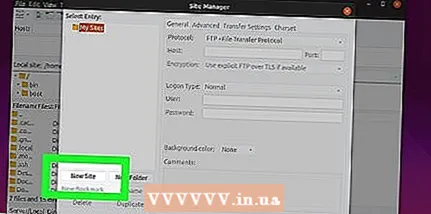
- Click Manage Site. You will find this option on the menu. The site manager window will open.
- Click Create Site. It's a white button in the lower left side of the window.The site manager's website section will open.
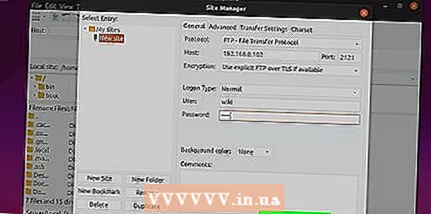
- Enter your server address. In the Host: text box, enter the address (or IP address) of the FTP server you want to connect to.
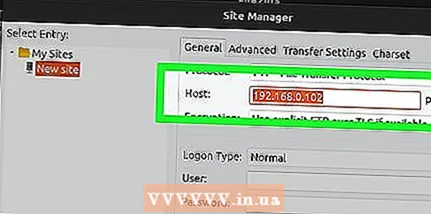
- Enter the forwarded port number. Enter 21 in the "Port:" text box.

- Click Connect. It's a red button at the bottom of the page. FileZilla will connect your computer to the FTP server.
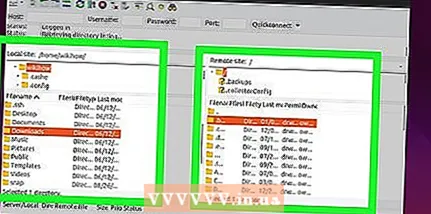
- Upload files to the server. To do this, simply drag the file folders from the left window to the right window.
Tips
- Forwarded port 20 can solve some network problems if you manage the server yourself.
- The connection to the FTP server in Ubuntu 17 and the latest versions of this system is different from the connection in the previous versions, so be sure to update the system to Ubuntu 17.10 or the latest versions.
Warnings
- FTP servers are not very secure (especially if you manage the server yourself), so do not upload confidential or personal information to the FTP server.
- ↑ https://www.linux.com/learn/linux-101-updating-your-system
- ↑ https://websiteforstudents.com/setup-vsftpd-ubuntu-17-04-17-10/
- ↑ https://help.ubuntu.com/lts/serverguide/ftp-server.html
- ↑ http://www.overclock.net/forum/142-coding-programming/639765-finding-ip-address-ftp-server.html
- ↑ https://my.bluehost.com/hosting/help/264


