Author:
Janice Evans
Date Of Creation:
25 July 2021
Update Date:
1 July 2024
Content
In this article, you will learn how to delete custom files, folders, and programs on a Windows XP-based computer by using the installation CD and formatting the hard drive. To use the methods described here, find your Windows XP installation disc.
Steps
Part 1 of 2: Boot from CD
 1 Back up the files you want. Once you delete files from your computer, it is nearly impossible to recover them. Therefore, copy the files to a USB stick or external hard drive.
 - You can also use a CD-RW disc to write files to it, but the capacity of such discs is much smaller than the capacity of a USB stick or hard drive.
 2 Insert the Windows XP installation disc into the optical drive of your computer.
- If you don't have a Windows XP installation disc, buy (find) it.
- You can also download the Windows XP installation file and burn it to a CD, but in this case, do not forget the product key.
 3 Reboot your computer. Click Start> Turn Off Computer> Restart.
  4 Hold the key Del or F2to open BIOS settings. Perhaps you need to hold down another key; in most cases, the corresponding key is displayed on the screen when the computer starts up in the "Press [key] to enter setup" line.
 - Also, the correct key can be found on the manufacturer's website or in the instructions for the motherboard or computer.
 5 Go to the tab Boot (Running). Do this with the arrow keys.
 - The Boot tab may be named Boot Options.
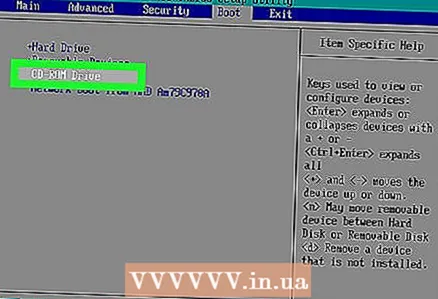 6 Select an option CD-ROM Drive (Optical drive). Push ↓ until the option is framed.
 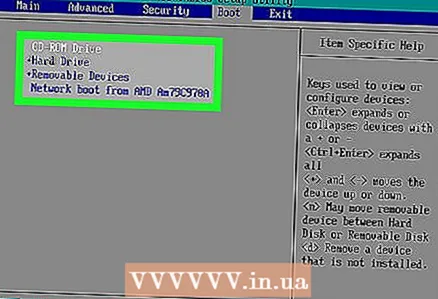 7 Make the optical drive the primary boot device. To do this, press + until the "CD-ROM Drive" option moves to the top of the list.
 - You may need to press another key. To find the correct key, look for the key assignments listed at the bottom of the screen.
 8 Save your changes. To do this, press the appropriate key, for example, F10... Find the “Save and Exit” line at the bottom of the screen to figure out the correct key. The computer will restart and then boot from the CD.
 - You may have to press ↵ Enterto confirm saving your changes.
Part 2 of 2: Formatting the hard drive
 1 Click on ↵ Enter on the Welcome to Installation screen. The installation process will start.
  2 Click on F8to accept the Windows agreement. If you are prompted to press another key, do so.
  3 Click on Escwhen prompted. This will bypass the Restore window.
  4 Select the Windows partition. Look for the line "Section 2 (Windows)" (or similar). Press the key ↓ until that line is highlighted.
  5 Click on Dand then press L. This will delete the partition that contains the operating system and its associated files.
 - Hints are displayed at the bottom of the screen. Use them if needed.
 6 Allocate unallocated space (if needed). Unallocated space is created in place of the deleted partition.
  7 Click on Cand then press ↵ Enter. A new empty partition will be created in place of the unallocated space.
  8 Highlight a new section and press ↵ Enter. This will select the new partition as the partition for the Windows XP installation.
  9 Select NTFS as the file system. Use the arrow keys to select the "Format the partition with NTFS (Fast)" option, and then press ↵ Enter.
  10 Wait for the hard drive formatting process to complete. This can take several hours. When the process is complete, follow the instructions on the screen to install Windows XP. Be aware that all files, programs and any other items installed by the user will be removed.
 - You will need a product key to complete the system installation.
Tips
- To permanently delete files, use Eraser or DBAN, which will overwrite the data on the hard drive.
Warnings
- To ensure that no one can recover deleted files, physically destroy the hard drive.


