Author:
Helen Garcia
Date Of Creation:
16 April 2021
Update Date:
1 July 2024

Content
- Steps
- Method 1 of 3: Choosing Materials and Hairstyles
- Method 2 of 3: Yarn Hair
- Method 3 of 3: Synthetic Hair
- Tips
- Warnings
- What do you need
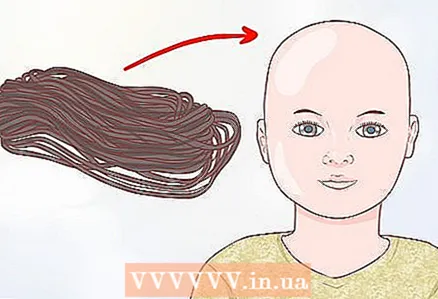
Any DIY doll needs hair. It is also sometimes necessary to replace the hair of a store toy if it is damaged or fell off. You can make hair for any doll - rag, baby, porcelain, wax, souvenir and many other types. In any case, the curls give the product a complete look. With due diligence and the right materials, homemade hair will decorate any toy.
Steps
Method 1 of 3: Choosing Materials and Hairstyles
 1 Choose the right materials. The type of material the hair will be made of is one of the most important decisions. First of all, you should consider the type of doll for which the hair is intended. Is the doll made of cloth or plastic? Is the hair intended for a new product or for replacement with an old one? When replacing hair, you must use the same materials that were originally used for hair.
 - For fabric and knitted dolls, yarn hair is often used. They not only match the appearance of the product, but are also easily attached to the doll's head.
- Plastic Barbie dolls and collectible toys are often adorned with synthetic hair. They look like real human hair but are made of synthetic materials.
- You can buy yarn and synthetic hair at almost any art supply store. If you can't find synthetic hair, you can always order it online.
 2 Length. After choosing the material, you need to decide how the finished hair should look. Be sure to think about length. Will the doll have short or long hair? Or maybe a medium length hairstyle?
 - Yarn is rarely used to create short hairstyles, so it is best to choose a similar material for medium to long hair.
- Synthetic hair comes in a wide variety of different lengths.
- Consider the type of doll the hair is for. Shorter hair will work for a child doll than for an adult doll. If the doll should be similar to a specific character, then the hair should be chosen appropriate. For example, when making Rapunzel, you need to make very long hair.
 3 Hairstyle. Next, you need to choose a suitable hairstyle. Should your hair be curly, wavy or straight? Some fabrics are easier to curl, while others look better straight or wavy.
 - Yarn hair is initially straight, but it is easy to curl it by winding it around a small wooden rod and leaving it on for a while. The unwound yarn will keep the curled shape.
- Synthetic hair can be shaped into almost any shape. They are initially sold pre-curled, wavy or braided.
 4 Gather the required materials. It is recommended that you buy all the necessary materials in advance and prepare for work in order to get to the point fully armed. Make your hair without being distracted by the little things, and admire the finished product. You will need:
 - scissors;
- sewing needle or sewing machine;
- selected hair material;
- adhesive tape;
- tape measure or sewing tape;
- hot glue gun (for yarn);
- universal glue (for synthetic hair);
- cigarette paper;
- DVD box (to measure the yarn).
Method 2 of 3: Yarn Hair
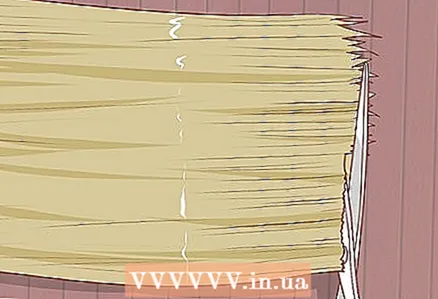
 1 Wind the yarn around the DVD box. You will need a skein and a DVD box. You need to wind the yarn around the width of the box. The box has two sides: the side with a cutout, from which it opens, and the smooth side. Start winding from the side with a cutout slightly to the left of the center. Wind the yarn towards the center of the box.
 - Wind the yarn tightly enough and be careful not to overlap. Also, there should be no gaps between them.
- The winding width should be 8-9 centimeters. Remove any gaps by sliding the threads closer together.
- If you cannot hold the threads with your fingers and they move, then fix the end of the yarn with duct tape.
 2 Use duct tape to glue the yarn. Finish wrapping the box and take two long strips of duct tape. Glue the yarn to the box near the smooth side by placing duct tape over all the threads and pressing against the plastic. The yarn should be securely fixed.
  3 Cut the yarn. Take your scissors and slide them under the yarn from the side of the cutout in the DVD case. Cut the threads from this side of the box. Peel the yarn from the plastic on the smooth side, but do not remove the tape from the threads. It will look like a wig. The place of the future parting is limited with adhesive tapes. There should be loose threads of yarn on both sides of the parting.
 - If you can't cut the yarn, use sharper scissors. Better to use sewing scissors rather than office scissors. The cut should be as straight as possible.
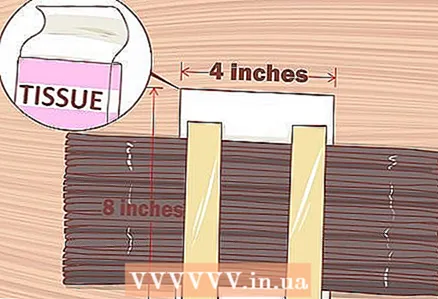 4 Secure the yarn to tissue paper. Cut a thin piece of tissue paper about 10 by 20 centimeters in size. Spread the paper out on a flat surface. Place the glued piece of yarn on the paper so that the strips of tape are parallel to the long side. Fold tissue paper over the glued section of yarn to pinch the threads between the layers of paper.
 - The paper should be in the middle of the long strands of yarn. Now it looks like hair. The future parting of the hair will pass over the tissue paper.
 5 Sew the yarn to the paper. Move down the middle of the tissue paper and sew on all the threads.The seam should run vertically down the center of the paper to form a straight line running in the center through all the layers of the structure. Pieces of hair on both sides should converge in the middle and be held in place by a thread seam.
 - If you are good with the needle, you can sew the yarn by hand. You can also work with a sewing machine to get the most straight seam.
- The stitches should be short and tight to hold future hair securely.
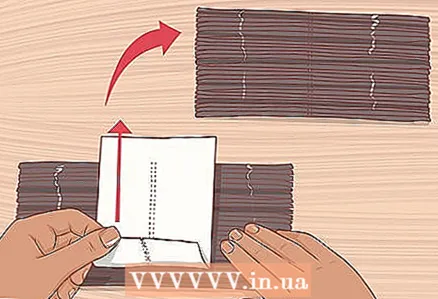 6 Remove the tissue paper. The strands are now sewn together and you can remove the paper on both sides of the seam. Tear off the paper gradually and carefully so as not to break the seam. Use tweezers for convenience. As a result, you should get a structure of two strands connected in the center with a thread seam.
 - If you can't remove the paper, try cutting gently with small scissors. Be careful not to accidentally cut the yarn or seam.
 7 Repeat with less yarn. Repeat the whole process one more time. The width of the yarn wound on the box should not exceed 3-5 centimeters.
 - Secure the end of the yarn again with duct tape if the threads tend to shift.
- Wind the yarn around the box, secure with duct tape near the smooth side, and cut the threads from the side of the notch in the box.
- Then attach the yarn to the tissue paper and sew in the center.
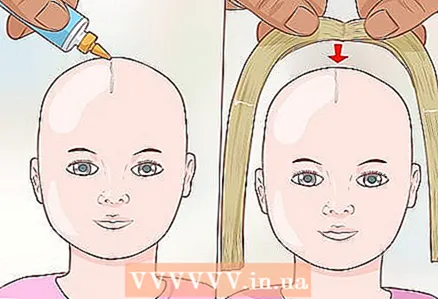
 8 Glue a large section of hair to the doll's head. Take the first strand of stitched hair. It is divided by a parting seam 8-9 centimeters long. Now take a hot glue gun. Heat the glue and apply a bead of glue directly to the seam, then press it against the center of the top of the doll's head. Wait for the glue to dry. When dry, straighten your hair on both sides.
 - If the glue does not hold the hair well on the fabric doll, then the yarn can be sewn to the head. Use a thread of yarn and a long needle to sew the hair to the garment. For security, go through the seam twice.
- If you need to glue the yarn hair to the head of a plastic doll, use universal glue instead of hot. It should be understood that synthetic hair looks better on plastic dolls.
 9 Attach a smaller section to the side. Take a smaller section of hair. The parting length is 3-5 centimeters. Repeat the steps to glue or sew the hair to the doll's head, only now place the parting slightly to the left or right of the center of the scalp. Another layer of yarn will add volume to your hair.
 - If a significant part of the doll's head is enlightened under the hair, then add another layer of hair. Make another large section and pin in the center of the head to overlap the threads.
 10 Get your hair done. Now you can do any hairstyle. Hair can be cut, braided, dyed, tied, or styled. You can also leave your hair unchanged. You are the author and owner, so it's up to you.
Method 3 of 3: Synthetic Hair
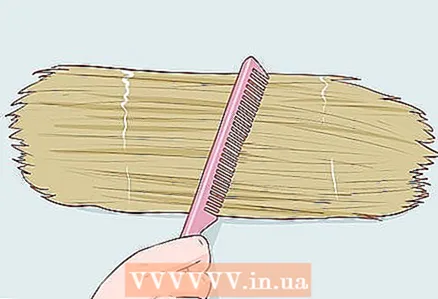 1 Remove synthetic hair from the bag. First you need to unpack your hair. This is sometimes tricky as synthetic hair is very thin and can get tangled or wrinkled upon delivery. Slowly pull hair in small tufts, loosen tangles and smooth.
 - Comb your hair with your fingers or a small doll comb to detangle the curls, as they tend to tangle very easily.
- Continue pulling and straightening your hair until there is nothing left in the package.
 2 Cut to the required length. Now that the hair has been pulled out and straightened, you can cut to the desired length. Consider the size of the doll. Cut hair twice the length of the future hairstyle to distribute it on two sides of the parting.
 - Synthetic hair is sometimes difficult to cut because it is not easy to work with. Dampen your hair to keep it together, then cut in a straight line.
 3 Apply glue down the center of your hair. Wrap your hair tightly around your index and middle fingers so that the center of the strands is on the edge of your index finger. Apply a thin layer of all-purpose glue across your hair. Try to apply glue to each hair.
 - If you find it difficult to apply glue in a straight line, then ask a friend for help. Sometimes it is very difficult to hold the hair with one hand and handle the glue with the other.
 4 Press the sewing needle against the glue line. Press the sewing needle along the line of the applied glue before it dries. Squeeze hair under the needle as close to the metal as possible. This action will allow the glue to evenly seep through the material and glue each hair. Do not remove the needle until the glue is dry.
 - Such a task can be overwhelming for one person. If you find it difficult to hold the needle with one hand and the hair with the other, then ask a friend for help.
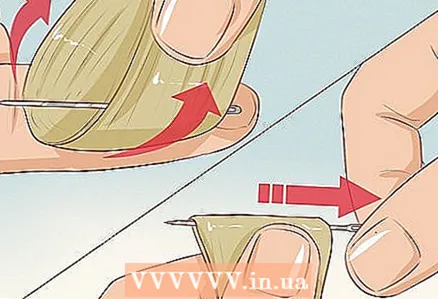 5 Remove the sewing needle. When the glue is dry, carefully pull the needle out of your hair. Flip the hair over after removing the needle. You should end up with a two-piece wig with a central parting where the needle was.
 - As before, you can use a friend's help. One of you can hold the hair while the other can pull out the needle.
 6 Glue the hair to the doll's head. Now we need to attach the hair to the head. Use all-purpose glue for plastic dolls and hot glue for rags. There should not be a lot of glue, otherwise it will seep through the hair and get messy knots. Hair will stick even with a little glue.
 - Apply a thin bead of all-purpose glue to the center of the doll's head. Press the centerline of your hair (where the needle was located) against the bead of glue so that the bead forms a parting. Then wait for the glue to dry.
- Lift your hair from one side to the parting and apply a thin bead of glue, then spread the glue over the side of your head. A small amount of glue is sufficient. Pull your hair back into place and let the glue dry. Repeat on the other side of the head.
- Press your hair against your head so that it sticks securely.
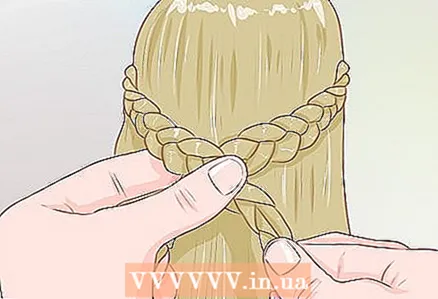 7 Get your hair done. Now you can do any hairstyle. Hair can be cut, braided, dyed, tied, or styled. First, make sure on the remnants of the material that the synthetic hair will hold the hairstyle and will not be damaged. Checking is especially important if you plan to heat your hair.
Tips
- All exposed parts of the fabric must match the color of the skin.
- Yarn hair can be curled. Secure and wind the yarn curls around wooden rods. Dampen the yarn and place in the oven at 120 degrees for 45 minutes.
- If the doll is played by a child under seven years old, then it is better to make the hair from yarn.
Warnings
- Be careful when handling hot glue to avoid scalding.
What do you need
- Scissors
- Sewing needle or sewing machine
- Suitable material for hair
- Duct tape
- Tape measure or sewing tape
- Glue
- Cigarette paper
- DVD box


