Author:
Eric Farmer
Date Of Creation:
10 March 2021
Update Date:
1 July 2024

Content
- Steps
- Method 1 of 3: Preparation
- Method 2 of 3: Getting a tattoo
- Method 3 of 3: Tattoo Cleansing and Healing Process
- Tips
- Warnings
If you have never gotten a tattoo before, you should have it done by a professional. But if you want to learn how to tattoo yourself and practice on yourself, you can do it at home, taking precautions. The process includes preparation, focus on work, and adherence to safety practices. In this article, we'll show you how to do this.
A warning: At home, the risk of infection is much higher than in the salon. Sterility, new needles and proper tattoo care are a must. It is recommended that all tattoos be done in a specialized salon.
Steps
Method 1 of 3: Preparation
 1 Buy a tattoo machine. If you have never gotten a tattoo before, you should buy a typewriter first. The machines work by using electromagnetic coils that guide a rod that moves several needles up and down at high speed. The needles are dipped in paint, which is then applied under the skin. The kits of the novice tattoo artist contain sterile tools and cost about 7,000 rubles.
 - Tattoo machines and all the necessary supplies cost almost the same as a small tattoo in a salon, which means that it is better to get a tattoo in a salon for the same money if you do not have tattoos. But if you have tattoos on your body and you want to learn how to make them yourself, you should invest in quality equipment.
- If you decide to make a typewriter yourself, it will save you money. You can get tattoos without a typewriter - look for related articles about this.
 2 Use a special tattoo ink or Chinese ink. It is important to use only special paints or Chinese ink based on carbon. These dyes have a natural base and do not cause rejection, making the tattooing process safe. Do not use other dyes.
 - Some people are allergic to certain substances and dyes contained in the paint, but most often this only applies to colored paints. You shouldn't start with multi-colored paints if you don't know how to do anything yet.
- Do not use ballpoint ink or any other dyes. You can get an infection, and the drawing will turn out to be ugly.
 3 Buy sterile supplies. Since the risk of introducing infection into the bloodstream is much higher with home tattooing, it is important to use only new, sterilized and unopened consumables. Your best bet is to buy a beginner tattoo artist's kit. To get started, you need:
 - New Tattoo Needles
- Disposable paint container
- Alcohol
- Cotton pads or cotton wool
- Latex gloves
- Treatment for tattoo after application (such as antibiotic ointment)
 4 Choose a picture. When choosing a drawing for your first tattoo, you should not look closely at crazy pictures or plan to do something big. Choose a simple drawing that you can expand later if you want. Perhaps a short phrase or one-line drawing would suit you? Think about what you want. Here are some examples of possible patterns:
 - Old script letters
- Small drawings of animals
- Stars
- Crosses
- Anchors
- Hearts
 5 Prepare your skin. To make it easier for you to work, you should clean and prepare the area on the skin. Do not drink alcohol several hours before work and do not take pain relievers, blood thinners (such as aspirin) or other medications.
 - Take a shower, dry your body, change into clean clothes before starting work.
 6 Shave the area of your body to be tattooed. Use a sharp blade to gently shave off the hair from and around the tattoo area. This should be done even if there is no visible hair. The razor sees better than your eyes.
  7 Prepare your workplace. Find a clean, level surface with good lighting where you can work.Thoroughly wash the work area with soap and water and let the water dry. Then spread a large amount of paper towels all over the surface to avoid staining the furniture or floor.
 - Ventilate the room - open a window or turn on a fan. You will be in pain and sweat, so it is best to work in a cool room.
 8 Transfer the design to the skin. This can be done by hand (although this is done very rarely) or using a stencil, which is essentially a temporary tattoo. Typically, professional tattooists do just that.
 - Draw your design on paper or print it first, then place it on stencil paper. After that, pour some stencil liquid onto the paper and spread it over the entire design.
- Lay the stencil on the leather, burgundy side down, trying to flatten it as much as possible. Leave it on for a while and remove it carefully. Let the skin dry completely.
Method 2 of 3: Getting a tattoo
 1 Sterilize your instruments. The main risk associated with home tattoos is the possibility of infection. Try to achieve maximum cleanliness and use only new sterile instruments.
 - Sterilize the needle. Before starting work, you need to lower the needle into boiling water and boil it for five minutes. Remove the needle from the water, dry it on a paper towel, then dip it in rubbing alcohol and dry it with another paper towel.
- Transfer the paint gently. Wipe the paint container with a paper towel dampened with rubbing alcohol and then pour the paint into it. Cover the container with another paper towel to keep dust out.
- Use less paint than you think you need. Most often, a small amount of paint is sufficient, and you can always add more if it turns out to be small. Keep a glass of clean water handy to rinse your game while you work.
- Put on clean rubber gloves. Keep a box of gloves near your work area and be prepared to change them regularly as your hands will sweat.
 2 Draw paint in the needle. When you're ready to start work, immerse the needle in the paint and position the tool so that your hand is steady. Turn on the clipper, place the needle level with the marked line and get to work.
 - First you need to turn on the machine so that the needle begins to move. Do not try to put the needle on your skin when the instrument is not already turned on.
- Pull and straighten the skin with your other hand. The skin should be ready for drawing. The tighter it is stretched, the better.
- Some cars can be painted in a jar. If you have such a machine, you will not need to dip the needle into the paint.
 3 Press the needle against the skin. It is almost impossible to insert the needle too deeply, as the design of the needle prevents this, however you should make sure that the needle is immersed at least a few millimeters. Then start drawing.
 - The skin will twitch slightly as you pull out the needle, but there will be little blood. If the skin does not follow the needle, it means that the needle was not immersed deeply enough. If there is a lot of blood, the needle is too deep.
- Since the needle is difficult to see, it is best to tilt it diagonally to the skin so that the tube rests on the skin.
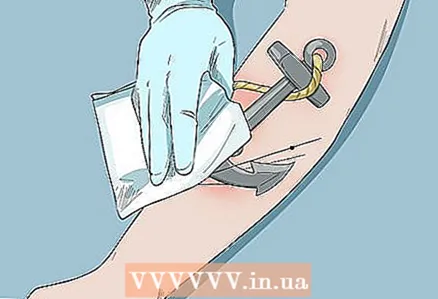
 4 Outline the drawing. Start moving the needle slowly along the line of the drawing. Only pull out the needle when you have walked a few centimeters. Wipe off excess paint and move on. Take your time, take a close look at how the line turns out so that the tattoo comes out beautiful.
 - The needle will move all the time, so at times it will be difficult to know exactly where it is in the skin. Move along the line of the drawing, then take out the needle and wipe off the excess paint so as not to stray. This is a very slow process.
 5 Keep working on your tattoo. Draw the lines of the drawing by wiping off excess paint and refueling the machine. Watch what you are doing and the width of the line.High-quality tattoos have straight lines, so it is important that the pressure does not change.
 - The pattern is filled with a thicker needle and circular rather than straight motions. If this is your first tattoo, you may not need it, but never be afraid to experiment.
 6 Keep the needle clean. Moisten it with water from time to time before drawing on paint. To get a good tattoo, and not to get an infection in the blood, you should constantly wash off excess paint. If the needle is not in the needle container or on your skin, re-sterilize it with a paper towel and rubbing alcohol. Dry the needle before returning to work.
 - Wipe off excess paint regularly. Wipe off excess ink and blood from the tattoo from time to time. Use a clean paper towel to do this each time.
Method 3 of 3: Tattoo Cleansing and Healing Process
 1 Clean the tattoo area gently. When done, apply special ointment to the tattoo area and cover it with clean gauze. Cover fresh tattoos with sterile material to reduce the risk of infection.
 - Do not apply body milk or petroleum jelly to a fresh tattoo. These substances clog pores, absorb ink, and prevent the tattoo from healing. Many people mistakenly believe that petroleum jelly promotes healing. The special ointment has a similar consistency, but its composition is different.
- Use only a small amount of the ointment. Most often, you need to squeeze out quite a bit of ointment (about the size of a pea). The tattoo should heal as soon as possible, and this will be difficult to achieve if the wound is covered with a thick layer of ointment all the time.
- Don't wash your tattoo right away. If you've used sterile instruments, give the wound time to calm down and the inflammation to clear up. Cover the tattoo and do not touch it.
 2 Make a bandage. Cover the tattoo with a soft gauze bandage. Be careful as this area will be painful. Secure the ends of the bandage with tape so that it is not too tight.
 - Wear the bandage for at least two hours or until the end of the day. This is a very important step in the healing process. Leave the bandage on to view the tattoo. Wait.
 3 Organize your workplace. Throw away any leftover ink, needle, gloves, and other consumables. These things cannot be reused. Use new and clean materials every time you get a tattoo.
  4 Remove the bandage and rinse the tattoo with water. Use a little cool water the first time you wash it. Wash the tattoo using your hand. Do not submerge the tattoo under water or under a tap. This is extremely important.
 - Do not immerse the tattoo in water for the first 48 hours after use. Then, gently wash your tattoo every night before going to bed with warm water and soap. After two days, you can shower again as usual and wash the tattoo there.
- Apply a thin layer of ointment to the tattoo 2-3 times a day for two weeks. Watch your skin to prevent infection and see a doctor if your tattoo seems to become inflamed.
Tips
- If you want to work out, buy silicone arms and legs. This is a great way to fill your hand without ruining your own skin.
- The tattoo usually stays on the skin forever. Even a low-quality tattoo that will shed will still be noticeable even after many years, and after laser removal, scars may remain. Make sure you really want this before you tattoo yourself.
- Use a wound-healing ointment. The ointment will not absorb the paint - it will prevent the skin from drying out. Blot the tattoo after showering and then apply the ointment. This will make the tattoo look better.
Warnings
- There are special kits on sale that include basic tattoo tools and paint. If you decide to buy such a kit, remember that some of them lack tools or clear instructions.Follow the guidelines in this article and sterilize all instruments before use.
- If your hand slips and you injure yourself while getting the tattoo, stop and see a doctor. Better to blush a little with shame in the hospital than to get sick or get scars.
- Getting tattoos is always painful. In some places the pain is stronger, in others it is weaker, but without it there is nothing. Think about this before deciding on a tattoo.
- Do not reuse or exchange needles with anyone. Treat every drop of blood as if it is poisonous.
- If you are under 18, do not get a tattoo. Your body is still growing, even if you do not notice it, and this can lead to distorted patterns on the body in adulthood. In addition, minors are not allowed to get tattoos everywhere, and parents are unlikely to like what they see (and they will see it anyway).
- Don't get a tattoo yourself if you can afford a trip to a salon. In the salon, everything is done much more pleasantly, better and faster.


